Cost so far, as of March 7th:
$124.50 for shed, incl delivery
$68.39 for brooder supplies
$93.07 for extra building supplies and chicken run lumber
$20.00 for gas
Update, March 14th:
Oh lordy.. now we're starting to get into the big bucks.
$32.60 for some more pieces of lumber.
$164.75 for stinkin' chicken wire and a gate door.
Update, March 29th:
$72.00 for more chicken wire.
April something:
Returned some unused supplies and got $85 back.
Used $85 to buy some more lumber and various chicken supplies.
$75 for one more roll of wire, some different sized nails and staples.
Total cost overall as of April 18th:
About $740 from start to finish, including chick food, chickens, misc. containers, feeders, waterers, gas money, paying for assistance, feeding helpers, etc etc!
I am brand new to chickens and have never had them before in my life.
I decided last summer that I wanted chickens when my neighbor got some!
So this is going to outline my journey to my chickens from start to finish! I will keep updating this page until it is complete! (Is it ever REALLY complete?)
First some background information on myself. I'm 23 and living with my grandparents while I work full time to get back on my feet. I live in rural Alabama, about 3 hours west of Atlanta and 1 hour north of Birmingham. I used to live in Atlanta before I lost my job, and they gave graciously allowed me to move in with them AND bring my pets.. 2 cockatiels, 3 cats, and soon, chickens!
They have given me a limit of 10 or less chickens (FYI: I live outside the city and I believe we are allowed 40 chickens as long as they are "contained in a permanent enclosure")
My chickens are going to be pets and the eggs are a bonus. My chickens will not be eaten!
So, I am not a handyman and I don't have any handymen in my life. My father is disabled, my grandfather is old and I won't allow him to help, my brother is younger than I and has about as much experience as I do.
Therefore.. I am clueless. To begin with, I was researching premade coops. Way too expensive and way too small. So I began researching how to build my own coop instead! I spent days and weeks on BYC reading every coop page I could find about how people built their coops and from what and what I needed. I filled up a notepad with drawings and ideas!
And that's when it began................
February 2012. I received my income tax check and I immediately took a chunk and put it into savings. I had been planning this for months and I knew I was going to use some of it to build my coop.
I had no idea what I needed as far as supplies went, so I volunteered one of my best friends to come with me to a hardware store to for check lumber, hardwire, tools, etc.
I told an employee at the store what I was trying to do, and she says, "Have you thought of buying a shed and just transforming it into a coop?"
Yes! But I don't want to spend $1000+ on a shed and then have to buy materials to transform it into a coop.
"Well, we have some sheds on clearance."
So my friend and I go to look to see what she has. They have all been SOLD.. except for one. An 8ft x 6ft Heartland Kwik Shed. This particular size and style has been discontinued, therefore the $700 shed was on sale for $200. But she told me, "My manager told me that we need to have it out of the store by March. I'll sell it to you for $50."
SOLD!!!!!!!!!
I jumped on that deal immediately.
The supply kit wouldn't fit in my grandpa's truck, so we had to have it delivered.
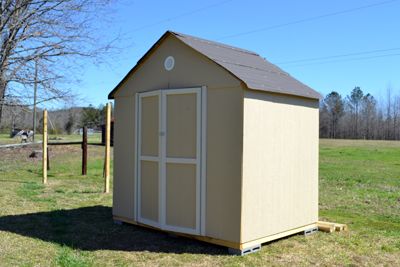
Two days and $123.50 later, I have a brand new unopened shed in my backyard.
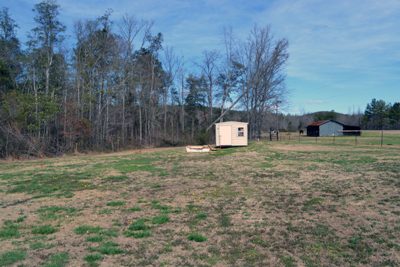
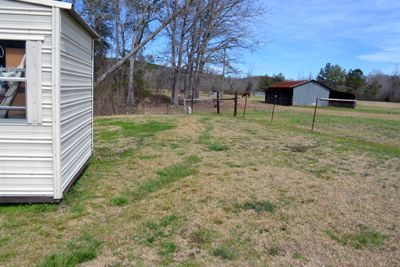
Here's my backyard. (The horse, barn and pasture belongs to my aunt and uncle.)

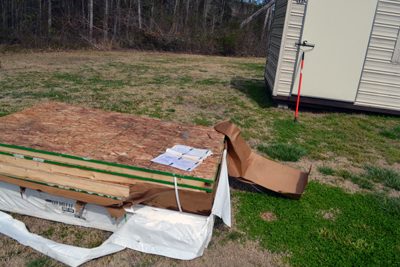
I'm pretty impatient, so even though I had no idea what I was doing, I had to open it.
Here's where I'm going to put it...
So I begin building!!!!!! Alone and cluelessly.
I didn't get any pictures of this part but.. I totally nailed the floor beams backwards to each other. I don't know how to explain it, but long store short, one side was 2 inches shorter than the other.
I solicited the help from my best friend and he helped me pry apart the pieces and then expertly put them together they way they were supposed to be. YIPPEE!
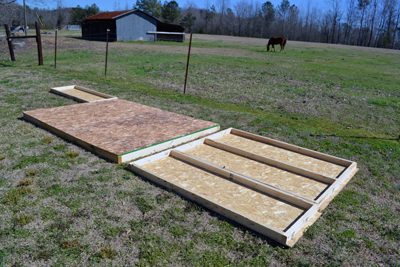
Took about an hour to fix what I had done and put it back together correctly, and voila! We have a floor!
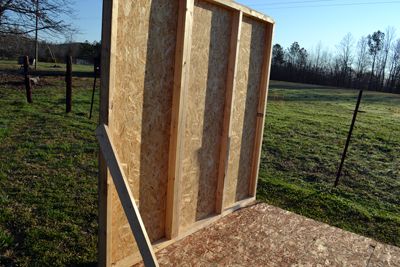
An hour later and voila, we have a wall and a half!!!!!
At this point we stopped because it was starting to get really cold, and we didn't have the power drill
Today I'm going to get some cinder blocks to put the floor up on so that it will be level.
Update, March 4th!
I forgot to take action shots yesterday cause I was so excited to be working on it again after the recent series of tornadoes. We were lucky and didn't get touched by any tornadoes, just some severe weather. We lost some trees and lawn ornaments but no serious damage.
So, even though it was really chilly and windy yesterday, I finally managed to get together my team of handymen (and women!) to put a few hours work into it.
What we accomplished yesterday in about 3 hours:
Got both left and right walls up (forgot to cut the chicken door into the left wall, luckily we didn't hammer it into place so we can take it down again to cut the door.)
Got the roof gables put together.
Got the floor up on blocks and leveled the floor.
Fixed some messups on the floor, it wasn't flush on one side so we had to take apart the front left corner. Luckily wasn't very difficult!
I didn't take any pictures yesterday but I took some this morning. You can also see in the pictures where the sun will be at 6:30 am on a March morning!")
The chicken door will be in this wall.
This is where the sun is shining on the right wall!
Here's a picture of the roof gables. We cut ventilation into it, which caused a little bit of wood splintering
And here is just a nice picture
Update, March 4th part 2!!!!
My wonderful team of handymen came over again today at about 3pm. It was very windy this morning and my 2 walls got blown over. Very saddening. But it took no time to get them back in place!
What we accomplished in about 4 hours~
Built the back and front wall, minus doors
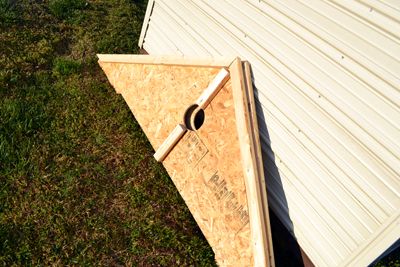
Added the chicken door! and new ventilation
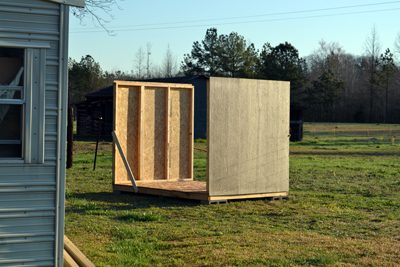
Attached all 4 walls to the floor and attached the gables to the top.
What remains is to install the door, the roof and then screw the walls firmly in place, then caulk and add the outer trim and decor. Later I'm going to buy paint and possibly insulate the inside, but that will come later!
After we get this built we are going to get the supplies for the inside shelving, roosts, and other chicken items, as well as get the outside fencing materials!!
Here are some pictures from today. My camera battery died before we got the roof on, so I'll take some of those tomorrow after it charges.
One of my handymen holding the wall while my dad nails in the other side
Cutting the ventilation
Update, March 5th!
Here are some more pictures. I took these this morning since my camera battery died yesterday afternoon!
This was the hardest part so far, especially because it was windy and there was just 2 of us today. I tried to solicit help but everyone was just busy.
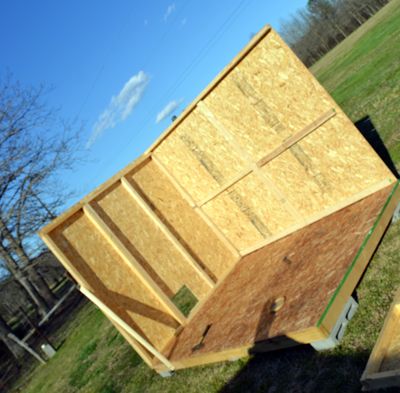
It took us about 5 hours, but we got the roof on and the roof felt on. We also went to Marvins to pick up more supplies, including the timber for the chicken run.
The only thing left to do is to attach the doors, shingle the roof, and nail on the trimmings.
Then we are going to start on the chicken run!
Update, March 10th!
Yesterday at about 9am my best friend came over and we mounted the doors! This leaves the shed mostly complete.
All that remains on the shed is to put on the shingles, install the chicken door, the nests, the perches, and trim. Paint will be for another time.
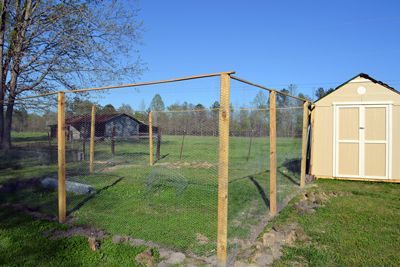
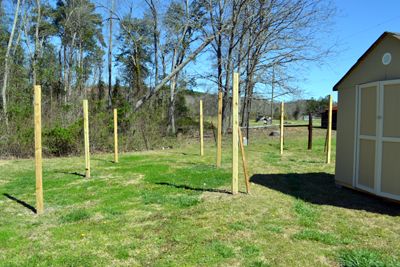
Aaaaaand.... we got up all the fence posts for the fence!! We have some left over "just in case." I believe it's about 10ft x 8ft, give or take.
We had to adjust it because the front 3 posts (in the picture) kinda uncovered our underground spring and the ground sunk in... so we may be adjusting in more because I'm worried it will swallow the posts.
Update, March 29th!
I haven't updated in almost 2 weeks but that doesn't mean we haven't been working on it.
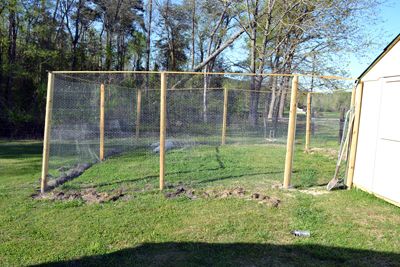
We had to reset 4 of the posts because they sunk due to our underground spring. Also we added some extra posts for stabilizing.
We got some of the top support put up and we got the first layer of chicken wire around all 4 walls. Woo hoo!
$124.50 for shed, incl delivery
$68.39 for brooder supplies
$93.07 for extra building supplies and chicken run lumber
$20.00 for gas
Update, March 14th:
Oh lordy.. now we're starting to get into the big bucks.
$32.60 for some more pieces of lumber.
$164.75 for stinkin' chicken wire and a gate door.
Update, March 29th:
$72.00 for more chicken wire.
April something:
Returned some unused supplies and got $85 back.
Used $85 to buy some more lumber and various chicken supplies.
$75 for one more roll of wire, some different sized nails and staples.
Total cost overall as of April 18th:
About $740 from start to finish, including chick food, chickens, misc. containers, feeders, waterers, gas money, paying for assistance, feeding helpers, etc etc!
I am brand new to chickens and have never had them before in my life.
I decided last summer that I wanted chickens when my neighbor got some!
So this is going to outline my journey to my chickens from start to finish! I will keep updating this page until it is complete! (Is it ever REALLY complete?)
First some background information on myself. I'm 23 and living with my grandparents while I work full time to get back on my feet. I live in rural Alabama, about 3 hours west of Atlanta and 1 hour north of Birmingham. I used to live in Atlanta before I lost my job, and they gave graciously allowed me to move in with them AND bring my pets.. 2 cockatiels, 3 cats, and soon, chickens!
They have given me a limit of 10 or less chickens (FYI: I live outside the city and I believe we are allowed 40 chickens as long as they are "contained in a permanent enclosure")
My chickens are going to be pets and the eggs are a bonus. My chickens will not be eaten!
So, I am not a handyman and I don't have any handymen in my life. My father is disabled, my grandfather is old and I won't allow him to help, my brother is younger than I and has about as much experience as I do.
Therefore.. I am clueless. To begin with, I was researching premade coops. Way too expensive and way too small. So I began researching how to build my own coop instead! I spent days and weeks on BYC reading every coop page I could find about how people built their coops and from what and what I needed. I filled up a notepad with drawings and ideas!
And that's when it began................
February 2012. I received my income tax check and I immediately took a chunk and put it into savings. I had been planning this for months and I knew I was going to use some of it to build my coop.
I had no idea what I needed as far as supplies went, so I volunteered one of my best friends to come with me to a hardware store to for check lumber, hardwire, tools, etc.
I told an employee at the store what I was trying to do, and she says, "Have you thought of buying a shed and just transforming it into a coop?"
Yes! But I don't want to spend $1000+ on a shed and then have to buy materials to transform it into a coop.
"Well, we have some sheds on clearance."
So my friend and I go to look to see what she has. They have all been SOLD.. except for one. An 8ft x 6ft Heartland Kwik Shed. This particular size and style has been discontinued, therefore the $700 shed was on sale for $200. But she told me, "My manager told me that we need to have it out of the store by March. I'll sell it to you for $50."
SOLD!!!!!!!!!
I jumped on that deal immediately.
The supply kit wouldn't fit in my grandpa's truck, so we had to have it delivered.
Two days and $123.50 later, I have a brand new unopened shed in my backyard.
Here's my backyard. (The horse, barn and pasture belongs to my aunt and uncle.)
I'm pretty impatient, so even though I had no idea what I was doing, I had to open it.
Here's where I'm going to put it...
So I begin building!!!!!! Alone and cluelessly.
I didn't get any pictures of this part but.. I totally nailed the floor beams backwards to each other. I don't know how to explain it, but long store short, one side was 2 inches shorter than the other.
I solicited the help from my best friend and he helped me pry apart the pieces and then expertly put them together they way they were supposed to be. YIPPEE!
Took about an hour to fix what I had done and put it back together correctly, and voila! We have a floor!
An hour later and voila, we have a wall and a half!!!!!
At this point we stopped because it was starting to get really cold, and we didn't have the power drill
Today I'm going to get some cinder blocks to put the floor up on so that it will be level.
Update, March 4th!
I forgot to take action shots yesterday cause I was so excited to be working on it again after the recent series of tornadoes. We were lucky and didn't get touched by any tornadoes, just some severe weather. We lost some trees and lawn ornaments but no serious damage.
So, even though it was really chilly and windy yesterday, I finally managed to get together my team of handymen (and women!) to put a few hours work into it.
What we accomplished yesterday in about 3 hours:
Got both left and right walls up (forgot to cut the chicken door into the left wall, luckily we didn't hammer it into place so we can take it down again to cut the door.)
Got the roof gables put together.
Got the floor up on blocks and leveled the floor.
Fixed some messups on the floor, it wasn't flush on one side so we had to take apart the front left corner. Luckily wasn't very difficult!
I didn't take any pictures yesterday but I took some this morning. You can also see in the pictures where the sun will be at 6:30 am on a March morning!
The chicken door will be in this wall.
This is where the sun is shining on the right wall!
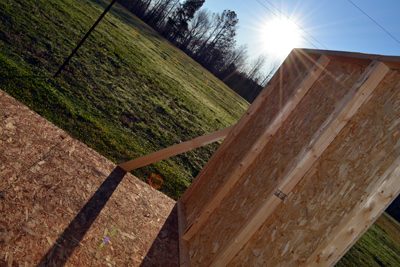
Here's a picture of the roof gables. We cut ventilation into it, which caused a little bit of wood splintering
And here is just a nice picture
Update, March 4th part 2!!!!
My wonderful team of handymen came over again today at about 3pm. It was very windy this morning and my 2 walls got blown over. Very saddening. But it took no time to get them back in place!
What we accomplished in about 4 hours~
Built the back and front wall, minus doors
Added the chicken door! and new ventilation
Attached all 4 walls to the floor and attached the gables to the top.
What remains is to install the door, the roof and then screw the walls firmly in place, then caulk and add the outer trim and decor. Later I'm going to buy paint and possibly insulate the inside, but that will come later!
After we get this built we are going to get the supplies for the inside shelving, roosts, and other chicken items, as well as get the outside fencing materials!!
Here are some pictures from today. My camera battery died before we got the roof on, so I'll take some of those tomorrow after it charges.
One of my handymen holding the wall while my dad nails in the other side
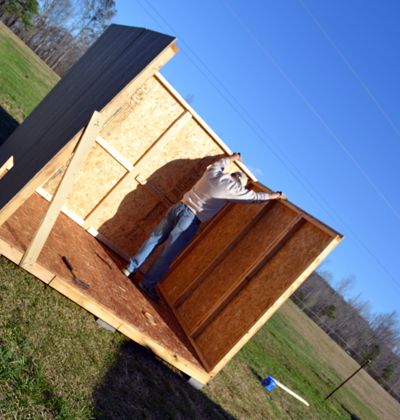
Cutting the ventilation

Update, March 5th!
Here are some more pictures. I took these this morning since my camera battery died yesterday afternoon!
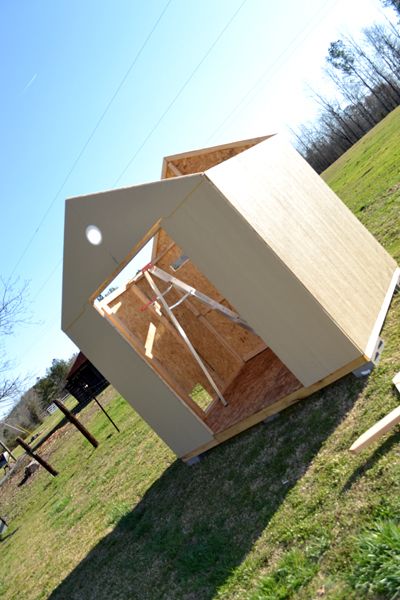
Update, March 7th!This was the hardest part so far, especially because it was windy and there was just 2 of us today. I tried to solicit help but everyone was just busy.
It took us about 5 hours, but we got the roof on and the roof felt on. We also went to Marvins to pick up more supplies, including the timber for the chicken run.
The only thing left to do is to attach the doors, shingle the roof, and nail on the trimmings.
Then we are going to start on the chicken run!
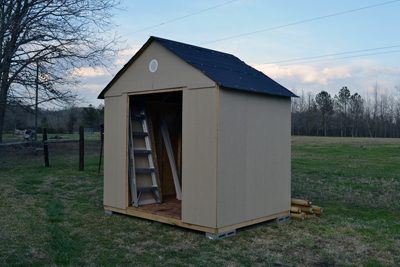
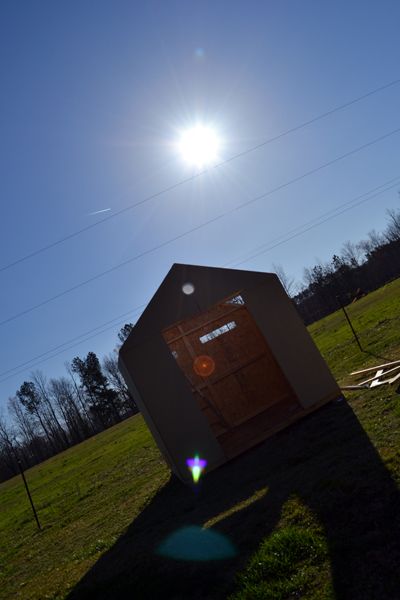
Update, March 10th!
Yesterday at about 9am my best friend came over and we mounted the doors! This leaves the shed mostly complete.
All that remains on the shed is to put on the shingles, install the chicken door, the nests, the perches, and trim. Paint will be for another time.
Aaaaaand.... we got up all the fence posts for the fence!! We have some left over "just in case." I believe it's about 10ft x 8ft, give or take.
We had to adjust it because the front 3 posts (in the picture) kinda uncovered our underground spring and the ground sunk in... so we may be adjusting in more because I'm worried it will swallow the posts.

Update, March 29th!
I haven't updated in almost 2 weeks but that doesn't mean we haven't been working on it.
We had to reset 4 of the posts because they sunk due to our underground spring. Also we added some extra posts for stabilizing.
We got some of the top support put up and we got the first layer of chicken wire around all 4 walls. Woo hoo!