After reading about natural tick eradication using Guineas we decided to purchase 5 Keets from a local family. I read a ton on BYC to come up with coop ideas, poured over designs, but couldn't convince my husband that we could build something. Next I contacted an amazingly talented contractor to inquire about having a coop built for us. Despite his willingness to work within our budget, and his love for both animals and his work, we ultimately decided on buying a shed in case we ever sold the property. Even with the modifications we plan to implement, it should be fairly easy to convert back to something more buyer-friendly should the need arise. During our coop research and Guinea keet raising, my husband relented to my wishes to add chickens to our flock. A quick trip to a farm store yielded 2 Buff Orpingtons (Maple & Daisy), 2 Rhode Island Reds (Sassafrass - a.k.a. Sassy & Vajcia - Slovik for "eggs," named by my good friend), and 1 Black Sexlink (Tali). 2 1/2 weeks later my daughter and I happened upon a chicken swap and picked up a Blue Splash Silkie (Lyra) and an Ameraucana (Lily), bringing our flock to 12. Sadly, we lost 2 of our chicks--Sassy and Daisy--to Cocci, and almost lost 2 others before all was said and done. Thanks to an amazing BYC member--Janet (1ChickMagnet), who graciously gave me tons of advice and medicine (as everything was closed over 4th of July weekend), the rest came through just fine.
Towards the beginning of July we added 5 Muscovy ducklings purchased from Janet (1ChickMagnet) and Greg (blazingsaddles) and then on 7/24 we purchased 2 Partridge Silkies (Miel and Seda--Spanish for "honey" and "silk") from Janet. We will be building a pen for the ducks as soon as it arrives so that the Muscovies can be moved out of my chicken run and in to their own area. As of now (7/30) our chickens are still in brooders in the basement. Sigh...
The shed we chose is a Suncast Alpine 7'-5 3/4" x 7'-2 1/4" double-walled resin model from Home Depot. Unfortunately we couldn't find one locally so we had to order it online. If you do this be prepared for a decent wait and plan accordingly. Although we ordered ours on 6/14 it didn't arrive until 6/21. Luckily the area behind our garage is already cleared out and fairly flat which made it the perfect location for our feathered friends' home. We laid down some landscaping timbers to set the floor on, as well as allow for a bit of air flow underneath. With the help of my dad we put the bulk of the coop structure together in about 2-3 hrs. The only thing we didn't get to that day were the windows and hardware. In order to help with ventilation I'm installing hardware cloth in place of the plastic "glass" for the windows. We will cut a pop door at the back of the shed which will lead out in to the run. Thanks to the ideas from the wonderful BYC members I will be adding a board that slides up and down across the large shed door opening in order to keep all of the bedding material in. Our run will be 6' x 12', attached to the back of the coop, and run the length of our garage.
And now to the pictures:
**6/21** Floor of the coop

Side walls going up
Back walls installed
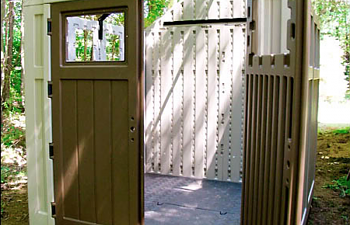
All walls up, doors on
Roof truss
Roof on
Some of the window frames with hardware cloth installed
Close-up of the windows to show the hardware cloth
**6/24** Work starts on the run today - I was inspired by CountryRoosterUSA's run and drew up a similar plan that is 6' x 12'. We used 2" x 6" x 12' (plus one 2" x 6" x 6' section for the end of the run) pressure treated lumber for the bottom portion of the run with 2" x 4" x 6' (the original length was 92 5/8" so we had Lowe's cut them down to 6') dimensional lumber for the "walls" and upper portion. The screen door we got for $10 as the screen portion was coming out of the bottom, however for our purposes it didn't matter. My dad did cut the door down to fit better, but you can't tell it. We also finished installing the windows with the hardware cloth on the coop. On to the pictures:
We assembled the walls in panel form in my garage
My dad installed a header and footer by using wood screws and washers screwed from the inside of the coop to the outside. Because the screws were a bit too long he went back and cut the ends off using a Dremel. The walls were then toe-nailed in to place.
Wall panel
Walls installed
In order to close the gap between the studs, bottom plate, and the screen door my dad added some leftover pieces of lumber from the cut studs.
Hinges installed
Screen door installed - we will be putting hardware cloth and 2" x 4" welded wire on the door.
Close-up of the jam, hinges, and screen door
We installed a spring so that the door would close behind anyone coming in or out of the run.
**6/25** Wiring the coop was the agenda for the day. After reading and asking questions I decided to use 2" x 4" welded wire for the top 3' of the run, as well as using it across the top, with 1/2" hardware cloth for the bottom 3'. We also dug out a few inches of dirt and ran an apron out about 12" or so, tacked it down with landscape pins (just to help keep it from curling up), and covered it back up with the soil. I added landscaping timbers around the bottom perimeter to hide the hardware cloth that was visible and as another deterrent for digging. We used 9/16" staples that were then hammered in even further to secure the wire--and LOTS of them. To connect the two different wire together my dad wrapped the cut ends of the welded wire around the top portion of the hardware cloth.
Screen door with the wire installed
**6/26** We only worked for a few hours today (mainly gathering supplies) but finished cutting the pop door, creating the feeder, and a few other items.
Pop door cut - looking from the outside in. We ended up making it larger so the ramp would lay flat against the coop when closed.
Looking inside out
My daughter working on the pop door and ramp
**6/27** Today we finished the coop! My dad installed the pop door/ramp using a pulley system, we put in the roosts, installed the feeder, added a piece of lumber across the shed doors to keep the bedding in, and laid down some DE and bedding. The guineas were moved in that night and are adjusting well! As soon as the youngest chicken is feathered we'll be integrating the flock under close supervision.
Here is the pop door that doubles as a ramp. The pulley system is locked down and lays flat against the shed.
Here you can see the pop door/ramp from inside the coop. My dad gave us a wireless thermometer that will allow us to monitor the temp inside the coop from inside of our house. Pretty nifty!
Feeding system - there is a cap at the top as well, this was taken before I filled it
And here's the inside of the coop--finished for now! We will be adding nesting boxes (or in my case 5 gallon buckets) as well as a watering system this week. I will be sure to post pics as we keep working!
Towards the beginning of July we added 5 Muscovy ducklings purchased from Janet (1ChickMagnet) and Greg (blazingsaddles) and then on 7/24 we purchased 2 Partridge Silkies (Miel and Seda--Spanish for "honey" and "silk") from Janet. We will be building a pen for the ducks as soon as it arrives so that the Muscovies can be moved out of my chicken run and in to their own area. As of now (7/30) our chickens are still in brooders in the basement. Sigh...
The shed we chose is a Suncast Alpine 7'-5 3/4" x 7'-2 1/4" double-walled resin model from Home Depot. Unfortunately we couldn't find one locally so we had to order it online. If you do this be prepared for a decent wait and plan accordingly. Although we ordered ours on 6/14 it didn't arrive until 6/21. Luckily the area behind our garage is already cleared out and fairly flat which made it the perfect location for our feathered friends' home. We laid down some landscaping timbers to set the floor on, as well as allow for a bit of air flow underneath. With the help of my dad we put the bulk of the coop structure together in about 2-3 hrs. The only thing we didn't get to that day were the windows and hardware. In order to help with ventilation I'm installing hardware cloth in place of the plastic "glass" for the windows. We will cut a pop door at the back of the shed which will lead out in to the run. Thanks to the ideas from the wonderful BYC members I will be adding a board that slides up and down across the large shed door opening in order to keep all of the bedding material in. Our run will be 6' x 12', attached to the back of the coop, and run the length of our garage.
And now to the pictures:
**6/21** Floor of the coop

Side walls going up

Back walls installed

All walls up, doors on

Roof truss

Roof on

Some of the window frames with hardware cloth installed

Close-up of the windows to show the hardware cloth

**6/24** Work starts on the run today - I was inspired by CountryRoosterUSA's run and drew up a similar plan that is 6' x 12'. We used 2" x 6" x 12' (plus one 2" x 6" x 6' section for the end of the run) pressure treated lumber for the bottom portion of the run with 2" x 4" x 6' (the original length was 92 5/8" so we had Lowe's cut them down to 6') dimensional lumber for the "walls" and upper portion. The screen door we got for $10 as the screen portion was coming out of the bottom, however for our purposes it didn't matter. My dad did cut the door down to fit better, but you can't tell it. We also finished installing the windows with the hardware cloth on the coop. On to the pictures:
We assembled the walls in panel form in my garage

My dad installed a header and footer by using wood screws and washers screwed from the inside of the coop to the outside. Because the screws were a bit too long he went back and cut the ends off using a Dremel. The walls were then toe-nailed in to place.

Wall panel

Walls installed

In order to close the gap between the studs, bottom plate, and the screen door my dad added some leftover pieces of lumber from the cut studs.

Hinges installed

Screen door installed - we will be putting hardware cloth and 2" x 4" welded wire on the door.

Close-up of the jam, hinges, and screen door

We installed a spring so that the door would close behind anyone coming in or out of the run.

**6/25** Wiring the coop was the agenda for the day. After reading and asking questions I decided to use 2" x 4" welded wire for the top 3' of the run, as well as using it across the top, with 1/2" hardware cloth for the bottom 3'. We also dug out a few inches of dirt and ran an apron out about 12" or so, tacked it down with landscape pins (just to help keep it from curling up), and covered it back up with the soil. I added landscaping timbers around the bottom perimeter to hide the hardware cloth that was visible and as another deterrent for digging. We used 9/16" staples that were then hammered in even further to secure the wire--and LOTS of them. To connect the two different wire together my dad wrapped the cut ends of the welded wire around the top portion of the hardware cloth.

Screen door with the wire installed

**6/26** We only worked for a few hours today (mainly gathering supplies) but finished cutting the pop door, creating the feeder, and a few other items.
Pop door cut - looking from the outside in. We ended up making it larger so the ramp would lay flat against the coop when closed.

Looking inside out

My daughter working on the pop door and ramp

**6/27** Today we finished the coop! My dad installed the pop door/ramp using a pulley system, we put in the roosts, installed the feeder, added a piece of lumber across the shed doors to keep the bedding in, and laid down some DE and bedding. The guineas were moved in that night and are adjusting well! As soon as the youngest chicken is feathered we'll be integrating the flock under close supervision.
Here is the pop door that doubles as a ramp. The pulley system is locked down and lays flat against the shed.

Here you can see the pop door/ramp from inside the coop. My dad gave us a wireless thermometer that will allow us to monitor the temp inside the coop from inside of our house. Pretty nifty!

Feeding system - there is a cap at the top as well, this was taken before I filled it

And here's the inside of the coop--finished for now! We will be adding nesting boxes (or in my case 5 gallon buckets) as well as a watering system this week. I will be sure to post pics as we keep working!