Preface:
All coops thus far have been wood and wire tractors and one lowe's play house that was pre-cut. Skill level (1-10) was probably 2.
This project in particular was all made possible by the contents of this box which I was lucky enough to be able to find about 6 years ago:
It's an all in one unit that does EVERYTHING!

The trickiest part of this coop building is that we had to get it done in the summer and travel 5 hours each way to work on it. So we best utalized three day weekends for this project and had to have a VERY good step by step plan. There was very little down time and we esentailly worked sun up to sun down. A big thanks go out to my dad for driving me to the store to buy materials in his truck and my mom which kept us fed and clean throughout the many hours of this project.
Phase 1: The Planning
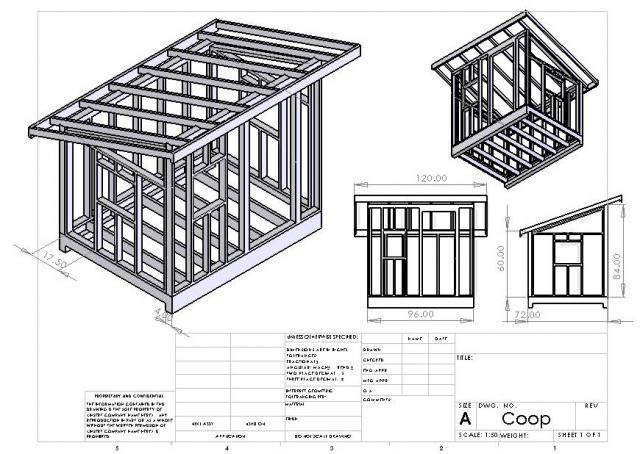
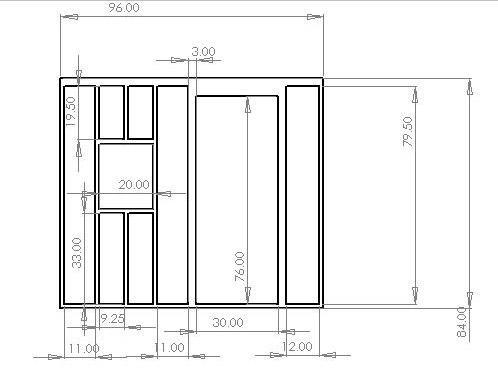
For the coop....we started with a plan:
It is a 6x8 shed with a 4 in 12 roof.
5 ft tall in the back, 7ft tall in the front.
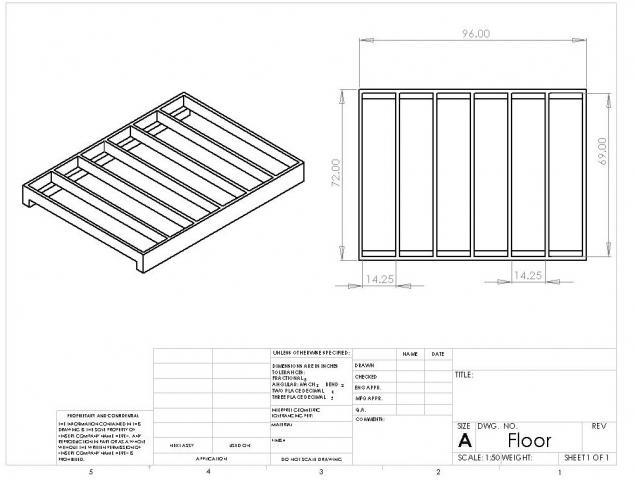
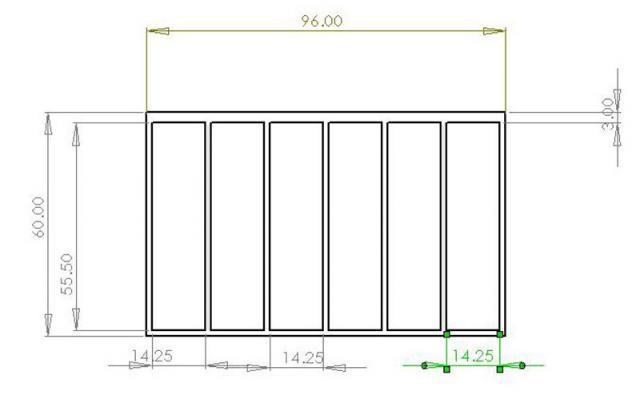
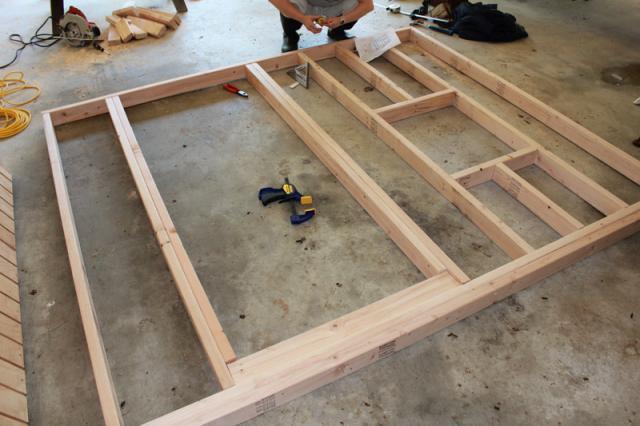
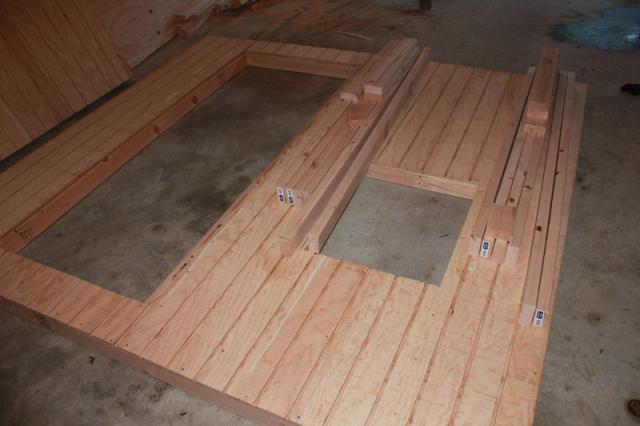
The floor:
Floors are made of 2x6's on skids, 16 on center, attached to 4x4 pressure treated skids.
There are three nails per end of the 2x6's holding them on to the front and back boards.
The back:
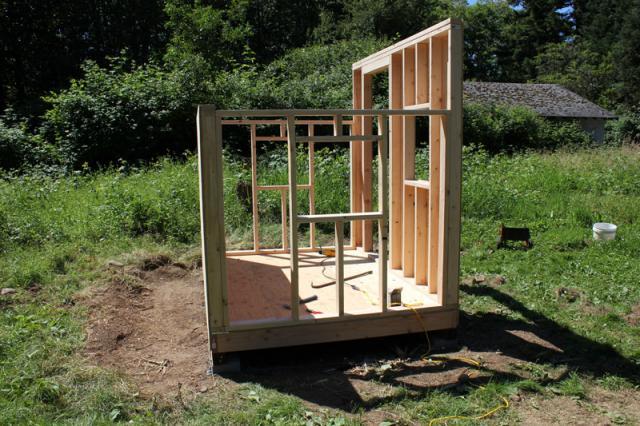
The back was made 8 feet wide to span the floor and studs were placed 16OC (on center) as it is one of the key load bearing walls. It is 5 feet tall.
There are two 16D coated sinker nails holding the pieces together from the top and bottom ends. The top is made of two overlapping 2x4's so I could use huricane ties. That said, a proper top plate should have extended over the side walls for structural stability/soundness to make the double layer studs at the top.
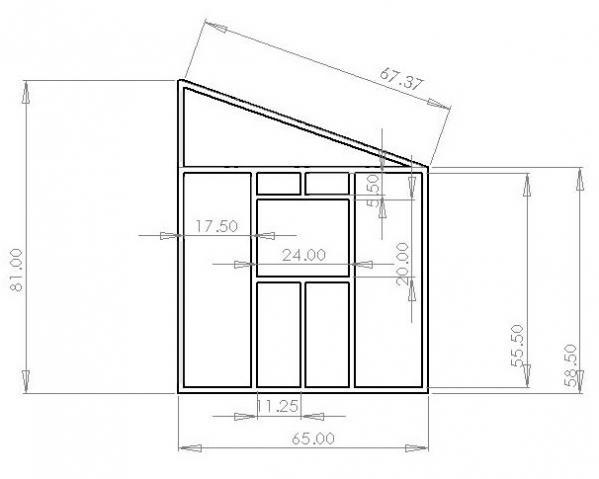
The front:
The front is 7 feet tall. The door is a bit more than 6 feet tall. Double top plate (?) like the back wall to fit the huricane ties. Window openings are to fit my custom windows that I made from 2x4's and a 16x20 sheet of glass. In the future, I would make the window hole openings on the frame smaller so it would be easier to shim in. The door is 30 inches wide, and when I cut the door from the ply, it was cut half an inch smaller all around for clearance.
The side walls:
Both side walls are identical with window holes. Simmilar to the front, I would have made the framing holes smaller for the windows for a easier fitment. Windows were screwed in with 2 inch long decking screws. The difference between this side plan and what was implemented is that the top slant area was not attached/built and we fastened the sides to the front and back. Of note, the width of the side walls are 5 inches shorter than the depth of the floor so that they would fit between the front and back walls.
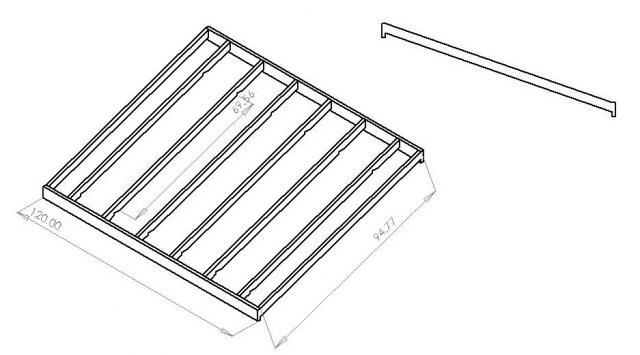
The roof:
The roof has 12 inch overhang on sides, 14 in front, 7 in back... to best optimize a full length 2x4x8. The span was just under 7 feet placed about 20 inches on center. Any longer I would have gone with 2x6's. It was somewhat eye balled when it came to instalation. The front and back fascia (?) are 2x6x10 pieces of lumber. What is not seen in this part of the plan is that the side overhangs have a few pieces of horizontal wood holding them out from the edge rafter pieces that are 10.5 inches long. These can be seen in the in progress pics.
Phase I Recap:
With a plan we started to build! Planning, designing and supply collecting time ~10-14 hours? It took a bit to learn how to use a CAD program to find some critical errors in the hand drawn plans.
Supples mostly bought from Lowe's. They were VERY helpful in moving pieces and loading the truck!
Lessons Learned:
-CAD really helped find problems in the design.
Phase II: The Ground Breaking.
This is the frst 3 day weekend we had to drive up to Washington from Oregon to build this coop.
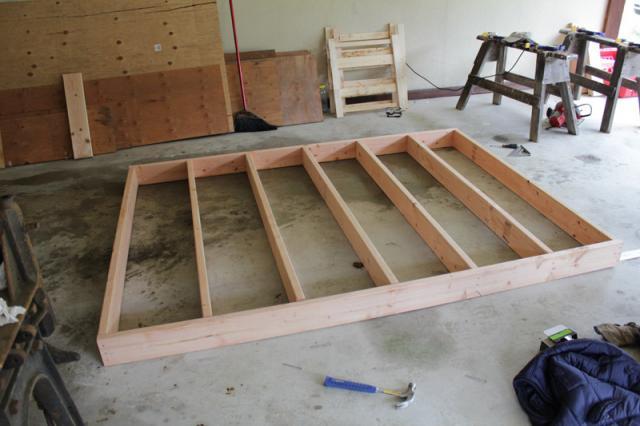
Floor:
2x6x8's. Three 16D coated sinkers per end piece to hold it all together. We squared it up by measuring the diagnonals to make sure they were equal.
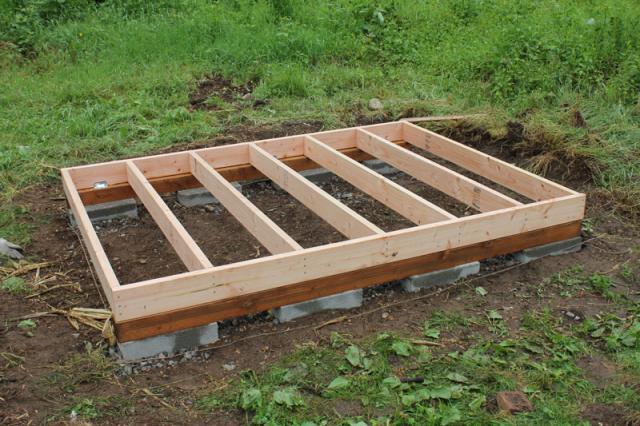
Foundation:
Foundation with floor on skids and blocks. Not a high wind area so I hope it does not move... might be a fatal mistake otherwise. Time will tell. The skids are 4x4x8 pressure treated studs. The concrete blocks were set on gravel and leveled prior to bringing the floor over to it. We sheathed the floor with 3/4 inch exterior plywood. The plywood was attached every 6 inches around the edges and every 12 inches on the beams with 2 inch 12D galvanized nails. When placing the boards, we placed the grain of the exterior ply perpenicular to the floor joists.
Front wall framing:
16D coated sinkers were used for all framing.
Front wall with siding: The structural plywood siding was attached every 6 inches with 2 inch nails all around any edges. Along interior studs, they were nailed in every 12 inches.
Front, sides, and back up. This was a bit tricky and we were glad that we chose not to pre-side the sides. The walls are all nailed down into the floor every foot or so, and the front and back walls are nailed into each other with the coated sinkers. One thing to note, is where the back and font walls have the extra double thick stud (header?), the side walls would ideally be overlapped on the corners and nailed down from the top for structural stability.
End of day two of building: Rafters and most of the sheating were put up. All sheating is nailed in eveyr 6 inches on edges, 12 inches on the beams.
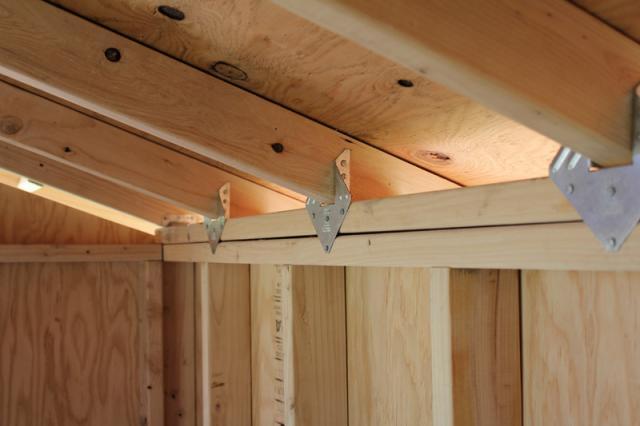
Rafters: Huricane ties on the inside by strong-tie. Birds mouth cuts were used to try and keep the load in compressoin on the walls.
Windows:
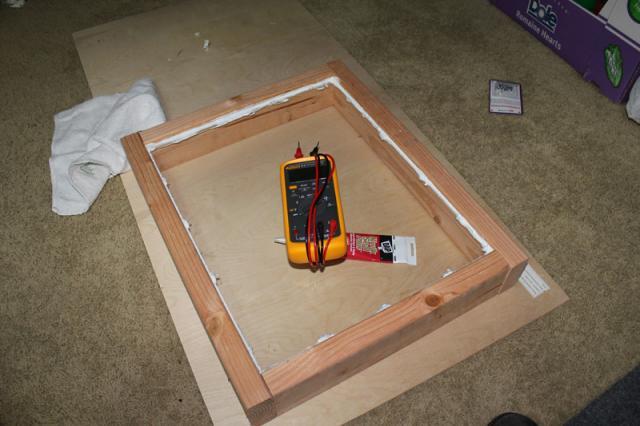
We used a 2x4 to make a frame, a sheet of 16x20 window glass, and glazing points to hold it in. Then we used silicone caulk to seal the window pane into the window frame. It is not the right way to do it, but is working so far. The proper method is to use a quarter round dowel to do the front frame to set the glass in, use glazing points on the back side to hold the glass in, and a product like dap33 to seal it in from the back over the glazing points. We put a towel on top of the glass when pushing in the glazing points in fear of it shattering on us. When the windows were dry, we installed them flush with the outside walls with help of shims and 2 inch long deck screws.
End of building on the 1st three day weekend...exhaused and out of time! The windows where pre made as shown above at the apartment and shimmed in. Shims were removed because the screws held in the window where we wanted. All window gaps were filled in with "Great Stuff Window and Foam" That great stuff is sticky and really does expand A LOT.
PhaseII Recap:
Total time thus far on feet working on the building: ~24 solid hours not including breaks.
What is left to do:
1) Make the 3rd window
2) Make a door
3) Finish nailing all pieces on
4) Paint interior and exterior
5) Felt and shingle the roof
6) Add the trim and paint it
7) Cover all ventilation holes with wire
8) Make nest boxes and roosts.
Est 24-36 solid standing hours to finish not including painting... we will see how long that takes.
Lessons Learned:
-Structural siding is HEAVY.
-Nailing takes A LOT of practice.
-Measure twice, cut once... and make sure the groves on the siding line up BEFORE cutting when appying multiple pieces of siding.
-The window frame holes should have been made smaller so there would be less of a gap.
-The could have been cut more precise so they fit over the window frame holes better as it made it tricky to install windows flush against the outside siding.
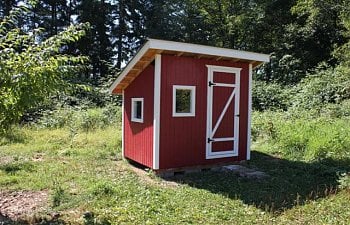
Phase III: Windows, Siding, Roofing, Painting!
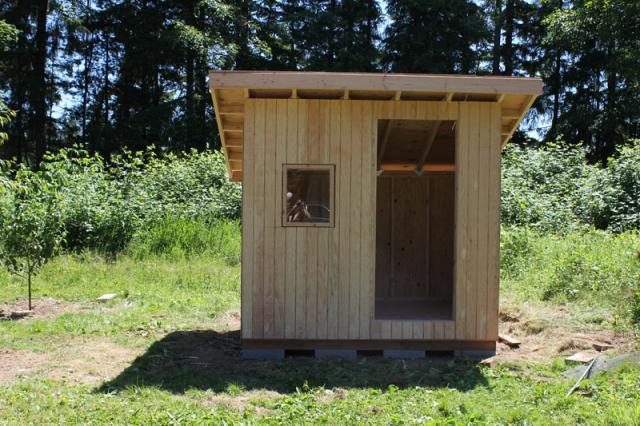
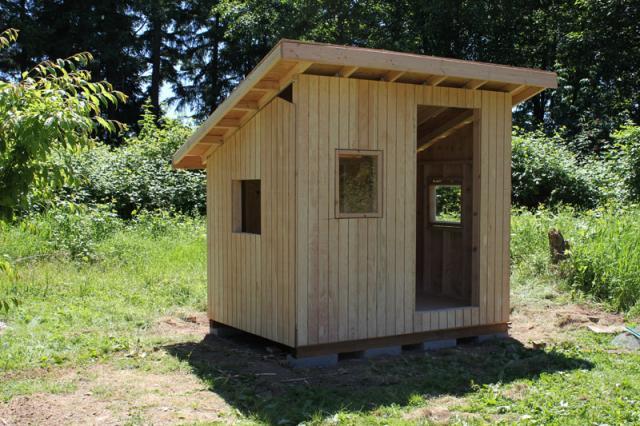
Three more days working and here is the result so far! All the ply is nailed in every 6 inches on edges and every 12 inches otherwise. All gaps caulked or puttied prior to painting. .
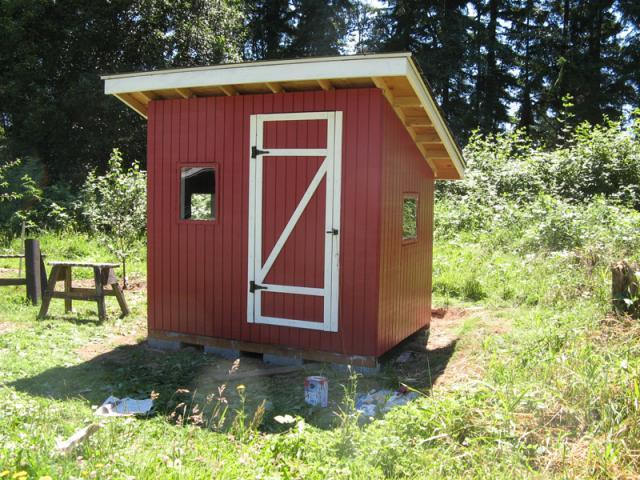
Apple-a-day Red exterior red with white trim. Trim was painted prior to installation. This increased lead time to construction, but saved a TON of time of needing to tape off and paint unprimed and painted trim pices from the walls. Clear caulk was used to seal trim to walls so I did not have to worry about painting a white caulk or needing to paint around hinges/latches. The door is just the cut out piece of siding with 1x2 trim around the edges.
Bright interior door makes it obvious the door is still open at night. Don't close it behind you though... the release string to the latch isn't installed yet!!! Paint takes a long time to dry. Here you can also see the perpenidcular pieces of 10.5 inch 2x4 that holds the outside edge fascia/rafter piece up. The roof is exactly 10 feet wide to fit the 10 foot 2x6 board across the front.
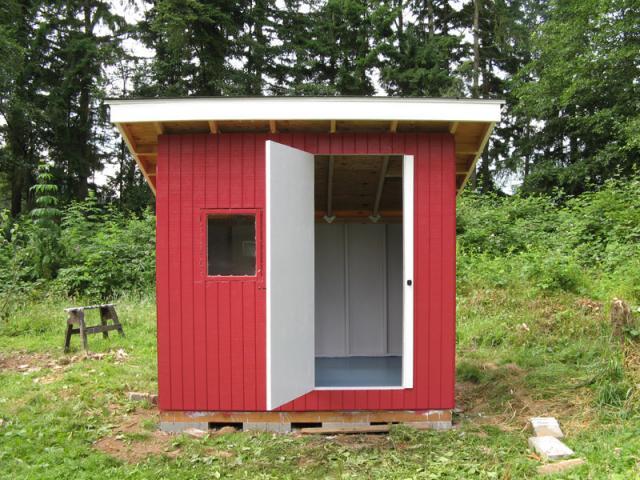
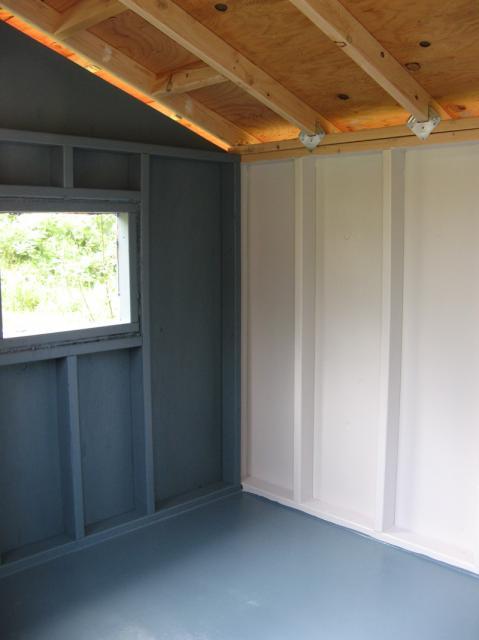
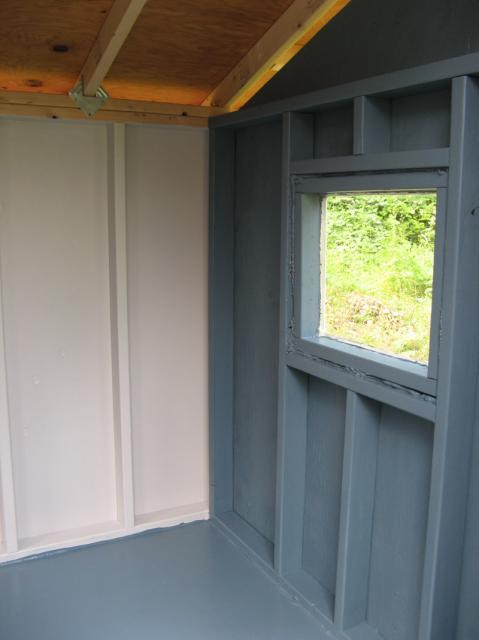
Interior walls and floor painted. The walls each have 2 coats of paint, the floor has 3. All paint is exterior latex paint.
Drip edges and roof installed. Used Certanteed Presidential Shake TL Lifetime Shingles. Dang things are thick, hard to cut, and really really really heavy.
The lower drip edge was installed 1st. Then the 30lb roofing felt was installed on top by nailing in every 12 inches or so and overlaping layers 4-6 inches. Then the upper and side drip edges were installed above the felt, but below the shingles. Followed instructions on shingles to install them.
The use of a shingle cutting blade was VERY useful. However, it did take 3-5 passes per shingle to cut through them due to how thick they were.
And here is the trim ready to install. Pre painted so only touch up and caulk needed to be added.
Phase III Recap:
What is left...
1) Even out shingles on roof
2) Install and finish trim
3) Touch up paint anything requied
4) Build and install roost
5) Build and install nest box
The building inspectors have already made their dust bath just behind the building and dusted the wet paint with fine dirt... Guess they like to bathe in privacy and help customize their coop. LOL
Lessons Learned:
-Expensive "lifetime" shingles are a PITA to install. Pre-painting trim is Great!
-Clear and paintable caulks (two different things) are a time saver. We got lucky with rain, as it started right after we put on the last coat of paint for this trip, and the large eves kept the siding dry enough to set.
-Paint takes at least 4 hours to dry to touch in "hot" 75F sun. It does not cure for at least a week so will be tacky if you walk on it... (I left some foot prints on the second coat of paint on the floor)
-Bugs LOVE to make their homes in the crevices of stacked T1-11 siding...
Phase IV: Roosts, Nest Box, Feeder, and Finishing Touches
The big push to finish! The last 3-day weekend before the rains of fall. Tired and exaused from busy weekends we were tired of working on the coop but had to finish. Siding and trim all installed, caulked, painted, and given final touches.
Clear caulk was used on all seams touching red siding, white caulk was used for all seams that were white touching white. All siding is nailed in with 2 inch nails, set, and caulked/painted over to hide them.
The front trim on the edges are 1x4 boards with 1x3 boards are the sides to give the look of 4 inch trim all around the edges.
Fishing line was used to make an invisible escape cord if you accidently closed the door behind yourself while inside.
The roosts:
Two roosts, one at 20 or so inches off the ground and one at about 36 inches from the ground. The roost themselves are 2x4's with the flat side up. The little wood bits are 14 inches long so chickens can turn around easily on the roosts and keeps poop off the shelf brackets. The lower roost is 3 feet wide, the upper roost is 6 feet wide. I anticipate all birds sleeping on the upper roost. Shelf brackets are the 12 inch long ones.
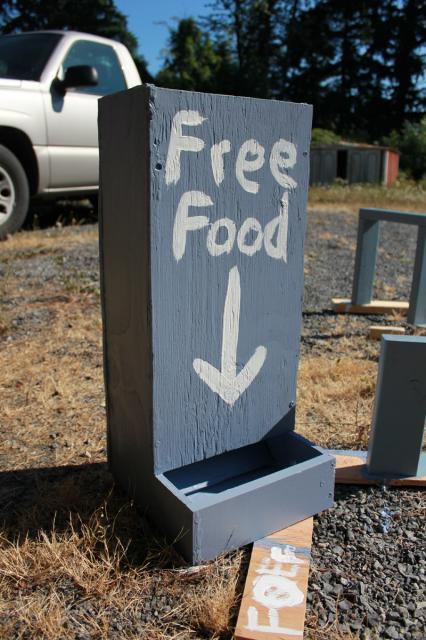
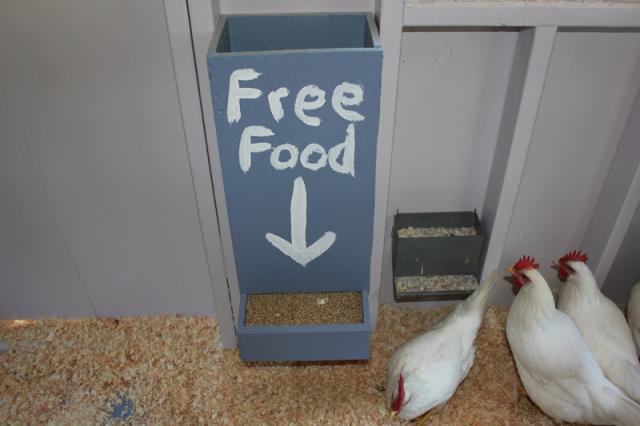
Feeder: With excess wood from constuction, I figured I'd just build the feeder because they can be expensive to buy. Anywhere from 40-100 bucks for a wall unit! Plus, with a custom unit, I could fit it stragetically between studs on the wall.
The feeder is 24 inches tall, 6 inches deep, with a 4 inch tray at the bottom sticking out, that is 3 inches deep, so the birds can easily get the food without hitting their combs. It is 13.5 inches wide. To ensure feed flows out, I added a slanted board in the bottom. The feeder is screwed together on edges of the 1/2 inch ply wood using 1.25 inch screws.
Heres the feeder installed on the front wall of the coop 12 inches from the floor. To the left is a rabbit J-feeder I had lying about for oyster shell (calcium). As a side note about 1.5 bags of shavings (15 expanded cubic feet) were put in the bottom before chickens were installed. The leghorns are a bit nervous because they were put in with the 3 older hens. Total there are 5 leghorns, 1 red sexlnk, 1 gold sexlink, and one production red. Am still rooster shopping...
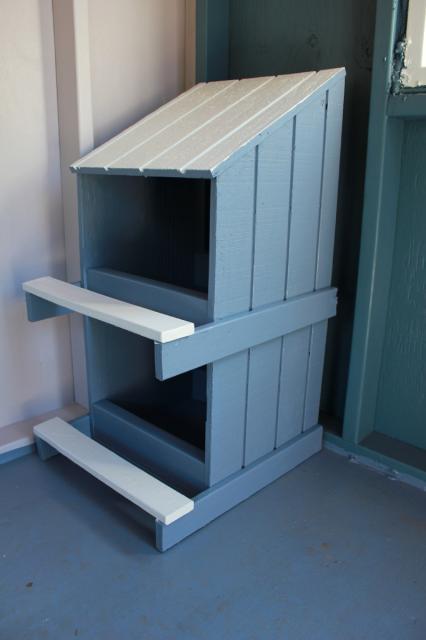
Here is the nest box before it was installed. It was also made with left over wood. The siding to be exact. It is sturdy! I can sit on it.
The bottom of the nesting holes are 14x14 inches. The front is 14 inches tall, back is 31.5 inches tall, and they are fastened together with a secton of remaining 2"x4"x14" blocks. The stepping pads are 19 inches long and 16 inches wide. The roof is 15x18 to fit the slant snugly. There is no back as it is to be put against the wall to fit right in between the studs. A nest box online of this style can be anywhere between 80-120 bucks! I felt like this was an added bonus from building our own coop.
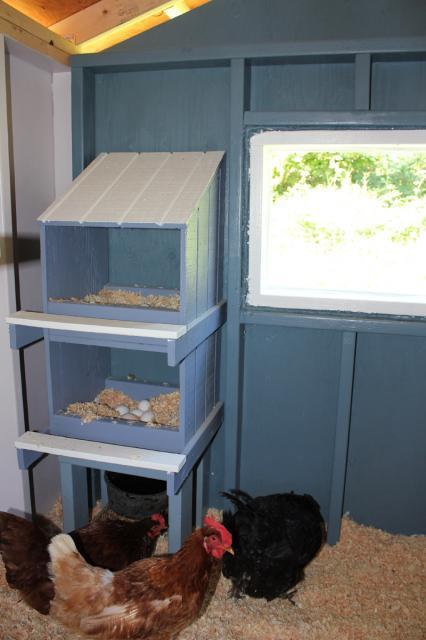
Here the nest box is installed 14 inches off the ground. The temporary water pan is underneat the nest boxes. I put one golf ball in the top nest and all but two birds decided to use the bottom nest. Only one bird added an egg next to the golf ball in the top nest... and my old hen decided the floor was better and my foot found it under the shavings.
They are going to be cooped up for a week to learn this is their new home. We tore down the old coop and the leghorns brooder coop is going to be occupied with the two cochin x silkie bantams. The furnishings in this coop are designed and adjusted for standards, so banties will all have to live in the 4x4 Lowe's playhouse mini coop.
Phase IV Recap:
Three long weekends and we have a coop. My SO now has a "permanently" brused hand from hammering which I hope will heal in the next few years.
There are 2 gallons of red Olympic exterior paint, 1 gallon of Valspar white exterior paint, 2 gallons of tinted exterior primer, 1 gallon of Sherwin Williams mismatch paint, and 2 gallons of Duramax exterior mismatch paint.
Total cost of project before tools and about 2000 total miles of driving to and from the project was $879.23. Only thing not new were the shingles left over from the house and the chickens who were installed. This was a TON of work and if we lived where it was built and did not have to travel, could probably do it again in one work week. There was a decent learning curve in using tools and hammering.
Lessons Learned:
-Doing 14 hour work days and driving 5 hours to start it off and 5 hours to end it is VERY tiring...
-Hammering is VERY hard and my SO has some brused bones in his hammering hand to show for it.
-Paint takes a LONG time to dry and is $$. Mismatched paint was a good money saving find for the inside. I wanted the red and white exterior though.
-A speed square is an Awesome tool and used for almost every framing cut.
-Circular saws are great for cutting almost everything.
-Irwin Quick Grip Clamps were very useful.
-Keep lots of pencils at hand because they get lost a lot...
The best lesson: Experience in construction!
To do: Order some poultry nipples to make a watering station.
Questions or comments?
https://www.backyardchickens.com/forum/viewtopic.php?pid=7065822#p7065822
All coops thus far have been wood and wire tractors and one lowe's play house that was pre-cut. Skill level (1-10) was probably 2.
This project in particular was all made possible by the contents of this box which I was lucky enough to be able to find about 6 years ago:
It's an all in one unit that does EVERYTHING!

The trickiest part of this coop building is that we had to get it done in the summer and travel 5 hours each way to work on it. So we best utalized three day weekends for this project and had to have a VERY good step by step plan. There was very little down time and we esentailly worked sun up to sun down. A big thanks go out to my dad for driving me to the store to buy materials in his truck and my mom which kept us fed and clean throughout the many hours of this project.
Phase 1: The Planning
For the coop....we started with a plan:
It is a 6x8 shed with a 4 in 12 roof.
5 ft tall in the back, 7ft tall in the front.
The floor:
Floors are made of 2x6's on skids, 16 on center, attached to 4x4 pressure treated skids.
There are three nails per end of the 2x6's holding them on to the front and back boards.
The back:
The back was made 8 feet wide to span the floor and studs were placed 16OC (on center) as it is one of the key load bearing walls. It is 5 feet tall.
There are two 16D coated sinker nails holding the pieces together from the top and bottom ends. The top is made of two overlapping 2x4's so I could use huricane ties. That said, a proper top plate should have extended over the side walls for structural stability/soundness to make the double layer studs at the top.
The front:
The front is 7 feet tall. The door is a bit more than 6 feet tall. Double top plate (?) like the back wall to fit the huricane ties. Window openings are to fit my custom windows that I made from 2x4's and a 16x20 sheet of glass. In the future, I would make the window hole openings on the frame smaller so it would be easier to shim in. The door is 30 inches wide, and when I cut the door from the ply, it was cut half an inch smaller all around for clearance.
The side walls:
Both side walls are identical with window holes. Simmilar to the front, I would have made the framing holes smaller for the windows for a easier fitment. Windows were screwed in with 2 inch long decking screws. The difference between this side plan and what was implemented is that the top slant area was not attached/built and we fastened the sides to the front and back. Of note, the width of the side walls are 5 inches shorter than the depth of the floor so that they would fit between the front and back walls.
The roof:
The roof has 12 inch overhang on sides, 14 in front, 7 in back... to best optimize a full length 2x4x8. The span was just under 7 feet placed about 20 inches on center. Any longer I would have gone with 2x6's. It was somewhat eye balled when it came to instalation. The front and back fascia (?) are 2x6x10 pieces of lumber. What is not seen in this part of the plan is that the side overhangs have a few pieces of horizontal wood holding them out from the edge rafter pieces that are 10.5 inches long. These can be seen in the in progress pics.
Phase I Recap:
With a plan we started to build! Planning, designing and supply collecting time ~10-14 hours? It took a bit to learn how to use a CAD program to find some critical errors in the hand drawn plans.
Supples mostly bought from Lowe's. They were VERY helpful in moving pieces and loading the truck!
Lessons Learned:
-CAD really helped find problems in the design.
Phase II: The Ground Breaking.
This is the frst 3 day weekend we had to drive up to Washington from Oregon to build this coop.
Floor:
2x6x8's. Three 16D coated sinkers per end piece to hold it all together. We squared it up by measuring the diagnonals to make sure they were equal.
Foundation:
Foundation with floor on skids and blocks. Not a high wind area so I hope it does not move... might be a fatal mistake otherwise. Time will tell. The skids are 4x4x8 pressure treated studs. The concrete blocks were set on gravel and leveled prior to bringing the floor over to it. We sheathed the floor with 3/4 inch exterior plywood. The plywood was attached every 6 inches around the edges and every 12 inches on the beams with 2 inch 12D galvanized nails. When placing the boards, we placed the grain of the exterior ply perpenicular to the floor joists.
Front wall framing:
16D coated sinkers were used for all framing.
Front wall with siding: The structural plywood siding was attached every 6 inches with 2 inch nails all around any edges. Along interior studs, they were nailed in every 12 inches.
Front, sides, and back up. This was a bit tricky and we were glad that we chose not to pre-side the sides. The walls are all nailed down into the floor every foot or so, and the front and back walls are nailed into each other with the coated sinkers. One thing to note, is where the back and font walls have the extra double thick stud (header?), the side walls would ideally be overlapped on the corners and nailed down from the top for structural stability.
End of day two of building: Rafters and most of the sheating were put up. All sheating is nailed in eveyr 6 inches on edges, 12 inches on the beams.

Rafters: Huricane ties on the inside by strong-tie. Birds mouth cuts were used to try and keep the load in compressoin on the walls.
Windows:
We used a 2x4 to make a frame, a sheet of 16x20 window glass, and glazing points to hold it in. Then we used silicone caulk to seal the window pane into the window frame. It is not the right way to do it, but is working so far. The proper method is to use a quarter round dowel to do the front frame to set the glass in, use glazing points on the back side to hold the glass in, and a product like dap33 to seal it in from the back over the glazing points. We put a towel on top of the glass when pushing in the glazing points in fear of it shattering on us. When the windows were dry, we installed them flush with the outside walls with help of shims and 2 inch long deck screws.
End of building on the 1st three day weekend...exhaused and out of time! The windows where pre made as shown above at the apartment and shimmed in. Shims were removed because the screws held in the window where we wanted. All window gaps were filled in with "Great Stuff Window and Foam" That great stuff is sticky and really does expand A LOT.
PhaseII Recap:
Total time thus far on feet working on the building: ~24 solid hours not including breaks.
What is left to do:
1) Make the 3rd window
2) Make a door
3) Finish nailing all pieces on
4) Paint interior and exterior
5) Felt and shingle the roof
6) Add the trim and paint it
7) Cover all ventilation holes with wire
8) Make nest boxes and roosts.
Est 24-36 solid standing hours to finish not including painting... we will see how long that takes.
Lessons Learned:
-Structural siding is HEAVY.
-Nailing takes A LOT of practice.
-Measure twice, cut once... and make sure the groves on the siding line up BEFORE cutting when appying multiple pieces of siding.
-The window frame holes should have been made smaller so there would be less of a gap.
-The could have been cut more precise so they fit over the window frame holes better as it made it tricky to install windows flush against the outside siding.
Phase III: Windows, Siding, Roofing, Painting!
Three more days working and here is the result so far! All the ply is nailed in every 6 inches on edges and every 12 inches otherwise. All gaps caulked or puttied prior to painting. .
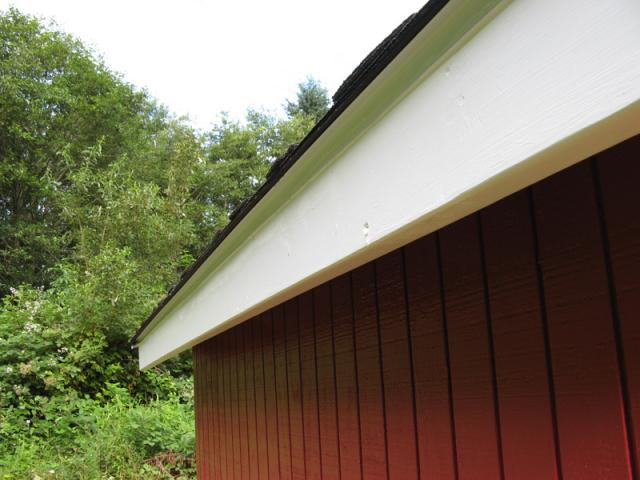
Apple-a-day Red exterior red with white trim. Trim was painted prior to installation. This increased lead time to construction, but saved a TON of time of needing to tape off and paint unprimed and painted trim pices from the walls. Clear caulk was used to seal trim to walls so I did not have to worry about painting a white caulk or needing to paint around hinges/latches. The door is just the cut out piece of siding with 1x2 trim around the edges.
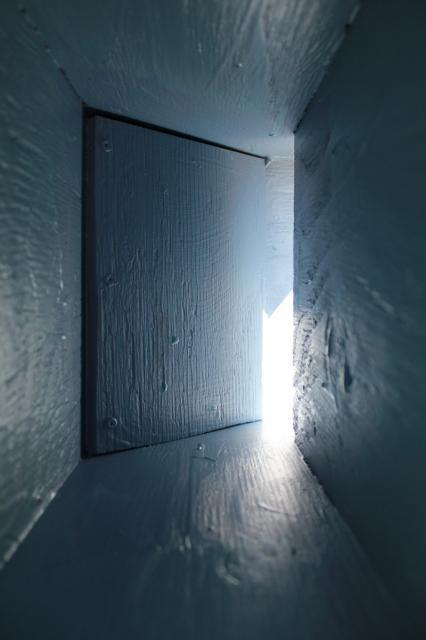
Bright interior door makes it obvious the door is still open at night. Don't close it behind you though... the release string to the latch isn't installed yet!!! Paint takes a long time to dry. Here you can also see the perpenidcular pieces of 10.5 inch 2x4 that holds the outside edge fascia/rafter piece up. The roof is exactly 10 feet wide to fit the 10 foot 2x6 board across the front.
Interior walls and floor painted. The walls each have 2 coats of paint, the floor has 3. All paint is exterior latex paint.
Drip edges and roof installed. Used Certanteed Presidential Shake TL Lifetime Shingles. Dang things are thick, hard to cut, and really really really heavy.
The lower drip edge was installed 1st. Then the 30lb roofing felt was installed on top by nailing in every 12 inches or so and overlaping layers 4-6 inches. Then the upper and side drip edges were installed above the felt, but below the shingles. Followed instructions on shingles to install them.
The use of a shingle cutting blade was VERY useful. However, it did take 3-5 passes per shingle to cut through them due to how thick they were.

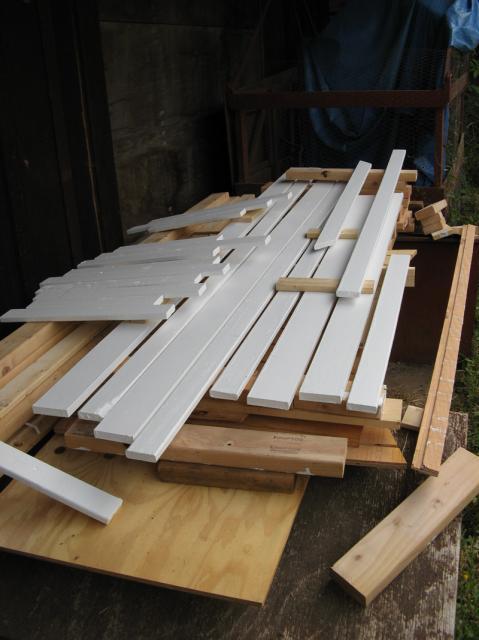
And here is the trim ready to install. Pre painted so only touch up and caulk needed to be added.
Phase III Recap:
What is left...
1) Even out shingles on roof
2) Install and finish trim
3) Touch up paint anything requied
4) Build and install roost
5) Build and install nest box
The building inspectors have already made their dust bath just behind the building and dusted the wet paint with fine dirt... Guess they like to bathe in privacy and help customize their coop. LOL
Lessons Learned:
-Expensive "lifetime" shingles are a PITA to install. Pre-painting trim is Great!
-Clear and paintable caulks (two different things) are a time saver. We got lucky with rain, as it started right after we put on the last coat of paint for this trip, and the large eves kept the siding dry enough to set.
-Paint takes at least 4 hours to dry to touch in "hot" 75F sun. It does not cure for at least a week so will be tacky if you walk on it... (I left some foot prints on the second coat of paint on the floor)
-Bugs LOVE to make their homes in the crevices of stacked T1-11 siding...
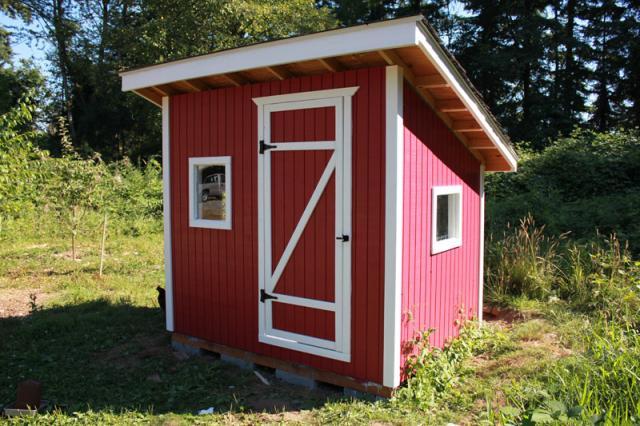
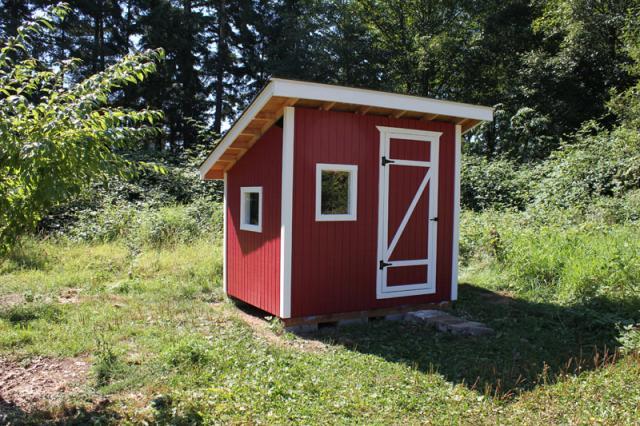
Phase IV: Roosts, Nest Box, Feeder, and Finishing Touches
The big push to finish! The last 3-day weekend before the rains of fall. Tired and exaused from busy weekends we were tired of working on the coop but had to finish. Siding and trim all installed, caulked, painted, and given final touches.
Clear caulk was used on all seams touching red siding, white caulk was used for all seams that were white touching white. All siding is nailed in with 2 inch nails, set, and caulked/painted over to hide them.
The front trim on the edges are 1x4 boards with 1x3 boards are the sides to give the look of 4 inch trim all around the edges.
Fishing line was used to make an invisible escape cord if you accidently closed the door behind yourself while inside.
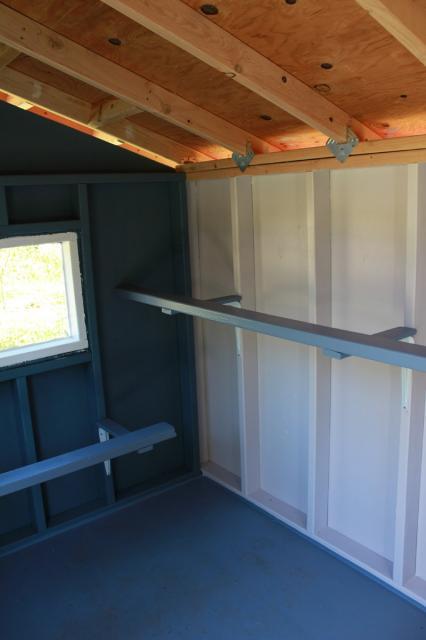
The roosts:
Two roosts, one at 20 or so inches off the ground and one at about 36 inches from the ground. The roost themselves are 2x4's with the flat side up. The little wood bits are 14 inches long so chickens can turn around easily on the roosts and keeps poop off the shelf brackets. The lower roost is 3 feet wide, the upper roost is 6 feet wide. I anticipate all birds sleeping on the upper roost. Shelf brackets are the 12 inch long ones.
Feeder: With excess wood from constuction, I figured I'd just build the feeder because they can be expensive to buy. Anywhere from 40-100 bucks for a wall unit! Plus, with a custom unit, I could fit it stragetically between studs on the wall.
The feeder is 24 inches tall, 6 inches deep, with a 4 inch tray at the bottom sticking out, that is 3 inches deep, so the birds can easily get the food without hitting their combs. It is 13.5 inches wide. To ensure feed flows out, I added a slanted board in the bottom. The feeder is screwed together on edges of the 1/2 inch ply wood using 1.25 inch screws.
Heres the feeder installed on the front wall of the coop 12 inches from the floor. To the left is a rabbit J-feeder I had lying about for oyster shell (calcium). As a side note about 1.5 bags of shavings (15 expanded cubic feet) were put in the bottom before chickens were installed. The leghorns are a bit nervous because they were put in with the 3 older hens. Total there are 5 leghorns, 1 red sexlnk, 1 gold sexlink, and one production red. Am still rooster shopping...
Here is the nest box before it was installed. It was also made with left over wood. The siding to be exact. It is sturdy! I can sit on it.
The bottom of the nesting holes are 14x14 inches. The front is 14 inches tall, back is 31.5 inches tall, and they are fastened together with a secton of remaining 2"x4"x14" blocks. The stepping pads are 19 inches long and 16 inches wide. The roof is 15x18 to fit the slant snugly. There is no back as it is to be put against the wall to fit right in between the studs. A nest box online of this style can be anywhere between 80-120 bucks! I felt like this was an added bonus from building our own coop.
Here the nest box is installed 14 inches off the ground. The temporary water pan is underneat the nest boxes. I put one golf ball in the top nest and all but two birds decided to use the bottom nest. Only one bird added an egg next to the golf ball in the top nest... and my old hen decided the floor was better and my foot found it under the shavings.
They are going to be cooped up for a week to learn this is their new home. We tore down the old coop and the leghorns brooder coop is going to be occupied with the two cochin x silkie bantams. The furnishings in this coop are designed and adjusted for standards, so banties will all have to live in the 4x4 Lowe's playhouse mini coop.
Phase IV Recap:
Three long weekends and we have a coop. My SO now has a "permanently" brused hand from hammering which I hope will heal in the next few years.
There are 2 gallons of red Olympic exterior paint, 1 gallon of Valspar white exterior paint, 2 gallons of tinted exterior primer, 1 gallon of Sherwin Williams mismatch paint, and 2 gallons of Duramax exterior mismatch paint.
Total cost of project before tools and about 2000 total miles of driving to and from the project was $879.23. Only thing not new were the shingles left over from the house and the chickens who were installed. This was a TON of work and if we lived where it was built and did not have to travel, could probably do it again in one work week. There was a decent learning curve in using tools and hammering.
Lessons Learned:
-Doing 14 hour work days and driving 5 hours to start it off and 5 hours to end it is VERY tiring...
-Hammering is VERY hard and my SO has some brused bones in his hammering hand to show for it.
-Paint takes a LONG time to dry and is $$. Mismatched paint was a good money saving find for the inside. I wanted the red and white exterior though.
-A speed square is an Awesome tool and used for almost every framing cut.
-Circular saws are great for cutting almost everything.
-Irwin Quick Grip Clamps were very useful.
-Keep lots of pencils at hand because they get lost a lot...
The best lesson: Experience in construction!
To do: Order some poultry nipples to make a watering station.
Questions or comments?
https://www.backyardchickens.com/forum/viewtopic.php?pid=7065822#p7065822