")
I have a goal to become as self-sufficient as possible, and figured adding chickens to our 1/4 acre backyard is essential in my goal.
") My husband calls me "The crazy bird lady" as I am quite partial to members of the Aves kingdom. I can sit and watch them for hours. I got my Amazon parrot as a teenager, then was introduced to coturnix quail a couple years ago while doing research for a nature science class I teach, and decided to get a "pair" of my own which has now become a flock of 10.
My husband calls me "The crazy bird lady" as I am quite partial to members of the Aves kingdom. I can sit and watch them for hours. I got my Amazon parrot as a teenager, then was introduced to coturnix quail a couple years ago while doing research for a nature science class I teach, and decided to get a "pair" of my own which has now become a flock of 10. When a friend of mine that works for Wilco (Farm store) told me they had day old chicks in this fall, I went to the store to 'get paint for the bathroom' and took a peek at the chicks. I had been doing research into the breeds I wanted, and whaddaya know? They had them all. I called my husband, and asked if I could bring 8 babies home with me. I know he was rolling his eyes and shaking his head when he said "Sure honey" in the fakest sweet voice he could muster....but I did. Two Rhode Island Reds, 2 Buff Orpingtons, 2 Americaunas, and 2 Barred Rocks. One of my Buff Orps died on the way home, so now we have 7.
Our chicks lived in our bathtub for the first 3 weeks of their life. I loved hearing them peep, and sitting in the bathroom watching my 7 little fluff balls peck at nothing and sleep. I was incredibly entertained one evening when a mosquito eater flew into the bathroom and slid down the wall of the tub. My then 2 week old chicks became wildly alert and one of them jumped up and snatched it in mid air in a matter of seconds. I then started leaving my windows and doors open at night to let as many mosquito eaters in as possible for my children and I to catch and hand feed to the chickies. I decided it was a great opportunity to teach them to come when I call, by squealing "Come chicky chicky!' and rewarding the first to arrive with the juicy bug treat. This worked exceptionally well, and I love that they now will all come running as soon as they hear me call.
When they were about 2 weeks old, I began taking them outside for a couple hours every day for some very supervised "free range" time. I was very amused watching such small birds scratch in the dirt. They seemed too little to know how to do that!
Our chicks, Mertz, Butter, Penny, Emma, Larkin, Tagen, and Ollie are now 10 weeks old, and it turns out my favorite, Ollie, is a Roo. (The Barred Rock on my shoulder in the pic above.) I wondered from the time he was tiny if he might end up a rooster, as he always had the strongest personality by far. This is a big bummer to me, as city ordinances do not restrict the number of hens I can have, but do not allow roosters. I CAN'T get rid of him!

They have all been living in our garage in a huge refrigerator box brooder. (They go out in the yard for about 4 hours a day now when we're home.) I know they are quickly getting too big for their little brooder, and I have finally decided on my coop plans and we've started building!


I was originally inspired by this coop I found online (on left) and wanted my husband to build me the exact same one, but then found out all sheds and buildings on our property had to be no higher than 8 feet, so I decided to modify it with ideas from a raised coop I saw on BYC, the Cottage Retreat. (right) I drew up some plans, and began scouring Craigslist for reuseable and salvaged materials. A neighbor gave us a big stack of wood and wire left over from his own coop construction, and we found a sweet deal on pressure treated 2x4's and 2x6's on Craigslist. (A third the price of un-treated lumber in the hardware store!) Here's my idea of the sweet marriage between my 2 inspirations:

We decided to make ours a square 6'x6', but ended up making it a square 47" x 47" (to make building the frame easier with the supplies we had on hand.) We planned on keeping about 8-10 birds, with 3 nesting boxes, a roosting area above the boxes, two windows on the east and west sides, a 12"x15" chicken door, and two large 3 foot doors on the back for easy cleaning.
Day1
November decided to give us a whole week of sunshine which is very uncommon here in Vancouver this time of year, so we decided we had better take advantage of it for coop building. We decided to place the coop in an otherwise unuseable corner of our yard where it will get both sun and shade, and protection from wind. That is a creek that runs directly behind the fence, that attracts a lot of animals, which is why we decided to set the coop off the ground. No snakes, rats, or racoons in our coop!
We set to work on day one digging the holes for the footings and getting our pressure treated 4x4 posts set. We set them in concrete Pier blocks about a foot underground.

We set to work on day one digging the holes for the footings and getting our pressure treated 4x4 posts set. We set them in concrete Pier blocks about a foot underground.


Once we had the floor joists in, we put on the 5/8" plywood floor and waited til morning to add the vinyl flooring remnant I found at Home Depot. The next morning arrived along with a very hard frost that didn't clear until after 1 pm. My flooring adhesive said to apply with temps between 65'-95'. Yeah, that wasn't gonna happen. We decided to skirt the bottom of the coop with tarps, stick a space heater underneath to warm up the floor for applying the vinyl, then let that baby pump away at 80' all night while it set. Crazy, I know. But it's all for my girls...and Ollie.

Day 3:
Sidewalls have been framed and raised. This step took us a long time, as I kept changing my mind about where/how many nest boxes I wanted, and I still have not located windows for the left and right sides. But, I knew what sizes I wanted them, so we framed them in. Think I'm going to have glass cut, and frame and grid them myself. REALLY hope I don't regret that decision!


*DH is getting some roofing clarification from my Dad, a pro-framer.*
We got the roof peak set before it got dark, but man, it was getting cold fast! We'll put on siding and finish the roof trusses tomorrow!
We got a lot done today! We cut the holes in our siding, and got all 4 sides on. It was a little tricky trying to keep waste to a minimum and get as much as we could out of the sheets of PLYWOOD.
Then we used some chipboard we had on hand for the roof sheeting, and framed in the outside edges of the main walls as well as the front window before it got dark. Sorry about the dark, oddly colored pics. I kept forgetting to get pictures until it was getting dark.
Day 5. 
Then we used some chipboard we had on hand for the roof sheeting, and framed in the outside edges of the main walls as well as the front window before it got dark. Sorry about the dark, oddly colored pics. I kept forgetting to get pictures until it was getting dark.

Today was slow-going. Sometimes I hate that I can't just pick something with a pattern or plan and make it. I always want to attempt my own designs, and it takes SO much longer. After we covered the roof sheeting in heavy tar paper, we had to figure out how to put on our roofing shingles. We are using cedar shakes, (these, from HD) and although some tutorials I came across didn't use slats under the shingles for airflow, (just plopped them straight on the tar paper) we felt that if we were going to go to all the work of building the square roof, that we wanted to make sure it was done right. We browsed online for a tutorial and followed this concept. We had to figure out how far apart to place our 1X2's on top of the tar paper to be able to nail each row of shingles down and make contact with the 1x2's for that row. When that was finally done, I started adding the 1x2's to the front siding for my board and batten look.
At first I placed the batten about 6" apart, but then felt I wanted more - and moved them to 4" between boards. Much better. Then I gave it a quick primer before night fell. (Roof trusses have not been trimmed yet.)
Day 6.
At first I placed the batten about 6" apart, but then felt I wanted more - and moved them to 4" between boards. Much better. Then I gave it a quick primer before night fell. (Roof trusses have not been trimmed yet.)

Now for the fun part. Windows. Turns out I was kind of an idiot for not finding my windows first and building around them. I won't make that mistake again. We ended up having to build our own windows, which required a LOT of research and time, (probably the biggest time waster of the entire build) but I am very pleased with the results. We cut the window holes before we made our windows, so the finished size is 15 1/2" x 47". We decided to have our glass cut, (local glass shop, but Home Depot and Lowe's also cut glass) and frame it in with chair rail from HD. After cutting the ends at 45' angles, my husband cut a 1/4" groove into the skinny edge of the chair rail to fit the glass into. (A dato blade would work well for this step, but the glass just happened to be the same width as our table saw blade, so we went with it.) After the frame was fitted around the glass, (used glue to hold in place for nailing) we used finish nails in the corners, and sealed the edge with a clear waterproof caulking.
After the caulking dried inside overnight, we (carefully) painted the frame and added dividers (cut from 1/8 x 3/4" trim pieces) to make it look more like real windows. The dividers were attached right to the glass with the clear waterproof caulking we used to seal the windows. Probably not the best choice, but it has worked well so far!
I also worked on the 2 doors for the back of the coop. I wanted "barn style" doors in the back that opened all the way up for easy cleaning and feeding. We decided to trim the doors with 1x4's to make them a bit heavier and more sturdy.
Day 7.

After the caulking dried inside overnight, we (carefully) painted the frame and added dividers (cut from 1/8 x 3/4" trim pieces) to make it look more like real windows.
The dividers were attached right to the glass with the clear waterproof caulking we used to seal the windows. Probably not the best choice, but it has worked well so far!
I also worked on the 2 doors for the back of the coop. I wanted "barn style" doors in the back that opened all the way up for easy cleaning and feeding. We decided to trim the doors with 1x4's to make them a bit heavier and more sturdy.

The next morning was foggy and cold, but we were excited to finish the roof! We found the cedar corner shingles for the roof, which we had to buy from a local roofing store. (Cost about 2x's as much as all the flat shakes for the roof!)

DH finished up the roof as I started on the batten on the remaining 3 sides. Then we installed the windows!
We mounted the windows with piano hinges along the top, so that the window could be opened by pulling up the bottom and resting it on a support...although I am really hoping to find some hardware that would allow me to crank it open.
(Update...I never found the "cranking" hardware, and have instead been opening them manually when it gets hot in the summer, and supporting with a dowel in the corners. If anyone knows where/how I can find hardware that will allow me to crank them open, I'd love to hear from you in the comments below!)
Added batten to the egg door and installed with 2 hinges along the top edge. A handle will be added to the bottom of the door for easy opening. Trimmed up the windows and the little door.
(Another Update - The egg door was another mistake. It's cute and all, but I've come to realize that having to use one arm to hold the door up, leaves only one for collecting the eggs and holding the egg basket. I think we will re-position the hinges so the door can be opened along a side so it will stay open without being held)
Day 8.
DH finished up the roof as I started on the batten on the remaining 3 sides. Then we installed the windows!
We mounted the windows with piano hinges along the top, so that the window could be opened by pulling up the bottom and resting it on a support...although I am really hoping to find some hardware that would allow me to crank it open.
(Update...I never found the "cranking" hardware, and have instead been opening them manually when it gets hot in the summer, and supporting with a dowel in the corners. If anyone knows where/how I can find hardware that will allow me to crank them open, I'd love to hear from you in the comments below!)
Added batten to the egg door and installed with 2 hinges along the top edge. A handle will be added to the bottom of the door for easy opening. Trimmed up the windows and the little door.
(Another Update - The egg door was another mistake. It's cute and all, but I've come to realize that having to use one arm to hold the door up, leaves only one for collecting the eggs and holding the egg basket. I think we will re-position the hinges so the door can be opened along a side so it will stay open without being held)
I was so excited to start on the cute little screens for the front window! My coop was starting to look great! We had hung tarps along the edges during the build so we could leave the space heater inside to keep the walls semi-warm so the paint would dry. I was in such a hurry to get my screens on, that I simply stepped behind the tarp, screwed in the hinges, then stepped back to admire it.
Grrrrr!
After I flipped it the right way, I started on the ladder. We had a scrap of siding left that was the perfect width. I added trim slats from our scrapwood pile every 4 inches, then we nailed two 2x4's to the underside to weigh it down a bit. One along each long side, secured slightly lower than the top of the board, to allow for a lip that would sit inside the chicken door.
Then 4 coats of paint, (cuz I was SURE it would get nice and muddy) and...voila!
Then DH started on the decorative vent boards. We used 2x6's and a 3" hole saw kit. (Using a cordless drill for this step is not recommended. They can't handle the torque involved for cutting the holes. A corded drill is a better option.) We cut the holes with 10 inches between, as close to the bottom of the board as possible, then used a jigsaw to cut the sides straight.
Attaching the vent boards really helped get everything squared up and secured.
I was having trouble finding shutters for the front that were as cheap as I wanted them to be. I eventually found a gentleman on Craigslist that had a huge stack of house shutters in his barn that he was selling for $5 a piece. After I got them home, I realized they were a bit longer than I wanted, so I had DH carefully remove the bottom trim on each of them, cut them down in the table saw to the desired length, then replace the trim. Worked beautifully. I wanted an aged/dirty look on the shutters, so I started by haphazardly painting them green and brown with some leftover paint I had in the garage. Then I covered them with some leftover white paint. When the white was dry, I sanded down the edges and random places in the slats to let the green and brown colors come through. Then I randomly smeared stain in the cracks and imperfections, (also leftover from a project) let it sit for a few minutes and wiped it dry with a clean cloth. Perfect!
I didn't take pictures of the shutters as I went, but I did the same thing to this finial for the top of the coop. (Which I later shortened.)
Here it is after I added the stain, and was waiting for it to dry a bit.....
...and after wiping off the stain.
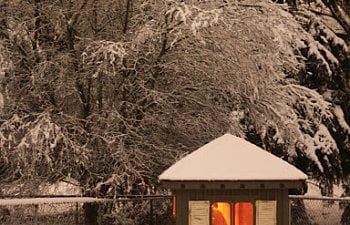
Here it is later that SPRING, after an uncharacteristic snowfall.
That summer we added wire fencing for our run, and began collecting lots of beautiful eggs...
We added a couple new girls during the summer, and by winter we were
learning how to clip Myrtle's wings. Naughty Myrtle.
learning how to clip Myrtle's wings. Naughty Myrtle.
Thanks for reading!
The end.