First "real" thing I have ever built. Learned a couple of things along the way, but perhaps the best advice I can give (even though no one is asking) is to start with a plan. Decide what functions and design elements you want before you get started, but don't be a slave to your plans -- they will change. Once you have an idea of what you want, commit those ideas to paper. When you start to draw things out, you get something tangible, something you can see. Don't hesitate to add, adjust, and, if necessary, start all over again. This thing is supposed to be fun...I guess that should be the first bit of advice, this thing, this backyard chicken thing is supposed to be FUN!............and always measure twice........and design the project with your materials in mind (i.e. - plywood comes 4'x8', don't build something 3'x7' you'll end up wasting a whole lot of money and material)......
.....Okay, you know what I'll just put a section on the bottom regarding the rules and tips I've learned from this project.
Functions and design elements:
1. Only need space for two chickens (legal limit in Honolulu).
- Over build the coop - only planned on two, but somehow ended up with three
2. I do not have unlimited space in the back so decide where it's going to go and design according to these spatial limitations (for my coop the area I had was a raised concrete planter that was 42" wide by 12' long, so my coop footprint is 40"x10').
3. Going to be outside so needs to be weatherproof - sealed and painted and the on concrete bricks rather than the wood sitting in the dirt/mud.
4. Only "predator" around my area is a single stray cat. I feel bad for everyone that has to deal with racoons, coyote, hawks, eagles, snakes, etc. Not even a stray dog. So if you're thinking of following my plans/ideas, please add the items necessary to predator-proof your coop. (But before you start wishing you were in Hawaii, remember how expensive everything is to ship here, and that's only IF it can be shipped here)
5. Functional elements: nest box, run, ramp, human-sized access to run and coop, perch, vinyl flooring to ease the poop clean up, and a sloped roof.
Now for some pictures:
Here's how it all started....my materials
As with most of these things, it all starts with a frame (10'x40"):
Remember How I said that plans change? Well.......
The original plan was to be a frame with conduit hoops covered with chicken wire. But...well...you see that pile of material behind the frame, I couldn't just let it sit there not realizing it's full potential. So break out the notepad, start drawing, and...
Bust out the saw, put the conduit on the side, and start processing the materials...
Then before I knew it...BAM!!!
End of day 1: Posts for the coop are 5' for the front and 4' in the back. The roof is 5'x40". We attached the roof using "L" brackets (that's what I'm calling them at least...to me the best things ever invented). The floor frame is 36"x40" with a single floor joist in the middle (probably not necessary if you're using plywood that's 1/2" or thicker). The floor frame is also attached using the "L" brackets.
The kids are super excited because they overheard me telling the neighbors (who probably wouldn't be the most receptive of the idea of chickens in the neighborhood) that I was building a playhouse for the kids...this would come back to haunt me later when it was time to put the chickens in the coop -- some promises were made to a couple of upset kids and now I think I've committed myself to building a real playhouse.
The frame for the run, the floor, and the panels went up next:
Oh boy is it going to be hard to when I have to tell them that it's not a playhouse:
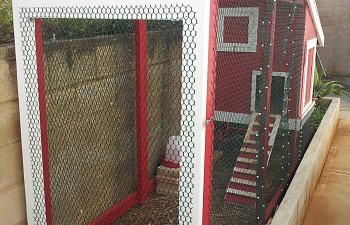
Here's a picture of the chicken door and ramp, the window, and the human access door:
Ramp down - I made it so the ramp, when closed, acts as the door to secure the coop at night (it pretty much stays open all the time now unless a whole lot of rain is in the forecast):
(The steps will be added later)
Now some paint:
- Used 2"x1" for the steps on the ramp and all the trim
- The window, ramp, and human access doors are secured with hook and eye closures
Finally I added an access door to the run and enclosed the whole thing with plastic chicken wire. Hardware cloth is just too expensive, and, like I mentioned earlier, I don't have any hardcore predators to defend against. If do you have any predators to defend against, I'd suggest that you spend the extra money for the welded wire.
- I used zip ties to join the sections of chicken wire (wish I used black ones, but oh well)
- I secure the wire with staples
The boy really didn't want to move out of his playhouse:
One final piece of advice (okay, not really final, but additional piece), not only make sure the coop/run will fit in it's final spot, but also make sure the beast can fit around the corners getting to the final spot:
And finally into it's backyard spot:
Like a glove!
So even with the chickens moved out into the coop, the kids still won't believe that it isn't a playhouse. To them the chickens are their guests:
So that's my coop and run for my three brown production layers. Hope you got some ideas for your coop. Please feel free to use anything from my coop on your project, just as I have shamelessly borrowed from others on this site.
Words of wisdom/things I learned:
- Measure twice, cut once (oldie, but a goodie)
- Don't be afraid to change your plans
- Do make plans (at least a rough sketch)
- It doesn't have to be perfect, it's a chicken house, don't get frustrated
- HAVE FUN!