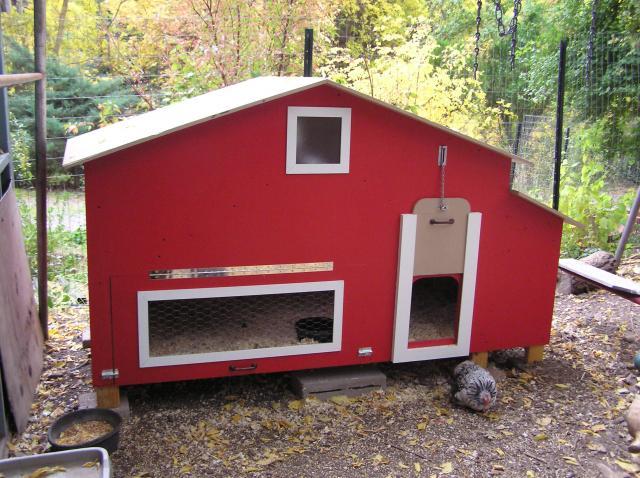
Hello, my name is Joe and I live in Salt Lake City, Utah. We have 9 chickens and we plan to get more in the spring. The old coop they were living in could only hold about 10 and was falling apart, so we knew we had to build another. My dad and I built this "Chicken Barn" in about 2 weeks using a new design I drew out that partially resembled the classic barn shape. It cost about $250 in materials. Here is the (almost) finished product.

I will try to take you through most of the steps as detailed, and accurately as I can, but know that there are some things you might have to do differently because of lack of proper tools, equipment, or slight measurement errors.
First off, let me show you the main features of the coop...
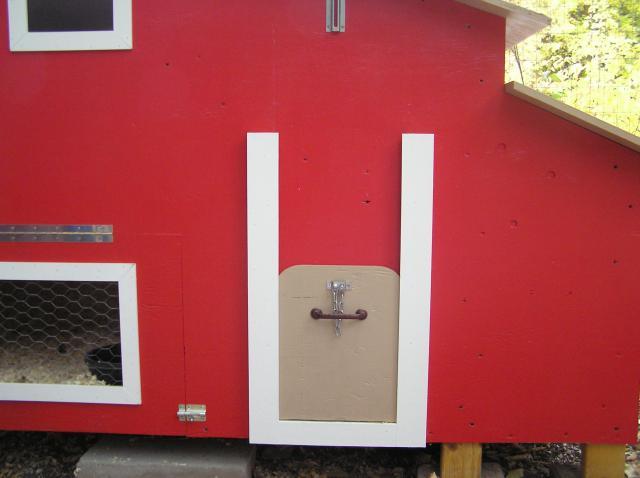
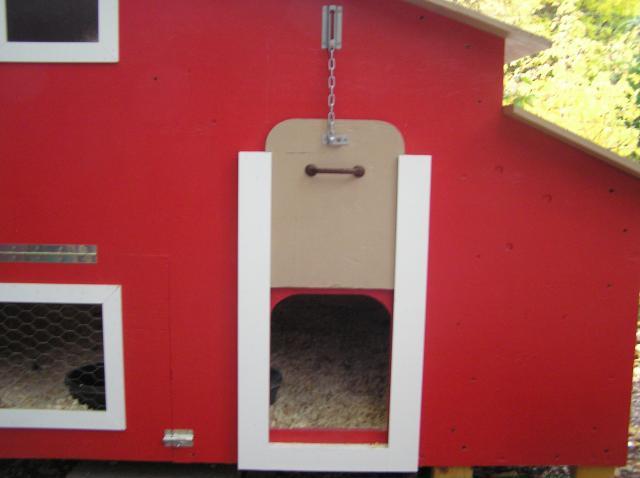
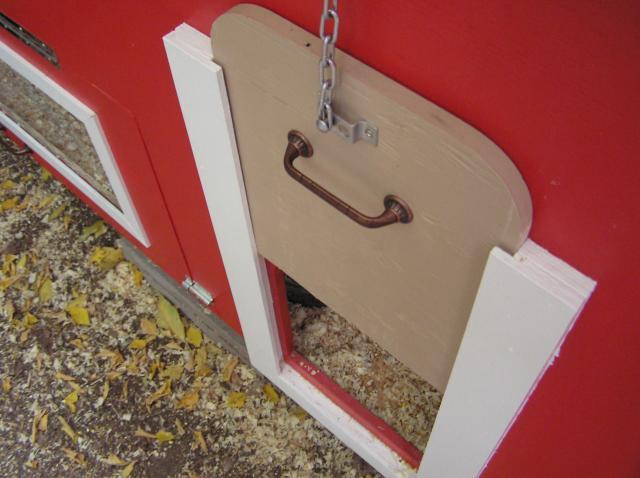
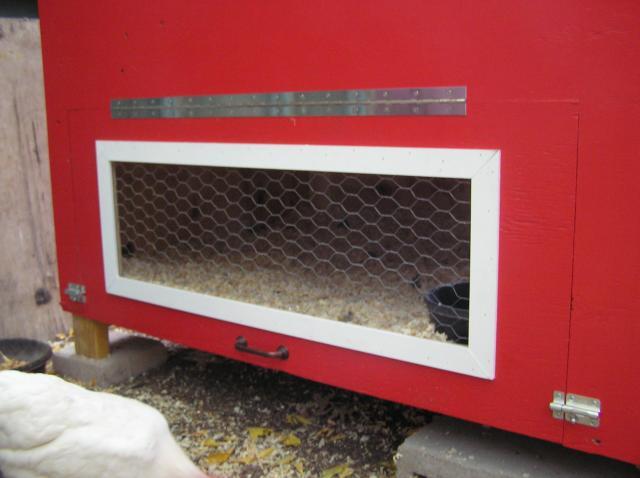
This is the sliding "guillotine door," but don't worry, it won't hurt the chickens!! It is held up by a small chain that locks itself inside a keeper and slides up and down in a groove.
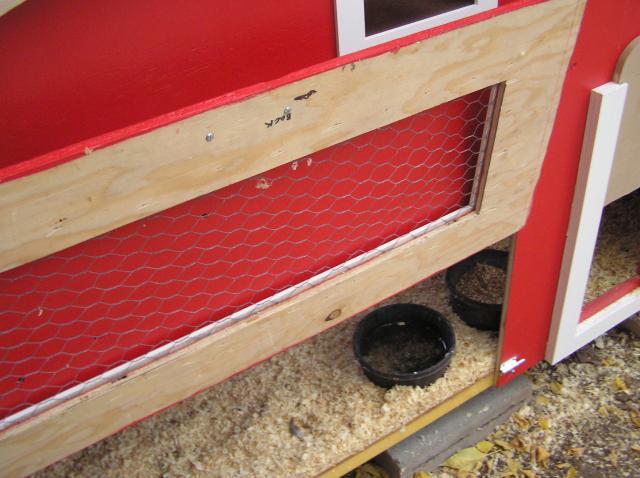
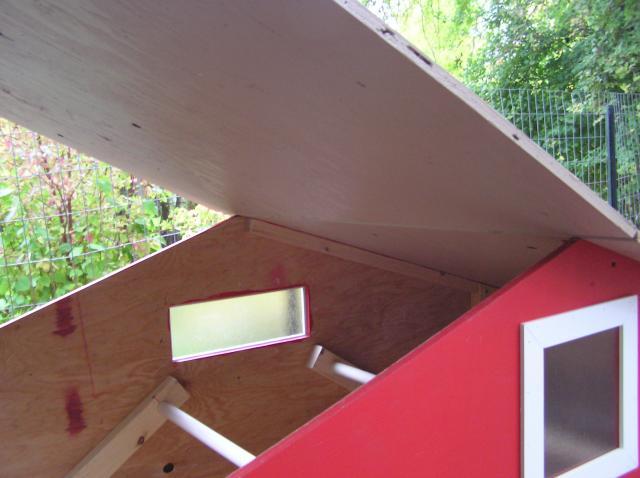
For the purpose of cleaning it out in the future without being a hassle, we included a part of the wall that lifts up for you, or a "Cleaning Door". (It is also the ventilation window) The door is held in place by 2 latches on either side of it.
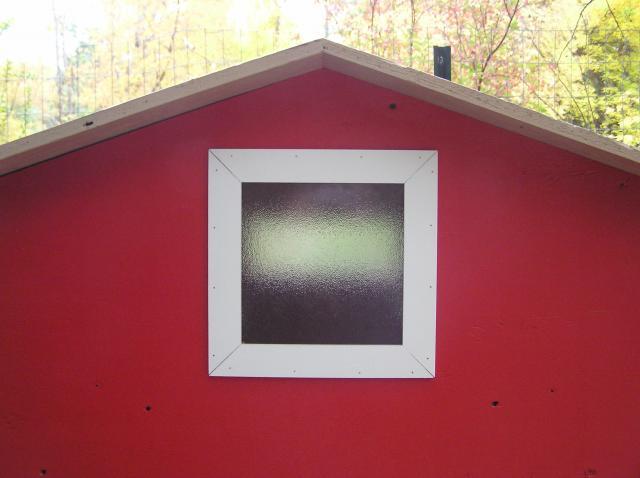
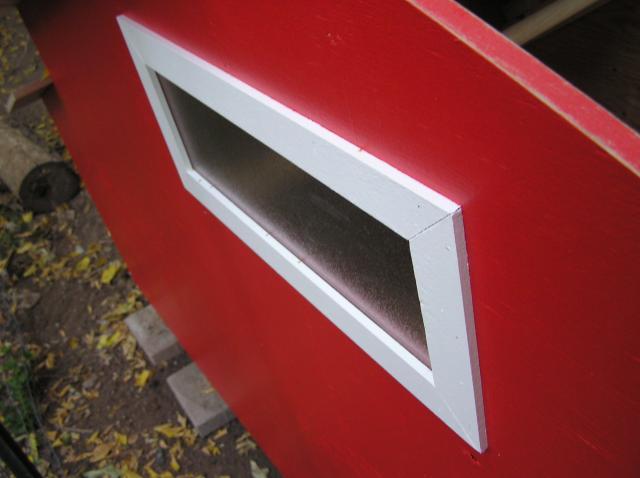
Another great feature are its 2 textured-glass windows with a square one in front and a rectangle one in back all with white frames. These will provide some of the light that comes in but also contribute to the aesthetics.
The left part of the roof lifts up and folds back all the way so you can check on them or help them get on their bars at night like we do!
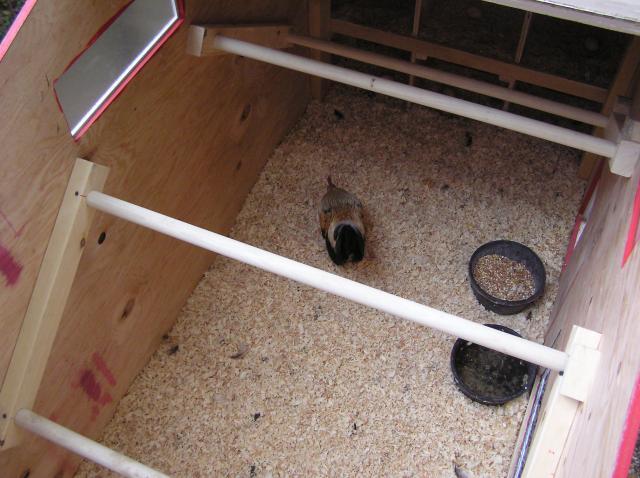
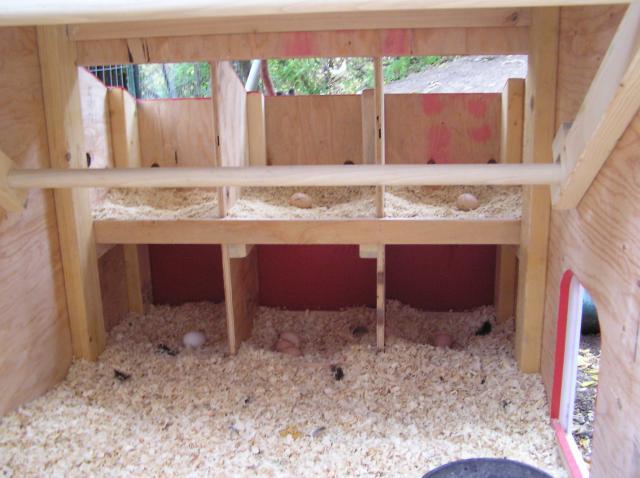
Going inside, this Coop has 4, 3-foot roosting dowels made of Poplar wood. If you need to, the bars can come out. These together can house UP TO 24 chickens, that being 6 on each bar in the night. But note that this coop is intended to be for about 10-20 chickens. (Less than 10 is fine too, more room for them!) (Rocky the Rooster is pictured.)
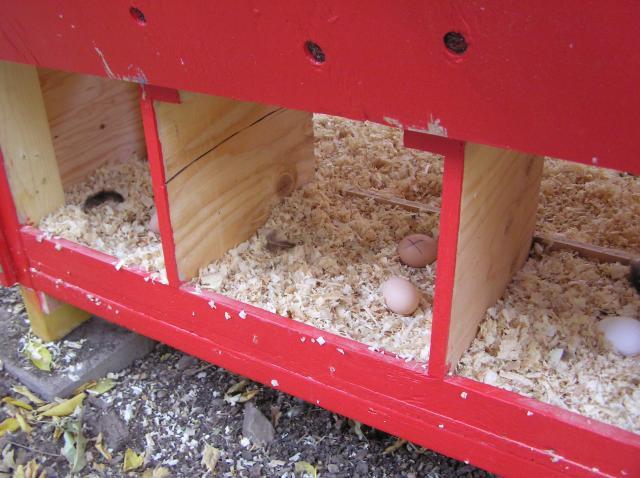
It also has 6 egg boxes located on the far right side of the coop, (3 per row with 2 rows). The chickens I guess will have to take turns in the day laying. There are two doors covering them from outside, one being a small roof piece, and the other a latched down lid.
So now that you have seen a short breakdown of it's features, let me take you step by step to build one yourself!
Section 1: Building the Frame and Main Body
Materials you will need:
Always remember to be safe when using your tools and wear safety glasses!
Step 1: Cutting out the Front & Back Walls
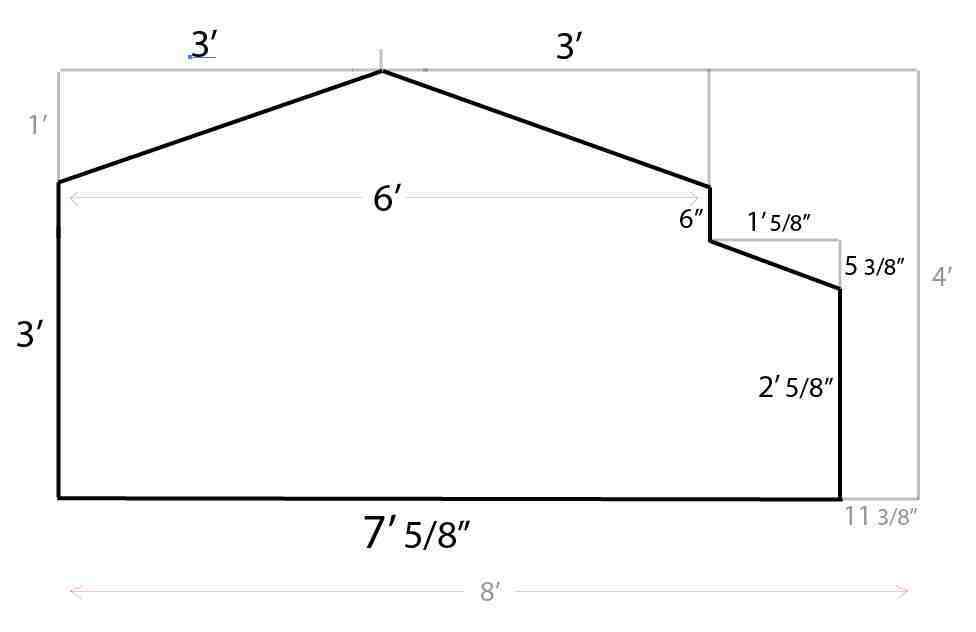
This is a template of the front and back cutouts you will make. (may be off on scale)
The main gray outline represents your 4x8 sheets, and the black outline is what you will cut out. As you can see, at 3' up on the left side and 3' in on the top left you can draw a line between those points and cut off that triangle piece. And at 6' in from the left and down 1', you can draw another line and cut off that piece. Make a mark 6 inches down past the last 1 foot cut you just made and cut down to it. On the right side of the board you can cut off 11 and 3/8 inches. Now that that right side is cut off, measure up 2' and 5/8" as indicated by the drawing and put a mark. From your cut that was 1' 6" down at 6' in from the left, draw a line to the 2' and 5/8" mark you just made. Cut along the line and presto! Your first front piece is done! Make a back piece in the same manner but keep the nice side of the board down on that one because then when you put it together, the good side of the wood will be on the outside. On the template, the extra 5/8" added to some of the measurements are there for a reason, to compensate for the thickness of the boards somewhere in the project. So try not to get too overwhelmed when dealing with small measurements!
Once your finished cutting out the front and back pieces, we will then cut out the windows and doors with a jigsaw.
Step 2: Cutting out the Doors and Windows
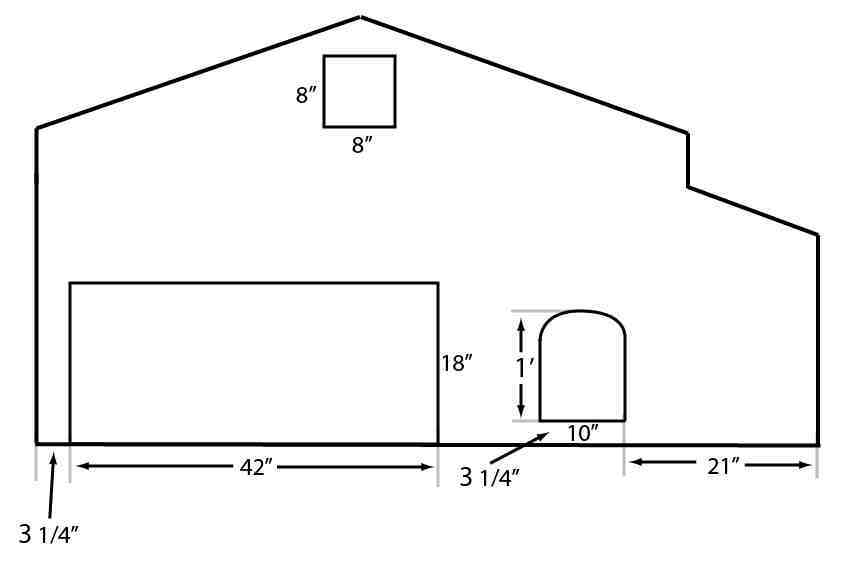
Here is a template of the window and door holes we will cut out of the front piece.
I suggest cutting out the chicken door and window holes first, and the cleaning door last so that you are not risking breaking the more fragile wood strip on the left side that will be left. The chicken door is cut 21" in from the right and 3 and 1/4" up as shown. It is 1' tall and 10" wide with a curved top. Draw the curved top however you think it looks best or none at all if you please. Drill holes on the 2 inside corners of the door piece you will cut out. These holes must be big enough to fit your jigsaw blade and will give you a place to start cutting it out. NOTE: (We will cut out a new bigger chicken door piece later. So don't worry if you cut or drill into the cut-out, you will throw it away.) Do the same process to cut out the window hole. If you want the window to be a different size or shape, go ahead. Just make sure you make the hole for the window about 1/2" shorter all the way around than the glass piece you have. We will router out a groove later for the glass piece to sit in. I had a 9x9" glass piece, so I cut a 8x8" hole so the glass could sit in the a groove 1/2" all the way around. The window hole on mine is centered and 5" down from the peak, giving it enough room for the white frames that will go around it. After the chicken door and window are cut out, it is time to cut out the cleaning door. It starts 3 and 1/4" in from the left and is 42" long and 18" tall, just a simple rectangle. Drill a hole like before in the inside part of a corner to have a place where your jigsaw can start cutting. (We will also make a new door later for this one too.) Cut it out.
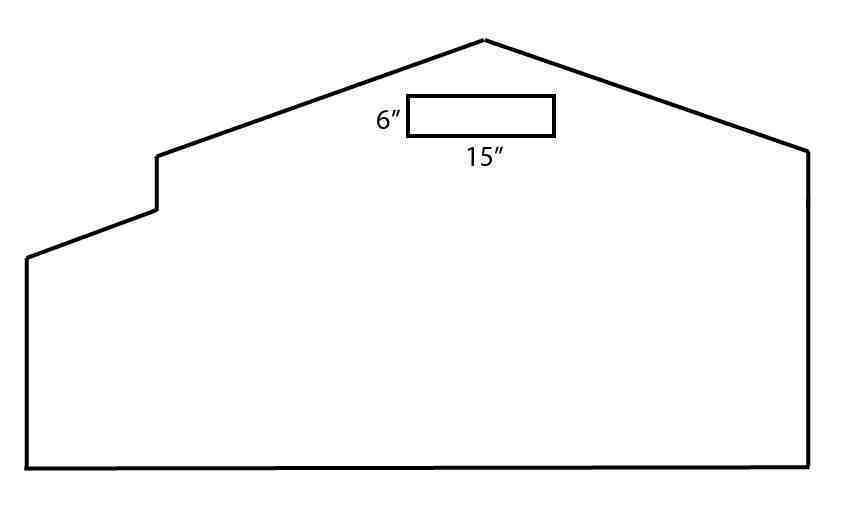
Back window hole:
The window hole in the back is approximately 6" by 15". But like I said before, cut it 1/2" smaller than the glass piece you have around the whole border.
This window is about 8" down from the peak and centered.
Step 3: Cutting the Legs and Frame Pieces
I will continue to come back each day updating this site, thanks for looking!
I will try to take you through most of the steps as detailed, and accurately as I can, but know that there are some things you might have to do differently because of lack of proper tools, equipment, or slight measurement errors.
First off, let me show you the main features of the coop...
This is the sliding "guillotine door," but don't worry, it won't hurt the chickens!! It is held up by a small chain that locks itself inside a keeper and slides up and down in a groove.
For the purpose of cleaning it out in the future without being a hassle, we included a part of the wall that lifts up for you, or a "Cleaning Door". (It is also the ventilation window) The door is held in place by 2 latches on either side of it.
Another great feature are its 2 textured-glass windows with a square one in front and a rectangle one in back all with white frames. These will provide some of the light that comes in but also contribute to the aesthetics.
The left part of the roof lifts up and folds back all the way so you can check on them or help them get on their bars at night like we do!
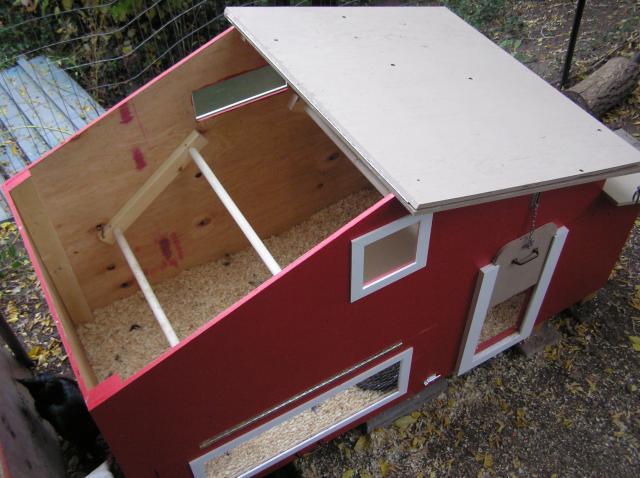
Going inside, this Coop has 4, 3-foot roosting dowels made of Poplar wood. If you need to, the bars can come out. These together can house UP TO 24 chickens, that being 6 on each bar in the night. But note that this coop is intended to be for about 10-20 chickens. (Less than 10 is fine too, more room for them!) (Rocky the Rooster is pictured.)
It also has 6 egg boxes located on the far right side of the coop, (3 per row with 2 rows). The chickens I guess will have to take turns in the day laying. There are two doors covering them from outside, one being a small roof piece, and the other a latched down lid.

So now that you have seen a short breakdown of it's features, let me take you step by step to build one yourself!
Section 1: Building the Frame and Main Body
Materials you will need:
- 6, 4x8 plywood sheets at 5/8 inch thick total for the whole project.
- 1 Box of (1" 5/8") screws
- 2, 2x2 beams
- 4, 2x4 beams
- A drill
- A jigsaw
- A router (for window grooves)
- A Chop saw
- A Skill saw that can make angled cuts
- Sand paper (various grits)
- 2 sets of hands
Always remember to be safe when using your tools and wear safety glasses!
Step 1: Cutting out the Front & Back Walls
This is a template of the front and back cutouts you will make. (may be off on scale)
The main gray outline represents your 4x8 sheets, and the black outline is what you will cut out. As you can see, at 3' up on the left side and 3' in on the top left you can draw a line between those points and cut off that triangle piece. And at 6' in from the left and down 1', you can draw another line and cut off that piece. Make a mark 6 inches down past the last 1 foot cut you just made and cut down to it. On the right side of the board you can cut off 11 and 3/8 inches. Now that that right side is cut off, measure up 2' and 5/8" as indicated by the drawing and put a mark. From your cut that was 1' 6" down at 6' in from the left, draw a line to the 2' and 5/8" mark you just made. Cut along the line and presto! Your first front piece is done! Make a back piece in the same manner but keep the nice side of the board down on that one because then when you put it together, the good side of the wood will be on the outside. On the template, the extra 5/8" added to some of the measurements are there for a reason, to compensate for the thickness of the boards somewhere in the project. So try not to get too overwhelmed when dealing with small measurements!
Once your finished cutting out the front and back pieces, we will then cut out the windows and doors with a jigsaw.
Step 2: Cutting out the Doors and Windows
Here is a template of the window and door holes we will cut out of the front piece.
I suggest cutting out the chicken door and window holes first, and the cleaning door last so that you are not risking breaking the more fragile wood strip on the left side that will be left. The chicken door is cut 21" in from the right and 3 and 1/4" up as shown. It is 1' tall and 10" wide with a curved top. Draw the curved top however you think it looks best or none at all if you please. Drill holes on the 2 inside corners of the door piece you will cut out. These holes must be big enough to fit your jigsaw blade and will give you a place to start cutting it out. NOTE: (We will cut out a new bigger chicken door piece later. So don't worry if you cut or drill into the cut-out, you will throw it away.) Do the same process to cut out the window hole. If you want the window to be a different size or shape, go ahead. Just make sure you make the hole for the window about 1/2" shorter all the way around than the glass piece you have. We will router out a groove later for the glass piece to sit in. I had a 9x9" glass piece, so I cut a 8x8" hole so the glass could sit in the a groove 1/2" all the way around. The window hole on mine is centered and 5" down from the peak, giving it enough room for the white frames that will go around it. After the chicken door and window are cut out, it is time to cut out the cleaning door. It starts 3 and 1/4" in from the left and is 42" long and 18" tall, just a simple rectangle. Drill a hole like before in the inside part of a corner to have a place where your jigsaw can start cutting. (We will also make a new door later for this one too.) Cut it out.
Back window hole:
The window hole in the back is approximately 6" by 15". But like I said before, cut it 1/2" smaller than the glass piece you have around the whole border.
This window is about 8" down from the peak and centered.
Step 3: Cutting the Legs and Frame Pieces
I will continue to come back each day updating this site, thanks for looking!


