How To Convert an Old Dog House Into a Chicken Coop
I realized I couldn't build my own coop from scratch, yet my DIY ethic prevented me from buying one outright. So I started with a large cedar dog house.
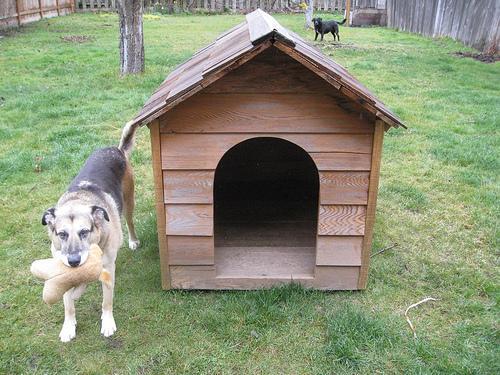
Step 1: Buy Dog House

Both my dogs can fit inside this doghouse - it's huge! The measurements are 4ft by 3ft, giving me 12 square feet of indoor space - much more than needed for 3 chickens. (The average recommended indoor coop space is about 2 sq ft per laying hen.) I bought this used for $75, and the very nice guy selling it to me strapped it to the back of his minvan, and drove it 45 minutes on the highway to my house.
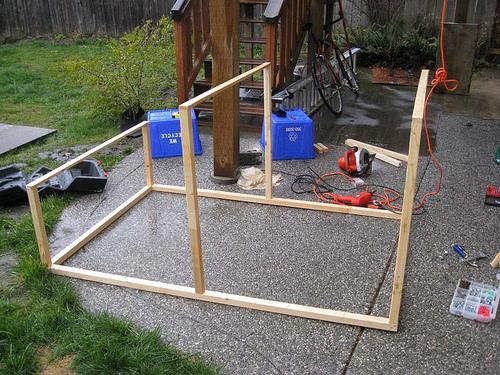
Step 2: Build Run
Building the run is really easy, so I recommend starting here for novice builders like myself.
We built the basic frame. (Don't procrastinate, or you'll be building in the rain too!)
I spray painted mine black.
Then stapled on some chicken wire.
We made some really basic plans for this, so basic they never even made it outside the hardware store. The run can be any shape you want - we chose to add a slant to ours but many people just make a straight box.
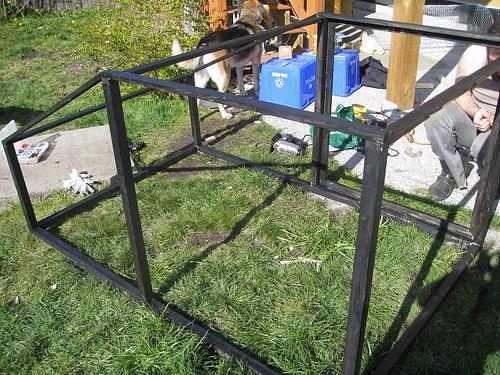
The run should be as wide as your doghouse and not too long, or else you won't be able to reach the entire floor without crawling in there. When measuring the height, remember wooden doghouses will have to be propped up on cinder blocks (or something like it). You can prop it up to prevent the floor from rotting and to protect the chickens if your yard gets puddles like mine does! See the photo below to see how my run fits right under the roof with the house raised up on cinder blocks.
I read a lot about predator-proofing, which in the city is mostly my dogs, cats, raccoons, and hawks. I knew the run had to have a roof, because of the cats and hawks. With dogs and raccoons, you have to worry about digging. I have found that the "bib" approach works amazingly well and is a lot less working than digging chicken wire 1-2 feet down into the ground. With the bib, you just cut the chicken wire a foot or so longer than your frame. It lays on the ground, deterring digging. I watched my dogs trying to figure out how to dig into the coop, never putting it together that all they had to do was take a step backwards and dig from there. I think in this picture you can really see it:
Free at last
When the run was in place, I pinned it down with rocks and stakes so you can't even see it through the grass anymore.
Step 3: Transform Doghouse into Coop
I started with ventilation. I did some reading and was convinced I needed about 10 times more ventilation than I thought I did.
I pulled off the front two shingles and covered them with hardware cloth.
Tons-o-ventilation
Then I cut out a slit at the top of the wall that was covered by the overhang of the roof. For paranoia's sake, I also covered that with hardware cloth.
hardware cloth on the vents
Next came the roost. I found a branch on a hike since dowel rods were $$$. The chickens love it!
Roost from a branch
Cutting out the pop door was hard, since the cedar was so brittle. I had to put down the jigsaw and use a handsaw. I frame it out, since the cedar was starting to split. My door is on the tiny size, about 12in tall and 8in wide. Most people recommend something much larger, but my hens are OK so far with this. They just have to duck!
Framing the door
I liked the idea of using the door as the ramp.
Door folds down
At first I was going to just use latches, but then I read that raccoons can open anything that a toddler can. So I opted for locks. I bought a 4 pack that all open with the same key.
Raccoon safe
Lastly, I needed a "people" door. Putting on my sewing hat, I traced a pattern with some cardboard.
Tracing the door pattern
Cutting out the door
Apparently, this is not the way you do things in construction, but it got the job done. A pretty black door!
What a pretty door
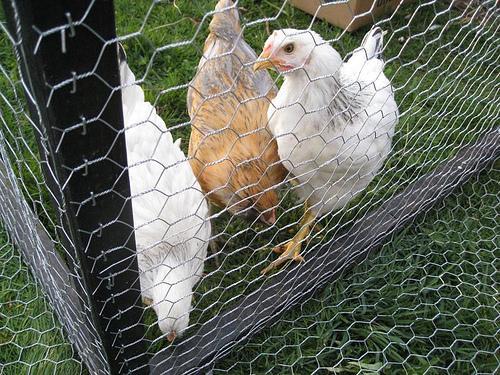
Step 5: Add Chickens
IMG_3400
Snack on the ramp
Video of my chickens in their new coop:
Bonus: What I Learned
- I am really glad I went with a "mini" coop. I was worried about not being able to stand up in it for cleaning purposes, but for 3 chickens, a big shed like thing would have just been too much.
- You don't necessarily save much money by building your own chicken coop, unless you have tons of time (months) to find discounted parts. My coop and run probably cost around $300CAD, and you can get some nice prefab things for not much more and save tons of time.
- Start early. This is going to take much longer than 2 weekends.
- I wasn't counting on the high cost of hardware like locks, hinges, etc. I didn't even think of looking for those on the cheap until it was too late.
- It annoys me to no end that little bits of bedding (straw, wood chips) fall out of my people door. I have no idea how to stop it. I've tried. Make it so yours doesn't. Somehow.
Ok, happy building!
I realized I couldn't build my own coop from scratch, yet my DIY ethic prevented me from buying one outright. So I started with a large cedar dog house.
Step 1: Buy Dog House
Both my dogs can fit inside this doghouse - it's huge! The measurements are 4ft by 3ft, giving me 12 square feet of indoor space - much more than needed for 3 chickens. (The average recommended indoor coop space is about 2 sq ft per laying hen.) I bought this used for $75, and the very nice guy selling it to me strapped it to the back of his minvan, and drove it 45 minutes on the highway to my house.
Step 2: Build Run
Building the run is really easy, so I recommend starting here for novice builders like myself.
- A note on materials: We chose lightweight cheap wood (1 x 2s and 2×2s) because I really didn't want to spend much money and I wanted to be able to move it with one or two people later on.
- Despite the warnings that hardware cloth is the only thing that is truly predator proof, I did go with twisted small gauge chicken wire instead. I had to drive all around the city looking for hardware cloth, and when I found it, it was just too expensive to use for the whole run. I bought a few feet of hardware cloth for my coop, and just stuck with chicken wire for the run. I do live in the city in a completely fenced in yard, this may not be a smart idea if you live somewhere with less protection.
We built the basic frame. (Don't procrastinate, or you'll be building in the rain too!)
I spray painted mine black.
Then stapled on some chicken wire.
We made some really basic plans for this, so basic they never even made it outside the hardware store. The run can be any shape you want - we chose to add a slant to ours but many people just make a straight box.
The run should be as wide as your doghouse and not too long, or else you won't be able to reach the entire floor without crawling in there. When measuring the height, remember wooden doghouses will have to be propped up on cinder blocks (or something like it). You can prop it up to prevent the floor from rotting and to protect the chickens if your yard gets puddles like mine does! See the photo below to see how my run fits right under the roof with the house raised up on cinder blocks.

I read a lot about predator-proofing, which in the city is mostly my dogs, cats, raccoons, and hawks. I knew the run had to have a roof, because of the cats and hawks. With dogs and raccoons, you have to worry about digging. I have found that the "bib" approach works amazingly well and is a lot less working than digging chicken wire 1-2 feet down into the ground. With the bib, you just cut the chicken wire a foot or so longer than your frame. It lays on the ground, deterring digging. I watched my dogs trying to figure out how to dig into the coop, never putting it together that all they had to do was take a step backwards and dig from there. I think in this picture you can really see it:
Free at last
When the run was in place, I pinned it down with rocks and stakes so you can't even see it through the grass anymore.
Step 3: Transform Doghouse into Coop
I started with ventilation. I did some reading and was convinced I needed about 10 times more ventilation than I thought I did.
I pulled off the front two shingles and covered them with hardware cloth.
Tons-o-ventilation
Then I cut out a slit at the top of the wall that was covered by the overhang of the roof. For paranoia's sake, I also covered that with hardware cloth.
hardware cloth on the vents
Next came the roost. I found a branch on a hike since dowel rods were $$$. The chickens love it!
Roost from a branch
Cutting out the pop door was hard, since the cedar was so brittle. I had to put down the jigsaw and use a handsaw. I frame it out, since the cedar was starting to split. My door is on the tiny size, about 12in tall and 8in wide. Most people recommend something much larger, but my hens are OK so far with this. They just have to duck!
Framing the door
I liked the idea of using the door as the ramp.
Door folds down
At first I was going to just use latches, but then I read that raccoons can open anything that a toddler can. So I opted for locks. I bought a 4 pack that all open with the same key.
Raccoon safe
Lastly, I needed a "people" door. Putting on my sewing hat, I traced a pattern with some cardboard.
Tracing the door pattern
Cutting out the door
Apparently, this is not the way you do things in construction, but it got the job done. A pretty black door!
What a pretty door
Step 5: Add Chickens
IMG_3400
Snack on the ramp
Video of my chickens in their new coop:
Bonus: What I Learned
- I am really glad I went with a "mini" coop. I was worried about not being able to stand up in it for cleaning purposes, but for 3 chickens, a big shed like thing would have just been too much.
- You don't necessarily save much money by building your own chicken coop, unless you have tons of time (months) to find discounted parts. My coop and run probably cost around $300CAD, and you can get some nice prefab things for not much more and save tons of time.
- Start early. This is going to take much longer than 2 weekends.
- I wasn't counting on the high cost of hardware like locks, hinges, etc. I didn't even think of looking for those on the cheap until it was too late.
- It annoys me to no end that little bits of bedding (straw, wood chips) fall out of my people door. I have no idea how to stop it. I've tried. Make it so yours doesn't. Somehow.
Ok, happy building!
