This is our new Chicken coop and below are some of the pictures I took during it's construction.

After several days of reading and research I began the build for our backyard chicken coop. It's most similar to the Wichita chicken coop but has some ideas taken from many of the designs on Backyardchickens.com. Considering the size of our backyard, I decided to build a coop of 8'x8' for 5 chickens. Once my wife and I had the location picked out, I started with the foundation. I had alot of cinder blocks already available and wanted to eventually go with a deep litter method so I built a simple square wall as the foundation.
Next came the predator barrier. I used hardware cloth and cemented it to the edge of the wall. Raccoons and skunks are the largest predators we have to worry about so I think this should work well enough.
Then came a layer of top soil.
With the foundation in place, I next built the frame. I decided to just glue this to the cinder block. There is little wind in this part of the yard so this should be more then sufficient to keep the coop in place.
Looking carefully at the pic below you can see the glue between the wood and the cinder block. Every joint was screwed together. There is not a single nail in the whole coop.
Once the basic frame was in place I did some staining.
With the frame in place I started on the coop itself.
and the roof.
I got some cheap linoleum for coop floor to aid in cleaning. The coop door and some windows are beginning to take shape next. The coop door would be string operated from outside the coop.
I also started to layup some of the hardware cloth for outer walls.
Next came the nesting boxes.
And the back access door for easy cleaning.
Her is my daughter helping with the staining.
Nesting box walled up now with a hinged lid. I add some trim and painted it green.
There are two large windows screened with hardware cloth and top vents above the coop door and cleaning door.
Back cleaning door and top air vents visible here:
Nesting boxes are trimmed a little on the inside. I just like the way this looks. It give a more finished appearance.
Nesting boxes are lined with linoleum easy cleaning
And a cleat to allow for flushing out with water.
Next came the coop door ramp. I was worried about the height of this ramp. If it was a straight shot down to the ground it would have been very steep. I decided to split into two with a landing in the middle. I covered it with left over composite roofing material. The chickens would prove to have no trouble using the ramp.
Ramp as seen from floor of the run and more hardware cloth on the walls:
The roof I covered with simple composite roofing shingles. More hardware cloth seen here as well. The cloth is always sandwiched between 2x4s after being stapled to the inner 2x4.
I added a short barrier at the base of the cleaning door to keep the pine shavings in when the door is open. You can also see the roost bar running diagonally inside the coop. It is not stained for easy visibility.
Another view of the ramp.
A view from the right side. At the far left of the picture you can see the pull string for the coop door.
Every Chicken coop needs a front door knocker!
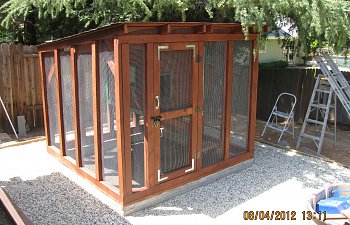
Front door finished and hung. A rock path goes around all four sides of the coop.
Now all we need are some chickens! More pictures can be see here at my website.
After several days of reading and research I began the build for our backyard chicken coop. It's most similar to the Wichita chicken coop but has some ideas taken from many of the designs on Backyardchickens.com. Considering the size of our backyard, I decided to build a coop of 8'x8' for 5 chickens. Once my wife and I had the location picked out, I started with the foundation. I had alot of cinder blocks already available and wanted to eventually go with a deep litter method so I built a simple square wall as the foundation.
Next came the predator barrier. I used hardware cloth and cemented it to the edge of the wall. Raccoons and skunks are the largest predators we have to worry about so I think this should work well enough.
Then came a layer of top soil.
With the foundation in place, I next built the frame. I decided to just glue this to the cinder block. There is little wind in this part of the yard so this should be more then sufficient to keep the coop in place.
Looking carefully at the pic below you can see the glue between the wood and the cinder block. Every joint was screwed together. There is not a single nail in the whole coop.
Once the basic frame was in place I did some staining.
With the frame in place I started on the coop itself.
and the roof.
I got some cheap linoleum for coop floor to aid in cleaning. The coop door and some windows are beginning to take shape next. The coop door would be string operated from outside the coop.
I also started to layup some of the hardware cloth for outer walls.
Next came the nesting boxes.
And the back access door for easy cleaning.
Her is my daughter helping with the staining.

Nesting box walled up now with a hinged lid. I add some trim and painted it green.
There are two large windows screened with hardware cloth and top vents above the coop door and cleaning door.
Back cleaning door and top air vents visible here:
Nesting boxes are trimmed a little on the inside. I just like the way this looks. It give a more finished appearance.
Nesting boxes are lined with linoleum easy cleaning
And a cleat to allow for flushing out with water.
Next came the coop door ramp. I was worried about the height of this ramp. If it was a straight shot down to the ground it would have been very steep. I decided to split into two with a landing in the middle. I covered it with left over composite roofing material. The chickens would prove to have no trouble using the ramp.
Ramp as seen from floor of the run and more hardware cloth on the walls:
The roof I covered with simple composite roofing shingles. More hardware cloth seen here as well. The cloth is always sandwiched between 2x4s after being stapled to the inner 2x4.
I added a short barrier at the base of the cleaning door to keep the pine shavings in when the door is open. You can also see the roost bar running diagonally inside the coop. It is not stained for easy visibility.
Another view of the ramp.
A view from the right side. At the far left of the picture you can see the pull string for the coop door.
Every Chicken coop needs a front door knocker!
Front door finished and hung. A rock path goes around all four sides of the coop.
Now all we need are some chickens! More pictures can be see here at my website.