This is our experience building a large-ish brooder. Finished measurements: 26" x 36" x 79.5" ... this is probably the maximum size we could ever manage to get inside the room we are using. We had to turn it on end, and it was a VERY tight squeeze from the hallway into the office where we put it. It probably should have been about 1" shorter to make it a little less sweaty to squeeze in there. Tip #1: Measure the HEIGHT of your doors, not just the width.
We have a quantity of 2x2 stakes on hand ... so they were "free" to me, though I've been told they can be bought in bulk for about $1 each (not reliable info, but the best I have for that material). These stakes are about 7' tall and have a pointed end. So after sawing off the pointy part of the stake with a jig saw, we have the finished length of 79.5" 2x2 as the sides of the brooder.
The pointy end of the stake.
Here is Nelson sawing off the points.
To set the dimensions of your width and height, make two frames of the 1x4 to use at either end of the brooder. We like to use 1x4 for the frame. If you buy two (2) 10' lengths of 1x4, you can cut each into two (2) 3' lengths, and two (2) 2' lengths right at the store (to fit in a tiny little "chicken farmer" vehicle like I have), or take it home and cut it yourself (lucky you for driving a proper vehicle!) ... each 10' length will give you the pieces for one end of the frame. Tip #2: Don't be silly and try to cut three 3' sections out of one 10' board, or you'll have a useless 1' piece left over and have to go back and buy an extra board. We think the 2' high x 3' wide is a good size ... and you should need exactly two (2) 10' 1x4s for it. This is true no matter how long you make your brooder.
Sorry, I don't have photos of this part, but it is similar to making the door frames below, so refer to those images if you need clarification ... Figure out how you want to butt your frames together keeping in mind how your choices will determine your final dimensions. Lay out your pieces, pre-drill holes, drive in your screws. Be sure to do both frames the same. I think it is nice to work up on a table for this, and I function as the lovely assistant to Nelson's muscle to help hold things still while he drills. Alternatively, work on the floor and brace the boards against a wall and you could probably make it a one-person job.
We like using 1x4s because we think these frames are light enough to make the finished product portable, and sturdy enough to keep things fairly solid. It is also nice to have a wider, flatter surface at each end than the 2x2s give you, though you could always frame it with 2x2s if you prefer.
Here you can see how the finished frames go at either end of the brooder.
Here you can see the finished height ... about 26", which is a good width to fit through average interior doors. This shows that we butted the 2' lengths of 1x4 INSIDE the 3' lengths. You could do it OUTSIDE. Alternatively, you could alternate one end of each board inside and one end outside. Just be consistent.
This photo shows the finished width of the frame as 3'.
Pre-drill screw holes at each end of your long 2x2s ...
Insert your screws, line up your corners, and drive the screws in.
Yeah, we like to use a lot of screws. Tip #3: In general, driving screws down is easier than driving them up, so do all four corners of the bottom of the brooder first, then flip it to do the other four corners. This is common sense, but if you're as new to building things as we are, every little tip helps.
This photo shows what your finished frame will look like.
Next, you'll add your doors. We were terrified of doors at first. We tried so many different things before we tried them this way and have various half-functional doors around our coop. These doors are by far the best we've tried. They are just frames, built from 2x2s, and jams also built out of 2x2s. It looks obvious typed up like that, and I even knew this before we started, but we were just not brave enough to try it at first. Not sure why we had that mental block ...
We like to do comparative measurements for the door jams ... maybe a team with more experience would trust their math and do exact measurements. What we do is carefully butt one end of 2x2 tight inside the brooder frame, and mark a spot on it tight inside the other side of the frame. You want this piece to fit tightly, so measure close.
Here is Nelson marking where he'll do his cut on a fresh length of 2x2.
Cut that piece, then tap it into place with a hammer.
You can see how Nelson has positioned one piece of the door jam at an angle between two sides of the frame, then he uses the hammer to tap it into place. He taps this piece flush with both the inside edge of the 1x4 frame and the top edge of the 2x2s. Because we're making two doors, one at each end of the brooder, we'll repeat this process at the other end of the frame.
Then drill your screw holes, and secure the door jams with screws.
This photo shows the proper position of the door jam, pre-drilled, with the screws ready to be driven in.
Next, you'll need door jams on the other side of each door. This is where we put our hinges, so our doors open from either end of the coop, which is a nice, flexible arrangement. Determine how big you want your doors to be (take into consideration things like the sizes of your feeders & waters, the width of your shoulders, etc.). You don't want the doors to be too small. Likewise, if the doors are too big they can be awkward.
We measured 2' from the inside edge of the door jam, and we're happy with the size of our doors. Use your desired door dimension to measure and mark spots equal distances from each top corner of the ends of the 1x4 frame ... down the length of 2x2. If you're building your brooder with two doors (highly recommended), you'll need four total marks to install two more pieces of jam, both installed close to the center line of the brooder.
Do more comparative measurements across the brooder at each set of marks. Cut your 2x2s. Tap them into place. Drill, screw. You will have added four total pieces of door jam.
Next, build your doors out of 2x2s.
Take measurements across one direction of your door jam, shrink that a fraction (about 1/2 inch), and cut two pieces of 2x2 that length.
This photo shows our cut pieces of door frame. You can see we chose to measure the width of the brooder, though perhaps it would have been slightly more reasonable to measure the other way as we already knew that measurement was 2' and could have simply cut two pieces at 23.5". Oh well. This way we got to measure again. Measuring is fun, right?
This part takes at least four hands as you'll want to place the new cut pieces exactly where they'll go inside the door jam and somehow hold them there in mid air while you measure the space between them. Hence no photograph as I was busy holding things. Subtract 1/2" from your measurement. Once you have that number, cut two more pieces that measurement.
You will have four pieces of 2x2. Butt all the pieces together as you'll want them finished, double check you did this right, and pre-drill both ends of the outside set (in our case, the longer pieces). Screw everything together.
You can see here we've butted the shorter pieces inside the longer pieces because that's the way we measured them.
Here is a view of the door frame. With any luck it will just about fit into your door jam opening.
It fit. Just about.
We don't normally get this exactly right on the first try ... we want the door pretty tight for maximum security ... things just move around too much while we're screwing them together ... getting stuff square is beyond our skill set. But never fear ... you can always just file or shave a little bit off the edges that stick.
Here is Nelson applying the file to one side of the door.
Before you set your door in and attach the hinges, you'll want to add a little stopper so the door doesn't fall into the coop instead of closing.
This could be metal brackets screwed in from the underside. We just use a scrap piece of wood. If you pre-drill the wood, it won't be as likely to crack when you screw it. Ask me how I know.
Next, attach hinges to your door frame ...
And then attach your doors to your door jam with your hinges ...
You should have something which looks a lot like this:
You think you're almost done, right? Hahaha!
Next you have to put the wire on your brooder.
We like to use hardware cloth because we may put this brooder out in the sunshine at some point, and at that point we'll want it to be safe for the chicks. We like 1/4" hardware cloth. This stuff is expensive.
For the measurements of our brooder we bought one 25' roll of each 2' and 3' hardware cloth. This is your standard 19 gauge stuff. We have some left over, but we know we'll need it for other projects.
Ideally, you would put 3' mesh on the bottom of the brooder and at both ends. You would then run the 2' hardware cloth down both sides. Depending on your door measurements and the rest of your top you could cover the whole top in 3' mesh, secure it everywhere necessary, then snip out the doors ... but we just used scraps for the top, some 2' and some 3'.
Here is nelson positioning a roll of 2' hardware cloth along the side of the brooder. We've rolled the brooder on its side for this because it is more comfortable to work that way.
Secure the hardware cloth along the 2x2s with screws and washers. Be sure to drill into the 2x2 if your screws are so long they'll poke through the other side of the 1x4.
To secure the cloth across the 1x4, use very short screws (we don't have any on hand), or staples. If using staples, be sure to tap them down tight with a hammer. Alternatively, you could use sturdier hammer-in staples, but we find those too awkward. Some people like to secure their hardware cloth with a piece of wood trim ... There are lots of ways to attach this stuff, but keep in mind you want it tight and secure so nothing can get in or out or rip it off or crush it in. You'll know the dangers for your situation.
It is totally worth it to invest in a pair of proper wire snips for cutting the hardware cloth.
Do yourself a favor, and snip off all of the little pokey bits of hardware cloth after you've made a cut.
This is time consuming, but so worth it. Ouch!
For the ends, we used some of the 3' hardware cloth.
Then installed door handles.
That handle is made from a bit of aviation wire left over from hanging the feeders and waterers inside the chicken coop, and a couple washers and screws. They work just fine. You can use a real handle if you're fancy like that.
Instead of putting hardware cloth on the bottom of this brooder, and then building a bedding tray for underneath, we just covered the bottom of the brooder in plastic. We may upgrade later, especially if we use this brooder for ducks!, but for now this system will work great for us.
We turned the brooder upside down and stapled the plastic in place. We trimmed off the extra plastic. This plastic is pretty durable -- it's the stuff you cover greenhouses. We'll use a cheap plastic dustpan to carefully scoop dirty bedding out of the brooder -- we found dustpans are great for removing large quantities of soiled bedding. No doubt we will replace this plastic between uses.
This is maybe my favorite part: For the "wet" area inside the brooder we wanted a wire mesh platform. We have a lot of these nifty flats on the farm, and we've found several ways to use them so far. You could replicate this flat by building another little frame like for the doors and use hardware cloth for the screen.
The flats have little legs on them, but we cut those off for this use.
Here is Nelson showing you why it is good to have back-up equipment when you're working on any project. His little hack-saw fell apart in his hands. So I fetched him an awesome pruning saw to use. We used to use this pruning saw for cutting ALL our wood, before we found the jig saw in one of the kitchen cupboards. That's probably where you keep your jig saw, too, right?
The process of moving the brooder into my office took all our hands and most of our ingenuity (did I already mention how important it is to measure ALL dimensions of your doors and hallways? it bears repeating!), so we don't have photos. Needless to say, we wasted no time transferring the little peepers into their awesome new box.
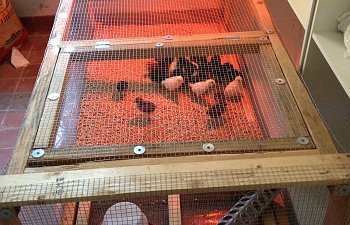
Here are 25 chicks ... you can see we have plenty of room, for now anyway. You can also see we have attached the heat lamp to a bookshelf above the brooder. This will allow us to move it up or down to control the temperature. What you don't see is the second heat lamp we installed. We pointed both heat lamps at the same spot. By placing both lights over the center of the brooder, we prevent the chicks from piling up in a corner. It is a toasty 95 degrees at the center of the brooder there today. Warm enough that the chicks spread out all over the brooder.
Here is an overhead shot of the "wet" end of the brooder in use -- that little black blob is a baby Black Jersey Giant. The bedding fills about to the level of the top of the screened flat and the side of the flat keeps the pellets from going under the water and getting all soggy and nasty. The chicks have no trouble getting to their water and it stays a LOT cleaner like this.
We have given the chicks two different choices for waterers and two different types of feeder. I think this discourages bullying.
If the area where you have your brooder is drafty, you could always wrap the brooder with either cardboard or plastic. Our room is small and snug, so we left the sides open for more ventilation.
So far we're very happy with our new brooder, and the chicks seem to be enjoying themselves in there, too. It is nice to give chicks plenty of room so they can run away from any trouble, and go cool off if they get too warm.