I am very carpentry challenged haveing absolutely no training/skills or experience prior to trying to build my girls their first coop. I had made a larger coop very similar to this one last January for my big girls. But this time I kept the plans and thought maybe they would help someone else who wanted to do it themselves. I decided to go this way after pricing ready made coops. I felt they were super expensive when compared to the type of materials they were made from (not saying all of them just what I saw personally). I even spoke with a man in my neighborhood that is a carpenter by trade about making a house for my peep. He said it would run about $300 for a basic 4x4 box....and he was using recycled non-matching supplies!.... so I went priced the materials and made up my mind to do it.
First I sat down, decided on a size and drew up some basic plans.

When cutting and attaching the boards for the box I measured from the outside to outside of boards to keep a uniform size of 4ft long and 2ft tall and 3ft wide. That way there is very little waste in materials. Use the 3" screws to put the frame work together.
Paint the frame.After dry measure and install the floor followed my the two long walls. (use the 1 1/4" screws on all the wall installs)
Now is the perfect time to put in the perch and the divider for the nesting box. Afterwards measure and attach the two remaining walls.
Paint the inside of the coop if that is your desire. I figured it would make it easier to clean.
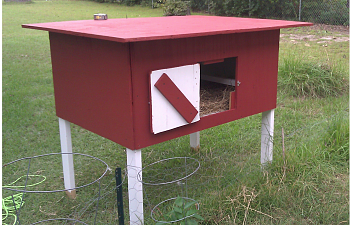
After all the sides are attached it is easy to flip it on it's side to cut out the doors and window. Note it is easier to draw the doors align the hinges on the drawing, screw them down and trace them out on the wood. Remove the hinges and cut that side of the door. Re-attach the hinges and finish cutting out the opening. Now you don't have to try and hold up the door and attach it at the same time. Use scrap blocks from the 2x4's to create back stops for the doors. After cutting out the window add the wire to the opening using the washers on the screws.
Attach the roof. Paint the outside of the coop.
Now to attach the trim. Using 1x4x8's First measure and cut the sides. I screw them up as I go so I can verify the fit. After two edges are attached measure the distance between them and continue.
After I cut all the pieces I take them down and paint them. Labeling them as I go so they go back in their exact position when dry.
I was concerned about heat gathering in the coop during the summer and found these roof vents at a mobile home supply store. First place them where you will want them, screw them down, and trace the outline. Remove the vents and drill several holes under the chimney, using silicone reattach the vents with the screws.
Touch up your paint and attach the ramp. Your girls will be happy with their new home!
Tools:
Drill
Drill bit/screw bit
Jig saw (to cut out the doors and window)
Skill saw
Measuring tape
Square
Supplies:
1 gal red barn paint
1 gal white barn paint
* I actually did 2 coops out of these cans
paint roller and tray
framing---
4-2x2x8 (legs and long sides)
2-2x4x6 (3'sides)
walls----
2-4x8x1/2" plywood
trim---
6-1x4x8
roost/ramp---
1-1x1x6 (roost)
1-1x6x6 (ramp)
1-1/2x1x6 (ramp cross pieces)
hardware---
6- hinges
3- hasps
2- small roof chimneys
1- box 1 1/4" screws
1- box 3" screws
10- washers to fit head of 1 1/4" screws
Small amount of chicken wire/hardware cloth
All together we spent about 200 on supplies. I think that is everything. Good luck on your venture....
edited
for ventilation,,,on the window side and on the opposite side there is about a 1.5" gap between the floor and the outer wall (due to construction method) to allow air to flow up and into the coop. This helps to with the air movement between the bottom of the house to the top vents.
Our little girls LOVE their house- they hardly ever want to leave it. Originally they were in a separate are but we moved them into the large pen, house and all. Now the big girls only want to lay in it but they still want to sleep in their house. We acquired 2 Muscovy ducks when we got rid of our rooster. The two ducks don't want to sleep in the duck house but walk up the ramp and sleep with the two bantam girls. So 2 little chickens and 2 full size ducks share this house with the nest using visitors.
First I sat down, decided on a size and drew up some basic plans.
When cutting and attaching the boards for the box I measured from the outside to outside of boards to keep a uniform size of 4ft long and 2ft tall and 3ft wide. That way there is very little waste in materials. Use the 3" screws to put the frame work together.
Paint the frame.After dry measure and install the floor followed my the two long walls. (use the 1 1/4" screws on all the wall installs)
Now is the perfect time to put in the perch and the divider for the nesting box. Afterwards measure and attach the two remaining walls.
Paint the inside of the coop if that is your desire. I figured it would make it easier to clean.
After all the sides are attached it is easy to flip it on it's side to cut out the doors and window. Note it is easier to draw the doors align the hinges on the drawing, screw them down and trace them out on the wood. Remove the hinges and cut that side of the door. Re-attach the hinges and finish cutting out the opening. Now you don't have to try and hold up the door and attach it at the same time. Use scrap blocks from the 2x4's to create back stops for the doors. After cutting out the window add the wire to the opening using the washers on the screws.
Attach the roof. Paint the outside of the coop.
Now to attach the trim. Using 1x4x8's First measure and cut the sides. I screw them up as I go so I can verify the fit. After two edges are attached measure the distance between them and continue.
After I cut all the pieces I take them down and paint them. Labeling them as I go so they go back in their exact position when dry.
I was concerned about heat gathering in the coop during the summer and found these roof vents at a mobile home supply store. First place them where you will want them, screw them down, and trace the outline. Remove the vents and drill several holes under the chimney, using silicone reattach the vents with the screws.
Touch up your paint and attach the ramp. Your girls will be happy with their new home!
Tools:
Drill
Drill bit/screw bit
Jig saw (to cut out the doors and window)
Skill saw
Measuring tape
Square
Supplies:
1 gal red barn paint
1 gal white barn paint
* I actually did 2 coops out of these cans
paint roller and tray
framing---
4-2x2x8 (legs and long sides)
2-2x4x6 (3'sides)
walls----
2-4x8x1/2" plywood
trim---
6-1x4x8
roost/ramp---
1-1x1x6 (roost)
1-1x6x6 (ramp)
1-1/2x1x6 (ramp cross pieces)
hardware---
6- hinges
3- hasps
2- small roof chimneys
1- box 1 1/4" screws
1- box 3" screws
10- washers to fit head of 1 1/4" screws
Small amount of chicken wire/hardware cloth
All together we spent about 200 on supplies. I think that is everything. Good luck on your venture....
edited
for ventilation,,,on the window side and on the opposite side there is about a 1.5" gap between the floor and the outer wall (due to construction method) to allow air to flow up and into the coop. This helps to with the air movement between the bottom of the house to the top vents.
Our little girls LOVE their house- they hardly ever want to leave it. Originally they were in a separate are but we moved them into the large pen, house and all. Now the big girls only want to lay in it but they still want to sleep in their house. We acquired 2 Muscovy ducks when we got rid of our rooster. The two ducks don't want to sleep in the duck house but walk up the ramp and sleep with the two bantam girls. So 2 little chickens and 2 full size ducks share this house with the nest using visitors.