August 14th, 2012
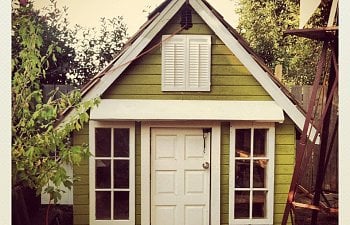
So we decided to get chicks a few weeks ago after months of discussing the idea, but had not really put too much thought yet into what kind of coop we wanted to make. I built the brooder box from two kitchen cabinets back to back, and the morning we went to pick up the first group of chicks, a quick glance at the free section provided this beauty:

It's a 10 year old 8ft x 8ft Wooden playhouse a Dad of one of the kids at this preschool a few towns away. The director decided that it was taking up too much space in the play yard, and listed it just ten minutes before I called about it. The thing weighs about a ton, and the woman was convinced that the only way to move it was in one piece using a crane. Well since I don't own a crane (hah!) we decided to take it apart and transport it that way. It took four of us most of a day to get it apart (with one terrifying moment when the roof came crashing down) and viola! Chicken coop in my backyard! Well... a pile of wood pieces that would hopefully be a coop anyways. After finding the playhouse, we decided that we wanted to build the whole thing from reclaimed materials, to save money and because we try to reuse most things we have anyways, so we took a trip down to The Rebuilding Center and bought about 500 linear feet of reclaimed wood (4x4, 2x4,, 2x6, 2x20, etc) for about $25. The most we've spent on this so far was a bit over $70 for welded wire fencing, post brackets, screws and some other small things that we had to buy new. We figured we'd have to buy those things new, as well as the plywood we'll need, but we plan on buying reclaimed materials or getting things on Craigslist. It's amazing the things people give away for free!!
So I am doing this pretty much by myself since I am off for the summer, and my husband works during the day, so the progress is fairly slow. The first thing I did was put the walls back together, and add a door and two small windows where the "window" holes were on the front.
Next I added 2x4 trim pieces to give the house more stability and make it look a little more finished in the end. The vertical ones will be cut to the proper length when we prepare to put the roof back on. Didn't want to cut them too short.
Then the other day after doing a lot of reading on this forum, I realized that my windows were not nearly sufficient enough in terms of allowing light into the coop, so I undid all the work I had done to put those small ones in and today added two windows I pulled from a 1920's house that was being demolished. The space to the left of the door is a bit smaller than to the right because the Dad who built the playhouse didn't center the door, and I was too lazy to build an entire new door frame just to eliminate a few inches difference. Being made from reclaimed materials, it's bound to be a little funky in places... it's part of the charm, right?
I have two more that will go on the east facing wall(to the right of the door) and one large one that may go on the back wall, but since there is only two feet of space between the back of the coop and the fence, I'm not sure if that window will be worth the effort. Luckily I am collecting windows for a Greenhouse Project (that my husband says I'm not allowed to start till the coop is finished), so I had them on hand already.
<--Only half the windows I have.. I know, I'm insane...
So now here we are today, front windows in, side windows ready to be put in, and still SO much work to be done. The 8ft x 14ft roofed run will be connected to the right side of the coop, and there is a pop door on that wall about two and a half feet up, so we'll have to build them a ramp. We plan to build a floor, two roost along the back wall with a giant poo board underneathe, and four nesting boxes on the west wall with outside access for easy egg collecting. There are two vents, a smaller one in the front (can be seen on the first picture of the playhouse at the peak of the roof), and a large one on the back wall in the same place. Will this be enough ventilation? We'll be putting gutters on both the coop and the roof of the run that drain into an old wine barrel for rainwater collection to water the hens with. It's going to be great when it's done I hope!\
August 15th, 2012
Well here is a better picture of the new side windows in the daylight: The windows are a litter taller than the front ones, and they had to sit lower on the wall due to the slope of the roof. It looks a little weird now, but I suspect it'll be fine when the roof is on.
Here are the floor joists before I put the plywood down and then a shot of where it stands right now with half the floor in. The joist wood is from a deck we ripped out so it's not pretty, but still solid. We have a ton of cork flooring that we got free that were going to lay down on top of the plywood for the floor of the coop. I have to get the floor down and the plywood walls in before I can put the roof on so we don't have to rip every sheet in half to get it through the door since our door is less than 4ft tall(only by a few inches too!) Though, I am thinking I can't put the nesting boxes on until I figure out where the slope of the roof ends so I don't make them too high, so one wall will have to wait...
We decided not to do the higher false floor because we realized that it would actually make cleaning the coop harder because we wouldn't be able to walk into it the whole way.
It's WAY too hot to keep working, so here it sits until it cools off this evening.
August 16th, 2012
Built the chicken ramp for the outside, re-framed the Pop door and added a new door and latch to it (reused the one of the tiny windows I had to redo earlier also!) after I gave up on doing the plywood for the floor by myself. I've actually never used plywood before, and I had no idea it is SO FLIPPEN HEAVY! I about died doing just the one piece I got done, and wasn't braving a second. Haha!
I have to seal the seam to the left of the pop door where I had to add a section of siding to the wall because I made the opening smaller. And keep in mind, this whole thing is going to be painted barn red and all the trim (and windows) will be white (our house is white with red trim) so it won't be as mismatched and ugly as it is now! Haha!
So today I got the rest of the subfloor put in, and am working on cutting lumber for the inside of the window frames so we can prepare the walls for plywood. It's WAY too hot to be out there right now though so I'm hiding inside where it's only 80 degrees instead of 100! Haha!
August 17th, 2012
Got the windows caulked(though a few spots need a bit more) and we're in the process of putting in the cork flooring. We're realizing as were putting the flooring in that stuff may soak into the seams between pieces, so we may end up getting sheet vinyl flooring and putting that in. The cork flooring we got free for a bathroom reno that never got used, so it's not a waste of money to just lay sheet flooring over it.
We're getting the last of the flooring put in as I type (the husbands home to help today! Yay!) and were beginning to put the wall boards in. It's going! Slowly, but it's going!
We had to add a makeshift roof since it's raining today (yesterday was 102 degrees and it's like 65 today and raining. The PNW is weird) and of course it stopped raining right after. *eyeroll*
August 18th, 2012
Here is the accomplishment of today. Two walls have paneling, and a third is mostly done. The floors are in, but we're planning on putting sheet vinyl over them to make them more waterproof.
And here is our dog Juno enjoying "her new house.."
Until we told her that it was FOR THE CHICKENS.
"Those chickens get their own HOUSE????? "
Hahahahahaha!
August 19th, 2012
We got the nest boxes built today, but since we could only work while the kiddo was napping, we didn't get them installed. Maybe that'll happen after it cools off this evening... It involves adding studs and cutting a hole in the siding where they will be fastened to the outside of the coop, so it's a project in itself!
It looks a little wonky from this angle, but it's mostly square. Each box is 12" Wide x 14" Deep and the dividers are 12" High though the slant of the lid makes them 12" at the smallest part up to 24" at the tallest part. We will cut one large opening to give access to all four boxes. We have 12 hens, so we figured 4 boxes was plenty. We actually got some free 2x4s that were previously used in a roof, and so they were cut at an angle on the ends, and this worked out perfectly and we didn't have to cut any angles! I hate cutting angles... The lid is an old cabinet door I found on the side of the road a couple weeks ago. We built the measurements of the box around this lid so it would fit.
August 26th, 2012
We have been slacking hard on the coop this last week, and then we went to a wedding yesterday, so today we FINALLY got some work done! Put the nest box on the wall after cutting out the whole for it, and framing it in. Then we added the finishing boards to that wall. Yes! It's coming along! Think I am going to finish the two windowed walls with the finishing boards tomorrow, and then I believe it'll be ready for the roof! We still havn't begun the run, but that is nest since we can't raise the roof until this weekend when we can get five or six people to help us. It's in two large pieces that weigh about 200lbs each, so it's going to be really hard.
Here is the pictures of the progress we made today!
The finished wall with the cutout for the nest boxes: We still need to make some sort of perch or ladder to them. Probably a perch...
The inside access to the next boxes: We have four boxes for 12 chickens.
The next box from the outside: It needs a board to trim off the top, but it started raining so we stopped.
And the egg collection door open(with our screws and drill inside, haha!)
Framed in the door:
And put in the roost and awning on the nest boxes!
Keep in mind this will all be painted white, so all the mismatched wood colors won't be there when it's done. I think it actually looks kinda neat with all the warm wood, but we need to seal t somehow since the wood we used is really soft cedar. We need to add the ramp up to the chicken door, and the roosts and the inside will be done and ready for the roof! We're having a roof raising party this Sunday and having bribing a few friends with free beer to help us.") Then after the roof is on and the vents at the peak have hardware cloth on them, I think we'll move the chicks out there (with the lamp of course.) They are between a week and almost four weeks old, so they definitely still need the light, but now that there are 13 of them, the brooder is a bit small for them to really get to run around. It's 4ftx4ft (and about a foot and a half high), so it's probably sufficient, but they would probably like more space, right?
Then after the roof is on and the vents at the peak have hardware cloth on them, I think we'll move the chicks out there (with the lamp of course.) They are between a week and almost four weeks old, so they definitely still need the light, but now that there are 13 of them, the brooder is a bit small for them to really get to run around. It's 4ftx4ft (and about a foot and a half high), so it's probably sufficient, but they would probably like more space, right?
August 29th, 2012
I got so much done today! Added the roosts, and the inside ramp for the chicken door. In the pictures, the roosts look really close, but they are further apart than they seem. There is about a foot height wise, and about 10 inches between them width wise. The bottom roost is 30 inches up and the top one is 42 inches up.
The inside of the coop is pretty much done save for a few small planks needed in spots on the walls and paint , and it's officially ready for the roof this weekend! Yay! We need to trim our huge pine trees before we can start building the run (since the branches we're going to lop off would fall right where the run is going), but hopefully I can convince my husband to do it tomorrow so I can start on the run.
My question though, (and I think I'll make a post about it to get some opinions) is do you think that the ramp to the chicken door is okay like this? It's really the only way I could build it without it being SUPER steep, or moving the entire chicken door, which would involve pretty much re-framing the entire wall. Which I obviously would rather not do....
September 2nd, 2012
We got the roof on today!!!!!!!!!
So the roof right now is the framing, panels and roofing paper, and I plan to search Craigslist for cedar shakes or asphalt roofing. Preferably shake... But we're on a really tight budget this month.Well... Most of the roof. We ended up having to rip off all the old weathered cedar shake because the roof panels were just too heavy for the five of us to get up and secure without it being dangerous. While I am quite sad about this, as I just LOVED that shake roof, it was for the best and I am getting over it.
Here we are (well, I'm taking the picture...) getting the first panel up and secured. We had to get some 2x4s to be temporary props until we could get the second panel up. Since it's from the playhouse and we wanted to reuse the same roof, we couldn't build it from trusses and plywood, so we had to do it this way.
Our little Supervisor:
AND it has a roof. It still needs the siding front and rear put on after we cut the vents larger, and all the side trim needs to be put back on after it's cut to size.
Once we have the roof finished and the siding on, were going to add plywood over the trusses on the inside to finish it off so the birds can't get up to the rafters since there are nails sticking out in random places from the shake we took off. After this is done, we're going to do a test run with the chicks to make sure it's secure enough for them not to get out (and nothing else to get in) and then we're going to move them all in! With the light of course. Our garage with electricity is right next to the coop so it'll be easy to run the light out to the coop for the next month or so.
I am beyond excited about today's progress. It's been waiting for the roof for over a week and now I can start to work on the finishing touches and then begin the run.
This is where we left off tonight.
And the side. The chicken door is a bit more covered by the slope of the roof than I had thought because I had the angle wrong in my plans for putting it back together. But it opens all the way and can still be hooked up on an I-hook along the edge of the roof to be kept open.
And this is what our yard looks like as of right now. We recently tore out an old deck that was placed diagonally in the yard that really took up most of the space in it, and just today our backyard went from a completely unusable place full of weeds, dead matter, half a torn out deck and all the wood we have scrapped to this.. We still have a long way to go, but it's mostly cleared out and is able to be walked around in without anyone getting hurt! Progress!! One step closer to a functional and dare I say beautiful, backyard. We're planning a patio with a fire pit, and grass.
September 3rd, 2012
Got the rear and peak panels on today. And deciding how to add a large vent on both peaks. The second picture below is what were thinking. Using plantation shutters backed with hardware cloth just in case. They can be closed down in really bad rain and still allow for ventilation when closed(But can be pushed fully open other times). Thinking the same thing on the back wall. The picture is of the vent just propped up with a scrap of siding to see how it looked. the random hole over the door is because the siding was cut oddly and was rotten. It'll be covered tomorrow.
September 7th, 2012
Got a bunch done today, but only really have a couple pictures of it. We put in the wire fencing on the ceiling to prepare for the plywood ceiling to go up this week, though I don't have a good picture of that. We really just put the wire up so soon so we could bring the girls out to see the coop for the day. It only has trusses and paper on the roof now, so they can't stay out there, we just wanted to let them see it for a bit while we changed the shavings in the brooder. I feel bad putting them back in the tiny brooder after they had so much fun in the coop!!
Here is what the front of the coop looks like now. We put an awning over the door and windows to give extra rain protection since the overhang of the roof in the front and back is a bit shorter than I would have liked. We installed the vent in the top, and the shutters can be open or closed depending on the weather. We are going to line the inside of the vent with hardware cloth just in case though, same goes for that tiny vent at the peak of the roof. There is a foot long six inch tall vent under the awning right over the door, a two foot wide by one foot tall triangle peak vent in the back, and six inch wide vents that run the entire length of the roof from front to back where the trusses sit on the walls. We made a 6.5 foot tall "ceiling" out of hardware cloth and will line the inside slants of the roof with plywood to keep the chickens out of the rafters. I still have to caulk around all the windows and doors and it is getting a real roof this weekend. We threw a huge tarp over the top for now and secured it down since its supposed to rain tomorrow. It also still needs the vinyl flooring before we can out the sand down. I'm not sure just yet how much sand we need to put in though. Maybe three inches?
And some pictures of the girls their first time in the coop. We just put a very thin layer of shaving down so they weren't slipping around, and at firs they huddled in the corner, but were running around and trying to fly really quick. They can't get up on the roosts yet, but they climbed up the rant and were having flying practice from the chicken door platform. Haha! It was so funny to see them so excited! Their brooder is a quarter of the size, so its big enough, but they just loved the huge space.
My husband Dan and daughter Basil and I sat in the coop with them for an hour feeding them treats and letting them climb on us. They were so comfortable with us when we were in there!
Our dog Takoda sat watching them through the window for a few hours. He loves them so much (and is super gentle with them), he just doesn't get why they get such a big house and he doesnt! Haha! He's the non-chicken eating of our two dogs.
And this one is Juno Fiona, the chicken eater. Well, she hasn't actually eaten a chicken... she just tries to play with them, since she is a puppy, and doesn't get that playing = eating when it comes to small animals. She's not allowed near the chicks.... And when we say were predator proofing the run, were really Juno proofing it, since she hops fences and digs under our sidewalk. She's not a bad dog, just a young one... She's learning.
And here is what the coop looks like this very moment... with a temporary tarp roof in case it does actually rain tomorrow.... Haha!
I just realized as I posted this picture that we never put the side trim back on the corners of the coop after we put the roof on. Haha! Adding that to my lists of things to do this week.... We're almost done with the coop itself. Then we start the run.
September 9th, 2012
So we started the project of putting on the roof today! After searching and searching, and finally considering buying new cedar shake, we finally found a listing on craigslist for enough free cedar fencing to make our own shake. It's pretty weathered, but still very solid wood, so I'm sure it will last us a good while. And it was free! Thank goodness, because we were going to need almost 3 squares of cedar shake for the roof(including the roof for the run) and the cheapest we found was $110 a square! Ugh. Was not looking forward to that expense.
It looks pretty much exactly like the old roof we tore off did, so I'm super happy about that. We got one side almost completely done, and are doing the other side and the ridge tomorrow. All we need inside is the ceiling plywood and the vents to be covered in wire and the girls can move in(with the heat lamp still)!
My husband Dan is dorky:
And he is afraid of heights, so this is BIG for him:
It still needs this pieces on the front and back ends to fill in the gaps where the overlap started, but we ran out of light, so that is happening tomorrow.
And one half of the roof on:
We put the shake on wonky and not lined up on purpose, we like that wacky DIY aesthetic.
September 12th, 2012
Our girls in the coop finally!
And I went back out to check on them, and of course they are all piled in the corner.
And it looks super creepy all lit up red in the dark backyard! Our back neighbors are probably wondering what the heck it is, since the big back vent is much higher than the top of our back fence and it's all lit up red. Haha!
September 17th, 2012
Picked up some $5 paint today off the oops paint rack at Lowes that is the perfect color for the coop! It was a magical moment.
It needs a second coat, and I need to keep working on the trim and such, but it's looking better already! I was REALLY hating that slate blue. Tomorrow this inside is getting painted, and then this weekend, we'll start (and hopefully finish) building the run, which will be white like the trim. Progress!!
And don't worry, the chicken ramp is gonna get treads. It's more of a slide right now... Haha!
And the girls are really in love with their new house! No roosting yet, but I expected that. But they havn't been sleeping in the nests either, so that is good.
September 19th, 2012
Well, I got the rest of the trim up, and gave the white another coat this morning. I still need to paint the back... since it faces the fence with barely enough room to walk behind, I am in no rush to paint back there. NO one sees it anyways! Haha! I am happy it's turning out like I (better than I) imagined, but I am sick of working on it, and wish there was a run fairy that would just come and magically make the run appear.... Ugh! I'm ready to be done!
Here is what it looks like as of right now:
And here is what my backyard looks like right now... Pretty little coop in an awful, dusty scrap and tool filled hazard area. Haha! Around the circle of bricks (which is going to be a fire pit) will be a red brick patio with brick walkways to the coop and a little play garden I am going to build for my daughter. To the right of the coop will be the run going all the way to the fence on the side and in the back, and everywhere else were planning on laying down sod. Eventually all this hard work will pay off, but for now, it's a pretty terrible place. Haha!
The windmill was in our front yard when we moved in, and we decided to paint it to match the coop and stick it over to the left of the coop in the flower bed that is over run right now. We painted it red, and then I got the green paint, so now I have to find some spray paint to match. Haha!
September 22nd, 2012
Today we built the beginnings of the chicken run! The whole left side will have a corrugated tin roof that slopes down to share a gutter with the coop roof (leading to a wine-barrel rainwater collection system), and the right side will have about three feet covered with the remaining 5 feet without a roof to allow for rainfall to reach the grass that will be planted in grazing frames at that end. The section in the front with the board straight across is the door frame (the board was just there to stabilize it while we set the concrete for the posts) and were using a cool old door we found in the attic of the garage(Seen below being used as a lean-to for sleeping by our lazy Aussie.)
We're covering the bottom two feet of the run with boards to keep predators(raccoons and such) from reaching in and grabbing a chicken. The fencing will go all the way up to the roof and there will also be fencing on the roof slant where there won't be an actual roof.
This somewhat gives an idea of how it will eventually all look. The left roof slant on the run will go all the way down and meet the coop roof slant. The patio in the foreground is also a work in progress, and we're picking up a yard of free sand tomorrow to fill the the cracks once we get the bricks all laid down. There will also be a brick pathway from the patio to the coop and another to the door of the run.
We're spending the day tomorrow working on it and will hopefully (fingers crossed!) have it done...
We're getting there!!
September 25th, 2012
Man, we got SO much done today! We didn't finish the entire thing like we had hoped, but it's SO close to done now! All we really have left to do is the rest of the fencing up to the top, to put on the roof (though it's a 1/4 of the way on, just not in these pictures), painting the entire run, and to get our rainwater collection barrel put in. Still sounds like a lot, but I think one more weekend will do it!
It has a door! We think we may paint it green like the coop...
The start of the fencing.
And once we got the bottom two feet of boards (instead of hardware cloth since we already had boards.)
The girls having tier first chance to explore thier new space. They LOVED it! They can't be in it without us there though since its not done..
September 27th, 2012
Eeeek, We are so close to done now! We still have to put the two feet of boars along the very back of the run, fix the peak metal flashing on the run roof and paint the whole run white, but it's officially predator proof! Oh, and we have to build the rainbarrel and put some weather stripping on the door of the coop and the egg collection hatch... but those can wait a bit so we can finish the patio. It will definitely be done this weekend!! YES! I am SO ready to be done!
All the bare wood on the run is going to be white. And the door is the same color as the coop, it just looks weird here because it was painted over a yellowish blue and needs another coat. And the paint was still wet.
The white thing sticking out between the coop and run is the gutter.. We haven't cut it to size yet. The rainbarrel will go on it's side right under it. We're also planning on building a little lean-to structure next to it to keep the metal garbage cans we keep the food and bedding in.
Hubs didn't take the white price stickers off the steel before we put it on the roof. Hahahaha!
And last but not least, the light I made from a mason jar and the top of a solar pathway stake light. Since it's solar, it turns on when it starts to get dark and stays on most of the night. It's not super bright, but it's really only so we can see the door latch to the run to go out after dark and shut the chickens up. We're going to put one on the coop door too, just haven't gotton around to it yet.
September 30th, 2012
We got the whole thing(or most of it, the back isn't getting painted since you cant see it anyway) and the rest of the boards up yesterday! The paint needs a second coat, and we have a couple more places we need to cover with fencing to make it TOTALLY predator proof, but the girls have officially been given the run, and they love it! And they are finally figuring out how to get out of the coop on thier own for the most part. The first few days we let them out there we had to bring each on up to the chicken door and let them out, but now 10 of the 13 are doing it on their own when we open the door in the morning. The other three will get it, I'm sure... Haha!
Here is what it looks like now. We're spending today doing the last few details and then cleaning up the yard for the company we're having over this afternoon.
I made a hand sanitizer jar for next to the door (down low so my three year old can use it by herself).
And here are the girls enjoying their new roost ladder in the run.
And each of the girls now.
Margo, a Gold Laced Wyandotte at 8 weeks.
Isadora, a Blue Andalusian at 7 weeks.
Harriet (the Spy!), a Silver Dorking, at 8 weeks.
Zoey Zebra, my daughter chicken, a Barred Rock at 7 weeks. She is the smallest of all of them though.
Cordelia, a Cuckoo Maran at 8 weeks.
Henrietta, a Buff Orpington, at 8 weeks.
Ginger, a Rhode Island Red at 7 weeks.
Sugar Magnolia, a Welsummer, at 5 weeks.
Stella Bella, a Silver Laced Wyandotte at 7 weeks.
Violet Brown, a Blue Laced Red Wyandotte at 7 weeks.
Petunia, a Speckled Sussex at 5 weeks.
Lucille, a Black Astralorpe at 6 weeks (and rather silly looking right now. haha!)
And I forgot to take a new picture of Nutmeg, my gimpy Ameracauna (my favorite!). With 13 it's hard to keep track! Haha!
October 1st, 2012
We got the patio put in today! I know this isn't really chicken related, but since I've been posting pictures of our backyard in it's terrible state, I thought I'd post one of an improvement.
And we moved the food and water out of the coop finally.
October 7th, 2012
We got most of the rain water barrel done yesterday! We need to paint it green, and this picture was taken before we sunk the terracotta pot down into the barrel. It's just sitting on top here. But it's functional! We got out the hose and make some test rain this morning.
It's still a work in progress, so we'll update this when we do things to it.
So we decided to get chicks a few weeks ago after months of discussing the idea, but had not really put too much thought yet into what kind of coop we wanted to make. I built the brooder box from two kitchen cabinets back to back, and the morning we went to pick up the first group of chicks, a quick glance at the free section provided this beauty:
It's a 10 year old 8ft x 8ft Wooden playhouse a Dad of one of the kids at this preschool a few towns away. The director decided that it was taking up too much space in the play yard, and listed it just ten minutes before I called about it. The thing weighs about a ton, and the woman was convinced that the only way to move it was in one piece using a crane. Well since I don't own a crane (hah!) we decided to take it apart and transport it that way. It took four of us most of a day to get it apart (with one terrifying moment when the roof came crashing down) and viola! Chicken coop in my backyard! Well... a pile of wood pieces that would hopefully be a coop anyways. After finding the playhouse, we decided that we wanted to build the whole thing from reclaimed materials, to save money and because we try to reuse most things we have anyways, so we took a trip down to The Rebuilding Center and bought about 500 linear feet of reclaimed wood (4x4, 2x4,, 2x6, 2x20, etc) for about $25. The most we've spent on this so far was a bit over $70 for welded wire fencing, post brackets, screws and some other small things that we had to buy new. We figured we'd have to buy those things new, as well as the plywood we'll need, but we plan on buying reclaimed materials or getting things on Craigslist. It's amazing the things people give away for free!!
So I am doing this pretty much by myself since I am off for the summer, and my husband works during the day, so the progress is fairly slow. The first thing I did was put the walls back together, and add a door and two small windows where the "window" holes were on the front.
Next I added 2x4 trim pieces to give the house more stability and make it look a little more finished in the end. The vertical ones will be cut to the proper length when we prepare to put the roof back on. Didn't want to cut them too short.
Then the other day after doing a lot of reading on this forum, I realized that my windows were not nearly sufficient enough in terms of allowing light into the coop, so I undid all the work I had done to put those small ones in and today added two windows I pulled from a 1920's house that was being demolished. The space to the left of the door is a bit smaller than to the right because the Dad who built the playhouse didn't center the door, and I was too lazy to build an entire new door frame just to eliminate a few inches difference. Being made from reclaimed materials, it's bound to be a little funky in places... it's part of the charm, right?
I have two more that will go on the east facing wall(to the right of the door) and one large one that may go on the back wall, but since there is only two feet of space between the back of the coop and the fence, I'm not sure if that window will be worth the effort. Luckily I am collecting windows for a Greenhouse Project (that my husband says I'm not allowed to start till the coop is finished), so I had them on hand already.
<--Only half the windows I have.. I know, I'm insane...
So now here we are today, front windows in, side windows ready to be put in, and still SO much work to be done. The 8ft x 14ft roofed run will be connected to the right side of the coop, and there is a pop door on that wall about two and a half feet up, so we'll have to build them a ramp. We plan to build a floor, two roost along the back wall with a giant poo board underneathe, and four nesting boxes on the west wall with outside access for easy egg collecting. There are two vents, a smaller one in the front (can be seen on the first picture of the playhouse at the peak of the roof), and a large one on the back wall in the same place. Will this be enough ventilation? We'll be putting gutters on both the coop and the roof of the run that drain into an old wine barrel for rainwater collection to water the hens with. It's going to be great when it's done I hope!\
August 15th, 2012
Well here is a better picture of the new side windows in the daylight: The windows are a litter taller than the front ones, and they had to sit lower on the wall due to the slope of the roof. It looks a little weird now, but I suspect it'll be fine when the roof is on.
Here are the floor joists before I put the plywood down and then a shot of where it stands right now with half the floor in. The joist wood is from a deck we ripped out so it's not pretty, but still solid. We have a ton of cork flooring that we got free that were going to lay down on top of the plywood for the floor of the coop. I have to get the floor down and the plywood walls in before I can put the roof on so we don't have to rip every sheet in half to get it through the door since our door is less than 4ft tall(only by a few inches too!) Though, I am thinking I can't put the nesting boxes on until I figure out where the slope of the roof ends so I don't make them too high, so one wall will have to wait...
We decided not to do the higher false floor because we realized that it would actually make cleaning the coop harder because we wouldn't be able to walk into it the whole way.
It's WAY too hot to keep working, so here it sits until it cools off this evening.
August 16th, 2012
Built the chicken ramp for the outside, re-framed the Pop door and added a new door and latch to it (reused the one of the tiny windows I had to redo earlier also!) after I gave up on doing the plywood for the floor by myself. I've actually never used plywood before, and I had no idea it is SO FLIPPEN HEAVY! I about died doing just the one piece I got done, and wasn't braving a second. Haha!
I have to seal the seam to the left of the pop door where I had to add a section of siding to the wall because I made the opening smaller. And keep in mind, this whole thing is going to be painted barn red and all the trim (and windows) will be white (our house is white with red trim) so it won't be as mismatched and ugly as it is now! Haha!
So today I got the rest of the subfloor put in, and am working on cutting lumber for the inside of the window frames so we can prepare the walls for plywood. It's WAY too hot to be out there right now though so I'm hiding inside where it's only 80 degrees instead of 100! Haha!
August 17th, 2012
Got the windows caulked(though a few spots need a bit more) and we're in the process of putting in the cork flooring. We're realizing as were putting the flooring in that stuff may soak into the seams between pieces, so we may end up getting sheet vinyl flooring and putting that in. The cork flooring we got free for a bathroom reno that never got used, so it's not a waste of money to just lay sheet flooring over it.
We're getting the last of the flooring put in as I type (the husbands home to help today! Yay!) and were beginning to put the wall boards in. It's going! Slowly, but it's going!
We had to add a makeshift roof since it's raining today (yesterday was 102 degrees and it's like 65 today and raining. The PNW is weird) and of course it stopped raining right after. *eyeroll*
August 18th, 2012
Here is the accomplishment of today. Two walls have paneling, and a third is mostly done. The floors are in, but we're planning on putting sheet vinyl over them to make them more waterproof.
And here is our dog Juno enjoying "her new house.."
Until we told her that it was FOR THE CHICKENS.
"Those chickens get their own HOUSE????? "
Hahahahahaha!
August 19th, 2012
We got the nest boxes built today, but since we could only work while the kiddo was napping, we didn't get them installed. Maybe that'll happen after it cools off this evening... It involves adding studs and cutting a hole in the siding where they will be fastened to the outside of the coop, so it's a project in itself!
It looks a little wonky from this angle, but it's mostly square. Each box is 12" Wide x 14" Deep and the dividers are 12" High though the slant of the lid makes them 12" at the smallest part up to 24" at the tallest part. We will cut one large opening to give access to all four boxes. We have 12 hens, so we figured 4 boxes was plenty. We actually got some free 2x4s that were previously used in a roof, and so they were cut at an angle on the ends, and this worked out perfectly and we didn't have to cut any angles! I hate cutting angles... The lid is an old cabinet door I found on the side of the road a couple weeks ago. We built the measurements of the box around this lid so it would fit.
August 26th, 2012
We have been slacking hard on the coop this last week, and then we went to a wedding yesterday, so today we FINALLY got some work done! Put the nest box on the wall after cutting out the whole for it, and framing it in. Then we added the finishing boards to that wall. Yes! It's coming along! Think I am going to finish the two windowed walls with the finishing boards tomorrow, and then I believe it'll be ready for the roof! We still havn't begun the run, but that is nest since we can't raise the roof until this weekend when we can get five or six people to help us. It's in two large pieces that weigh about 200lbs each, so it's going to be really hard.
Here is the pictures of the progress we made today!
The finished wall with the cutout for the nest boxes: We still need to make some sort of perch or ladder to them. Probably a perch...
The inside access to the next boxes: We have four boxes for 12 chickens.
The next box from the outside: It needs a board to trim off the top, but it started raining so we stopped.
And the egg collection door open(with our screws and drill inside, haha!)
Framed in the door:
And put in the roost and awning on the nest boxes!
Keep in mind this will all be painted white, so all the mismatched wood colors won't be there when it's done. I think it actually looks kinda neat with all the warm wood, but we need to seal t somehow since the wood we used is really soft cedar. We need to add the ramp up to the chicken door, and the roosts and the inside will be done and ready for the roof! We're having a roof raising party this Sunday and having bribing a few friends with free beer to help us.
Then after the roof is on and the vents at the peak have hardware cloth on them, I think we'll move the chicks out there (with the lamp of course.) They are between a week and almost four weeks old, so they definitely still need the light, but now that there are 13 of them, the brooder is a bit small for them to really get to run around. It's 4ftx4ft (and about a foot and a half high), so it's probably sufficient, but they would probably like more space, right?August 29th, 2012
I got so much done today! Added the roosts, and the inside ramp for the chicken door. In the pictures, the roosts look really close, but they are further apart than they seem. There is about a foot height wise, and about 10 inches between them width wise. The bottom roost is 30 inches up and the top one is 42 inches up.
The inside of the coop is pretty much done save for a few small planks needed in spots on the walls and paint , and it's officially ready for the roof this weekend! Yay! We need to trim our huge pine trees before we can start building the run (since the branches we're going to lop off would fall right where the run is going), but hopefully I can convince my husband to do it tomorrow so I can start on the run.
My question though, (and I think I'll make a post about it to get some opinions) is do you think that the ramp to the chicken door is okay like this? It's really the only way I could build it without it being SUPER steep, or moving the entire chicken door, which would involve pretty much re-framing the entire wall. Which I obviously would rather not do....
September 2nd, 2012
We got the roof on today!!!!!!!!!
So the roof right now is the framing, panels and roofing paper, and I plan to search Craigslist for cedar shakes or asphalt roofing. Preferably shake... But we're on a really tight budget this month.Well... Most of the roof. We ended up having to rip off all the old weathered cedar shake because the roof panels were just too heavy for the five of us to get up and secure without it being dangerous. While I am quite sad about this, as I just LOVED that shake roof, it was for the best and I am getting over it.Here we are (well, I'm taking the picture...) getting the first panel up and secured. We had to get some 2x4s to be temporary props until we could get the second panel up. Since it's from the playhouse and we wanted to reuse the same roof, we couldn't build it from trusses and plywood, so we had to do it this way.
Our little Supervisor:
AND it has a roof. It still needs the siding front and rear put on after we cut the vents larger, and all the side trim needs to be put back on after it's cut to size.
Once we have the roof finished and the siding on, were going to add plywood over the trusses on the inside to finish it off so the birds can't get up to the rafters since there are nails sticking out in random places from the shake we took off. After this is done, we're going to do a test run with the chicks to make sure it's secure enough for them not to get out (and nothing else to get in) and then we're going to move them all in! With the light of course. Our garage with electricity is right next to the coop so it'll be easy to run the light out to the coop for the next month or so.
I am beyond excited about today's progress. It's been waiting for the roof for over a week and now I can start to work on the finishing touches and then begin the run.
This is where we left off tonight.
And the side. The chicken door is a bit more covered by the slope of the roof than I had thought because I had the angle wrong in my plans for putting it back together. But it opens all the way and can still be hooked up on an I-hook along the edge of the roof to be kept open.
And this is what our yard looks like as of right now. We recently tore out an old deck that was placed diagonally in the yard that really took up most of the space in it, and just today our backyard went from a completely unusable place full of weeds, dead matter, half a torn out deck and all the wood we have scrapped to this.. We still have a long way to go, but it's mostly cleared out and is able to be walked around in without anyone getting hurt! Progress!! One step closer to a functional and dare I say beautiful, backyard. We're planning a patio with a fire pit, and grass.
September 3rd, 2012
Got the rear and peak panels on today. And deciding how to add a large vent on both peaks. The second picture below is what were thinking. Using plantation shutters backed with hardware cloth just in case. They can be closed down in really bad rain and still allow for ventilation when closed(But can be pushed fully open other times). Thinking the same thing on the back wall. The picture is of the vent just propped up with a scrap of siding to see how it looked. the random hole over the door is because the siding was cut oddly and was rotten. It'll be covered tomorrow.
September 7th, 2012
Got a bunch done today, but only really have a couple pictures of it. We put in the wire fencing on the ceiling to prepare for the plywood ceiling to go up this week, though I don't have a good picture of that. We really just put the wire up so soon so we could bring the girls out to see the coop for the day. It only has trusses and paper on the roof now, so they can't stay out there, we just wanted to let them see it for a bit while we changed the shavings in the brooder. I feel bad putting them back in the tiny brooder after they had so much fun in the coop!!
Here is what the front of the coop looks like now. We put an awning over the door and windows to give extra rain protection since the overhang of the roof in the front and back is a bit shorter than I would have liked. We installed the vent in the top, and the shutters can be open or closed depending on the weather. We are going to line the inside of the vent with hardware cloth just in case though, same goes for that tiny vent at the peak of the roof. There is a foot long six inch tall vent under the awning right over the door, a two foot wide by one foot tall triangle peak vent in the back, and six inch wide vents that run the entire length of the roof from front to back where the trusses sit on the walls. We made a 6.5 foot tall "ceiling" out of hardware cloth and will line the inside slants of the roof with plywood to keep the chickens out of the rafters. I still have to caulk around all the windows and doors and it is getting a real roof this weekend. We threw a huge tarp over the top for now and secured it down since its supposed to rain tomorrow. It also still needs the vinyl flooring before we can out the sand down. I'm not sure just yet how much sand we need to put in though. Maybe three inches?
And some pictures of the girls their first time in the coop. We just put a very thin layer of shaving down so they weren't slipping around, and at firs they huddled in the corner, but were running around and trying to fly really quick. They can't get up on the roosts yet, but they climbed up the rant and were having flying practice from the chicken door platform. Haha! It was so funny to see them so excited! Their brooder is a quarter of the size, so its big enough, but they just loved the huge space.
My husband Dan and daughter Basil and I sat in the coop with them for an hour feeding them treats and letting them climb on us. They were so comfortable with us when we were in there!
Our dog Takoda sat watching them through the window for a few hours. He loves them so much (and is super gentle with them), he just doesn't get why they get such a big house and he doesnt! Haha! He's the non-chicken eating of our two dogs.
And this one is Juno Fiona, the chicken eater. Well, she hasn't actually eaten a chicken... she just tries to play with them, since she is a puppy, and doesn't get that playing = eating when it comes to small animals. She's not allowed near the chicks.... And when we say were predator proofing the run, were really Juno proofing it, since she hops fences and digs under our sidewalk. She's not a bad dog, just a young one... She's learning.
And here is what the coop looks like this very moment... with a temporary tarp roof in case it does actually rain tomorrow.... Haha!
I just realized as I posted this picture that we never put the side trim back on the corners of the coop after we put the roof on. Haha! Adding that to my lists of things to do this week.... We're almost done with the coop itself. Then we start the run.
September 9th, 2012
So we started the project of putting on the roof today! After searching and searching, and finally considering buying new cedar shake, we finally found a listing on craigslist for enough free cedar fencing to make our own shake. It's pretty weathered, but still very solid wood, so I'm sure it will last us a good while. And it was free! Thank goodness, because we were going to need almost 3 squares of cedar shake for the roof(including the roof for the run) and the cheapest we found was $110 a square! Ugh. Was not looking forward to that expense.
It looks pretty much exactly like the old roof we tore off did, so I'm super happy about that. We got one side almost completely done, and are doing the other side and the ridge tomorrow. All we need inside is the ceiling plywood and the vents to be covered in wire and the girls can move in(with the heat lamp still)!
My husband Dan is dorky:
And he is afraid of heights, so this is BIG for him:
It still needs this pieces on the front and back ends to fill in the gaps where the overlap started, but we ran out of light, so that is happening tomorrow.
And one half of the roof on:
We put the shake on wonky and not lined up on purpose, we like that wacky DIY aesthetic.
September 12th, 2012
Our girls in the coop finally!
And I went back out to check on them, and of course they are all piled in the corner.
And it looks super creepy all lit up red in the dark backyard! Our back neighbors are probably wondering what the heck it is, since the big back vent is much higher than the top of our back fence and it's all lit up red. Haha!
September 17th, 2012
Picked up some $5 paint today off the oops paint rack at Lowes that is the perfect color for the coop! It was a magical moment.
It needs a second coat, and I need to keep working on the trim and such, but it's looking better already! I was REALLY hating that slate blue. Tomorrow this inside is getting painted, and then this weekend, we'll start (and hopefully finish) building the run, which will be white like the trim. Progress!!
And don't worry, the chicken ramp is gonna get treads. It's more of a slide right now... Haha!
And the girls are really in love with their new house! No roosting yet, but I expected that. But they havn't been sleeping in the nests either, so that is good.
September 19th, 2012
Well, I got the rest of the trim up, and gave the white another coat this morning. I still need to paint the back... since it faces the fence with barely enough room to walk behind, I am in no rush to paint back there. NO one sees it anyways! Haha! I am happy it's turning out like I (better than I) imagined, but I am sick of working on it, and wish there was a run fairy that would just come and magically make the run appear.... Ugh! I'm ready to be done!
Here is what it looks like as of right now:
And here is what my backyard looks like right now... Pretty little coop in an awful, dusty scrap and tool filled hazard area. Haha! Around the circle of bricks (which is going to be a fire pit) will be a red brick patio with brick walkways to the coop and a little play garden I am going to build for my daughter. To the right of the coop will be the run going all the way to the fence on the side and in the back, and everywhere else were planning on laying down sod. Eventually all this hard work will pay off, but for now, it's a pretty terrible place. Haha!
The windmill was in our front yard when we moved in, and we decided to paint it to match the coop and stick it over to the left of the coop in the flower bed that is over run right now. We painted it red, and then I got the green paint, so now I have to find some spray paint to match. Haha!
September 22nd, 2012
Today we built the beginnings of the chicken run! The whole left side will have a corrugated tin roof that slopes down to share a gutter with the coop roof (leading to a wine-barrel rainwater collection system), and the right side will have about three feet covered with the remaining 5 feet without a roof to allow for rainfall to reach the grass that will be planted in grazing frames at that end. The section in the front with the board straight across is the door frame (the board was just there to stabilize it while we set the concrete for the posts) and were using a cool old door we found in the attic of the garage(Seen below being used as a lean-to for sleeping by our lazy Aussie.)
We're covering the bottom two feet of the run with boards to keep predators(raccoons and such) from reaching in and grabbing a chicken. The fencing will go all the way up to the roof and there will also be fencing on the roof slant where there won't be an actual roof.
This somewhat gives an idea of how it will eventually all look. The left roof slant on the run will go all the way down and meet the coop roof slant. The patio in the foreground is also a work in progress, and we're picking up a yard of free sand tomorrow to fill the the cracks once we get the bricks all laid down. There will also be a brick pathway from the patio to the coop and another to the door of the run.
We're spending the day tomorrow working on it and will hopefully (fingers crossed!) have it done...
We're getting there!!
September 25th, 2012
Man, we got SO much done today! We didn't finish the entire thing like we had hoped, but it's SO close to done now! All we really have left to do is the rest of the fencing up to the top, to put on the roof (though it's a 1/4 of the way on, just not in these pictures), painting the entire run, and to get our rainwater collection barrel put in. Still sounds like a lot, but I think one more weekend will do it!
It has a door! We think we may paint it green like the coop...
The start of the fencing.
And once we got the bottom two feet of boards (instead of hardware cloth since we already had boards.)
The girls having tier first chance to explore thier new space. They LOVED it! They can't be in it without us there though since its not done..
September 27th, 2012
Eeeek, We are so close to done now! We still have to put the two feet of boars along the very back of the run, fix the peak metal flashing on the run roof and paint the whole run white, but it's officially predator proof! Oh, and we have to build the rainbarrel and put some weather stripping on the door of the coop and the egg collection hatch... but those can wait a bit so we can finish the patio. It will definitely be done this weekend!! YES! I am SO ready to be done!
All the bare wood on the run is going to be white. And the door is the same color as the coop, it just looks weird here because it was painted over a yellowish blue and needs another coat. And the paint was still wet.
The white thing sticking out between the coop and run is the gutter.. We haven't cut it to size yet. The rainbarrel will go on it's side right under it. We're also planning on building a little lean-to structure next to it to keep the metal garbage cans we keep the food and bedding in.
Hubs didn't take the white price stickers off the steel before we put it on the roof. Hahahaha!
And last but not least, the light I made from a mason jar and the top of a solar pathway stake light. Since it's solar, it turns on when it starts to get dark and stays on most of the night. It's not super bright, but it's really only so we can see the door latch to the run to go out after dark and shut the chickens up. We're going to put one on the coop door too, just haven't gotton around to it yet.
September 30th, 2012
We got the whole thing(or most of it, the back isn't getting painted since you cant see it anyway) and the rest of the boards up yesterday! The paint needs a second coat, and we have a couple more places we need to cover with fencing to make it TOTALLY predator proof, but the girls have officially been given the run, and they love it! And they are finally figuring out how to get out of the coop on thier own for the most part. The first few days we let them out there we had to bring each on up to the chicken door and let them out, but now 10 of the 13 are doing it on their own when we open the door in the morning. The other three will get it, I'm sure... Haha!
Here is what it looks like now. We're spending today doing the last few details and then cleaning up the yard for the company we're having over this afternoon.
I made a hand sanitizer jar for next to the door (down low so my three year old can use it by herself).
And here are the girls enjoying their new roost ladder in the run.
And each of the girls now.
Margo, a Gold Laced Wyandotte at 8 weeks.
Isadora, a Blue Andalusian at 7 weeks.
Harriet (the Spy!), a Silver Dorking, at 8 weeks.
Zoey Zebra, my daughter chicken, a Barred Rock at 7 weeks. She is the smallest of all of them though.
Cordelia, a Cuckoo Maran at 8 weeks.
Henrietta, a Buff Orpington, at 8 weeks.
Ginger, a Rhode Island Red at 7 weeks.
Sugar Magnolia, a Welsummer, at 5 weeks.
Stella Bella, a Silver Laced Wyandotte at 7 weeks.
Violet Brown, a Blue Laced Red Wyandotte at 7 weeks.
Petunia, a Speckled Sussex at 5 weeks.
Lucille, a Black Astralorpe at 6 weeks (and rather silly looking right now. haha!)
And I forgot to take a new picture of Nutmeg, my gimpy Ameracauna (my favorite!). With 13 it's hard to keep track! Haha!
October 1st, 2012
We got the patio put in today! I know this isn't really chicken related, but since I've been posting pictures of our backyard in it's terrible state, I thought I'd post one of an improvement.
And we moved the food and water out of the coop finally.
October 7th, 2012
We got most of the rain water barrel done yesterday! We need to paint it green, and this picture was taken before we sunk the terracotta pot down into the barrel. It's just sitting on top here. But it's functional! We got out the hose and make some test rain this morning.
It's still a work in progress, so we'll update this when we do things to it.