I first acquired two young pullets in April 2010 while in the process of remodeling our kitchen. The first coop for Lucy and Ethel was a small base cabinet demo'ed from the old kitchen that my son and I hobbled together in an afternoon to accommodate the new girls. They happily lived in it for almost a year, with a few small upgrades along the way. The urge to expand my flock demanded a newer, bigger coop, which was again hobbled together from a larger base cabinet and scraps of wood from other projects. I thought the two coops would easily house all 6 girls, but my older girls decided they liked the new digs and moved into the larger coop, which has become way too crowded, especially now with a rooster in the mix.
So with the demolition of an old fence, I now had access to more salvaged wood with which I could build a "real" chicken coop. I researched for several months, spending hours looking at all the beautiful chicken coops on this site. My primary goal was to find a design that would be easy enough for someone like me (no carpentry skills) and allow use of the recycled materials that I had on hand. I finally settled on a design that is a hybrid of the Purina Hen House (here), and a free chicken coop plan by the Barn Geek (here).
I also desperately needed to build a fully enclosed run that would not only protect my hens, but also protect my garden from them! So far,
I roughed out a sketch on paper, which is a huge accomplishment as I normally just dive in and see what happens. I have made modifications along the way as materials and skills required; and spontaneity is more my style anyway.
Piles of reclaimed wood from fencing demolition. Much was rotted and had to be tossed unfortunately.

Way too much time was spent sorting, trimming and prepping the salvaged posts and 2x4s.
Initial framing of the basic design is completed. Old red cabinet coops and my girls in the background watching the building.
The new coop is spec'd out as 4' x 6', free-standing and moveable (if it doesn't get too heavy). We'll see how it progresses.
Now 4 days into this project, I realize how little expertise I have in the way of building skills. However, I am hoping my enthusiasm will overcome the lack of knowledge. So day 5, I have made little progress by the pictures, but I feel good about the direction we are going. The frame has been moved to the coop location in our yard. We needed to move the coop before it got to heavy to transport. So the rest of the build will be in this location. More shade here than our original site for the chickens. I spoke with the neighbors on the other side of the fence, and they have no worries, they actually love the sound of chickens and roosters in the mornings.
After moving the framework and installing the floor, I realized that some angle braces in the corners would have added needed stability. So I spent half a day crawling under the coop (in the dirt) to install some triangular wood braces. I also worried that my recycled flooring materials would not be sturdy enough to support the external nest boxes in my original plans. So I cut of the extended flooring and converted my plans to an internal nest box with external access.
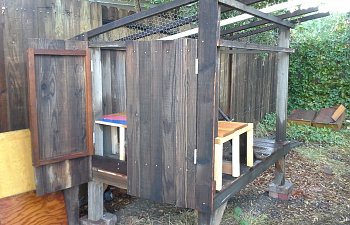
Internal next boxes framed in. I found some left over shelving from the old kitchen cabinets to use as a 2nd floor kitchen area. This is where my girls will come for food and water. Planning to build doors to access both the kitchen and nesting areas from the outside. Now I just need to learn how to build doors out of old recycled fence materials.
I got the doors built and installed, though many adjustments to make to get a good fit. Rain this last week has slowed down the progress. And the progress is much slower than I realized. This "measure twice, cut once" is actually more like "measure twice, cut once, re-measure, cut again and again, and sometimes start all over again."
So with the demolition of an old fence, I now had access to more salvaged wood with which I could build a "real" chicken coop. I researched for several months, spending hours looking at all the beautiful chicken coops on this site. My primary goal was to find a design that would be easy enough for someone like me (no carpentry skills) and allow use of the recycled materials that I had on hand. I finally settled on a design that is a hybrid of the Purina Hen House (here), and a free chicken coop plan by the Barn Geek (here).
I also desperately needed to build a fully enclosed run that would not only protect my hens, but also protect my garden from them! So far,
I roughed out a sketch on paper, which is a huge accomplishment as I normally just dive in and see what happens. I have made modifications along the way as materials and skills required; and spontaneity is more my style anyway.
Piles of reclaimed wood from fencing demolition. Much was rotted and had to be tossed unfortunately.
Way too much time was spent sorting, trimming and prepping the salvaged posts and 2x4s.
Initial framing of the basic design is completed. Old red cabinet coops and my girls in the background watching the building.
The new coop is spec'd out as 4' x 6', free-standing and moveable (if it doesn't get too heavy). We'll see how it progresses.
Now 4 days into this project, I realize how little expertise I have in the way of building skills. However, I am hoping my enthusiasm will overcome the lack of knowledge. So day 5, I have made little progress by the pictures, but I feel good about the direction we are going. The frame has been moved to the coop location in our yard. We needed to move the coop before it got to heavy to transport. So the rest of the build will be in this location. More shade here than our original site for the chickens. I spoke with the neighbors on the other side of the fence, and they have no worries, they actually love the sound of chickens and roosters in the mornings.
After moving the framework and installing the floor, I realized that some angle braces in the corners would have added needed stability. So I spent half a day crawling under the coop (in the dirt) to install some triangular wood braces. I also worried that my recycled flooring materials would not be sturdy enough to support the external nest boxes in my original plans. So I cut of the extended flooring and converted my plans to an internal nest box with external access.
Internal next boxes framed in. I found some left over shelving from the old kitchen cabinets to use as a 2nd floor kitchen area. This is where my girls will come for food and water. Planning to build doors to access both the kitchen and nesting areas from the outside. Now I just need to learn how to build doors out of old recycled fence materials.
I got the doors built and installed, though many adjustments to make to get a good fit. Rain this last week has slowed down the progress. And the progress is much slower than I realized. This "measure twice, cut once" is actually more like "measure twice, cut once, re-measure, cut again and again, and sometimes start all over again."