I may as well make my 1st entry into BYC a good one.
This was the biggest construction project I had ever done since my high school woodworking class, so I was pretty proud of the end result. Basically, I got the chicken coop plans from a link in a YouTube video description.
I was originally gonna stick to THE PLAN. since I didn't think I was that creative, but ended up making some modifications along the way.The panel saw at Home Depot was out of commission, so I couldn't buy all the treated wood at once; my truck's bed isn't that big.

Here would be the permanent home of my chicks' permanent home:
The dirt is actually on a raised area. See the concrete walkway on the left side? That's about a 4 foot drop, so I had to make sure I had relatively easy access. THE PLAN. was for a 40-inch by 12-foot coop, but since we're only allowed 2 chickens in Honolulu, I figured an 8-foot long coop would be plenty of room for my egg-layers to run around. BTW, alcohol + power tools = fun...
I started off building the frame. I didn't wanna deviate from THE PLAN. at first, so it didn't dawn on me there was more than one direction to drill in a screw...
Here was the finished frame. If I had to do it again, I would've gotten myself a framing square, 'cause I spent a good 20 minutes trying to make sure my entry door (left side on the pic below) was square only to find out the frame itself was a bit off. I also learned along the way it was better to drill pilot holes for the screws to help the frame be more square.
Oh, you know the measurements THE PLAN. gave for the roof trusses? LIES! ALL LIES..!
Here's where I first deviated from the THE PLAN. The roof was supposed to be the whole length of the coop, but I thought that was a waste of wood & I had learned from this site chickens love sunshine, so in my drunken state, I said to nobody in particular, "screw you, THE PLAN., I'm gonna do my own thing..!" THE PLAN. also called for a solid wood floor, but I wanted an easier time cleaning up chicken poop, so I decided on a hardware cloth floor & removable tray underneath. To serve as rails for the poop tray, I used the deformed roof trusses from the pic above & glued back the pieces which I cut off previously. Gotta love recycling...
THE PLAN. didn't show how to attach the nest box, so I had to figure it out on my own. Using scraps of wood, I built the surrounding frame piece by piece,
...and the result was pretty good.
For the color scheme, the frame was supposed to be a dark green while the coop itself would be white with a concrete-like texture. I guess I wanted it to be like an egg. If I had to do it again, I definitely would've used regular can paint instead of spray paint, which probably cost me over $50. A single can of white textured spray paint was almost $7 & I must have used at least 5 cans. I swear, I should own stock in Home Depot...
My vision was coming alive! Here's the hardware cloth bottom of the coop. For the "back" of the coop, I just used scrap wood & put some hardware cloth at the top to give the chicks more ventilation. The sides of the nest box were connected to some 2x3's. The 2x3's were connected to the makeshift frame. The makeshift frame was connected to the main frame. The main frame was connected to the hip bone...
After stapling on some hardware cloth on the "back" of the coop, it was time to take it to the backyard. At this point, the project was way too heavy for me to lift alone, so I had 2 friends help me take it to its final destination. Oh, speaking of paranormal, check out the 2 spirit orbs come to visit me..! Just kidding. Seriously, just kidding. I hope those aren't spirit orbs. That would be freaky, since my bedroom is right there. Anyway...
It was time to put up the chicken house walls,
...and the chicken house roof. This was the coop's 1st test at the elements 'cause it started to rain really hard right after I put the roof on. After it stopped raining, I put caulking on the inside of the nest box. I didn't know if the hens were gonna start pecking at the caulking, so I figured I'd be on the safe side & use aquarium-safe caulking. The tube I bought had just enough for the inside & outside of the nest box itself. I had to make another trip to Home Depot (HD, NYSE...) for some silicone caulking for the rest of the chicken house.
Another deviation. THE PLAN. called for a solid door to the chicken house, but I wanted the options of ventilation & viewing, so I made 2 doors: 1 with a hardware cloth screen & 1 solid one for wind & rain. That unpainted 2x3 on the bottom of the door is part of the rail system for the solid sliding door.
More deviations from THE PLAN. LIke I mentioned before, I read that chickens like sunshine, so I put hardware cloth on the top of the coop. But then, I started brainstorming about ways I could have a sliding door for the ramp entrance too & have it accessible. A drop-down door pulley system was a no-go since the roof would get in the way. I thought about attaching a wooden dowel with a hinge so I could just push/pull the door sideways. I ended up making a "hood" that I could lift up & just access the ramp door.
Here's the inside of the chicken house. I made the roost/perch 5" wide since I learned about the idea that chickens are not really perching birds since they don't have the grip that other birds do. From the chicks' perspective, that roost was super high, so I made a ramp going up, but then I figured they would need a platform to get to the roost, so I made that too. Hopefully 5" is all the width they need for the platform when they become full-grown hens.
You can't really see it well, but I put glossy vinyl tiles on the poop tray to help with cleaning. As I'm typing this, I know some of the tiles are not sticking right, so I'll have to go back & put some contact cement I have laying around.
That $1 piece of wood I got from the scrap pile at Home Depot served me well as I made both ramps out of it. The bottom ramp naturally bends from its own weight, so I braced it from underneath with a couple of 2x3's. I used a little piece of 3/8" thick wood to hold the upper ramp in place; it's funny 'cause it looks like a welcome mat.
The screen door here is complete. I might have to go back & brace it 'cause I've discovered it's the coop's weakness against predators (neighborhood cats). I used 3/8" wood for it & it's only being held together by staples. In this picture, you can barely see the single window latch on the bottom of the door. I went back to Home Depot & bought another latch for it.
The clamps are for the "rail system" as the glue dries.
I was gonna use some leftover roof shingles for the roof of the coop, but I didn't for 2 reasons:
I'm thinking of installing some hinges on the roof so it'll be easier to get into the chicken house if I need to do some cleaning or adjusting.
In this bottom pic, there's only 1 window latch holding the main door secure, but the frame wasn't square so the door was twisting a little. I installed another window latch to make it more secure.
So after installing a few hooks, handles and latches and wrapping some zip ties around the hardware cloth along the bottom of the coop, I'm finally done with my project.
If I were to do it all over again:
Well, my chicks are happy.
This was the biggest construction project I had ever done since my high school woodworking class, so I was pretty proud of the end result. Basically, I got the chicken coop plans from a link in a YouTube video description.
I was originally gonna stick to THE PLAN. since I didn't think I was that creative, but ended up making some modifications along the way.The panel saw at Home Depot was out of commission, so I couldn't buy all the treated wood at once; my truck's bed isn't that big.
Here would be the permanent home of my chicks' permanent home:
The dirt is actually on a raised area. See the concrete walkway on the left side? That's about a 4 foot drop, so I had to make sure I had relatively easy access. THE PLAN. was for a 40-inch by 12-foot coop, but since we're only allowed 2 chickens in Honolulu, I figured an 8-foot long coop would be plenty of room for my egg-layers to run around. BTW, alcohol + power tools = fun...
I started off building the frame. I didn't wanna deviate from THE PLAN. at first, so it didn't dawn on me there was more than one direction to drill in a screw...
Here was the finished frame. If I had to do it again, I would've gotten myself a framing square, 'cause I spent a good 20 minutes trying to make sure my entry door (left side on the pic below) was square only to find out the frame itself was a bit off. I also learned along the way it was better to drill pilot holes for the screws to help the frame be more square.
Oh, you know the measurements THE PLAN. gave for the roof trusses? LIES! ALL LIES..!
Here's where I first deviated from the THE PLAN. The roof was supposed to be the whole length of the coop, but I thought that was a waste of wood & I had learned from this site chickens love sunshine, so in my drunken state, I said to nobody in particular, "screw you, THE PLAN., I'm gonna do my own thing..!" THE PLAN. also called for a solid wood floor, but I wanted an easier time cleaning up chicken poop, so I decided on a hardware cloth floor & removable tray underneath. To serve as rails for the poop tray, I used the deformed roof trusses from the pic above & glued back the pieces which I cut off previously. Gotta love recycling...
THE PLAN. didn't show how to attach the nest box, so I had to figure it out on my own. Using scraps of wood, I built the surrounding frame piece by piece,
...and the result was pretty good.
For the color scheme, the frame was supposed to be a dark green while the coop itself would be white with a concrete-like texture. I guess I wanted it to be like an egg. If I had to do it again, I definitely would've used regular can paint instead of spray paint, which probably cost me over $50. A single can of white textured spray paint was almost $7 & I must have used at least 5 cans. I swear, I should own stock in Home Depot...
My vision was coming alive! Here's the hardware cloth bottom of the coop. For the "back" of the coop, I just used scrap wood & put some hardware cloth at the top to give the chicks more ventilation. The sides of the nest box were connected to some 2x3's. The 2x3's were connected to the makeshift frame. The makeshift frame was connected to the main frame. The main frame was connected to the hip bone...
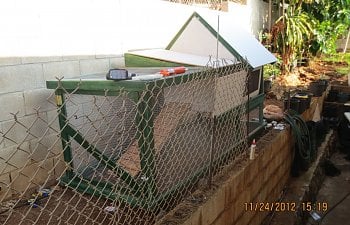
After stapling on some hardware cloth on the "back" of the coop, it was time to take it to the backyard. At this point, the project was way too heavy for me to lift alone, so I had 2 friends help me take it to its final destination. Oh, speaking of paranormal, check out the 2 spirit orbs come to visit me..! Just kidding. Seriously, just kidding. I hope those aren't spirit orbs. That would be freaky, since my bedroom is right there. Anyway...
It was time to put up the chicken house walls,
...and the chicken house roof. This was the coop's 1st test at the elements 'cause it started to rain really hard right after I put the roof on. After it stopped raining, I put caulking on the inside of the nest box. I didn't know if the hens were gonna start pecking at the caulking, so I figured I'd be on the safe side & use aquarium-safe caulking. The tube I bought had just enough for the inside & outside of the nest box itself. I had to make another trip to Home Depot (HD, NYSE...) for some silicone caulking for the rest of the chicken house.
Another deviation. THE PLAN. called for a solid door to the chicken house, but I wanted the options of ventilation & viewing, so I made 2 doors: 1 with a hardware cloth screen & 1 solid one for wind & rain. That unpainted 2x3 on the bottom of the door is part of the rail system for the solid sliding door.
More deviations from THE PLAN. LIke I mentioned before, I read that chickens like sunshine, so I put hardware cloth on the top of the coop. But then, I started brainstorming about ways I could have a sliding door for the ramp entrance too & have it accessible. A drop-down door pulley system was a no-go since the roof would get in the way. I thought about attaching a wooden dowel with a hinge so I could just push/pull the door sideways. I ended up making a "hood" that I could lift up & just access the ramp door.
Here's the inside of the chicken house. I made the roost/perch 5" wide since I learned about the idea that chickens are not really perching birds since they don't have the grip that other birds do. From the chicks' perspective, that roost was super high, so I made a ramp going up, but then I figured they would need a platform to get to the roost, so I made that too. Hopefully 5" is all the width they need for the platform when they become full-grown hens.
You can't really see it well, but I put glossy vinyl tiles on the poop tray to help with cleaning. As I'm typing this, I know some of the tiles are not sticking right, so I'll have to go back & put some contact cement I have laying around.
That $1 piece of wood I got from the scrap pile at Home Depot served me well as I made both ramps out of it. The bottom ramp naturally bends from its own weight, so I braced it from underneath with a couple of 2x3's. I used a little piece of 3/8" thick wood to hold the upper ramp in place; it's funny 'cause it looks like a welcome mat.
The screen door here is complete. I might have to go back & brace it 'cause I've discovered it's the coop's weakness against predators (neighborhood cats). I used 3/8" wood for it & it's only being held together by staples. In this picture, you can barely see the single window latch on the bottom of the door. I went back to Home Depot & bought another latch for it.
The clamps are for the "rail system" as the glue dries.
I was gonna use some leftover roof shingles for the roof of the coop, but I didn't for 2 reasons:
- they were gonna make the coop heavier than it already was
- I wanted a white roof & the shingles were green
I'm thinking of installing some hinges on the roof so it'll be easier to get into the chicken house if I need to do some cleaning or adjusting.
In this bottom pic, there's only 1 window latch holding the main door secure, but the frame wasn't square so the door was twisting a little. I installed another window latch to make it more secure.
So after installing a few hooks, handles and latches and wrapping some zip ties around the hardware cloth along the bottom of the coop, I'm finally done with my project.
If I were to do it all over again:
- I definitely would make it a lot taller so I wouldn't have to squat down to get inside
- I would make a predator-proof drainage system/foundation so the rats wouldn't be able to dig in & the rain waters wouldn't flood the run.
- more beer...
Well, my chicks are happy.