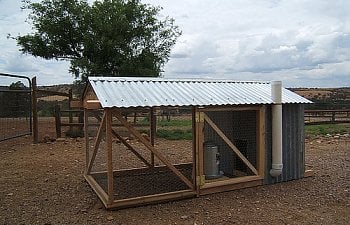
This is my 2nd attempt at a chicken tractor. the first one was OK, but needed a few changes. This is the first one I built for Bob:

A few changes that were needed, were the addition of a nest box, move the access door to the center, handles for easier moving, a place for the waterer, wider and shorter for fitting in the back of a pickup truck.
The new design has a 4 x 8 floor plan foot print, so it can be hauled in the back of my truck. The handles are part of the roof framing that extend past the roofing. Skids on the right side are the wall framing extended past to provide a place to attach some wheels.
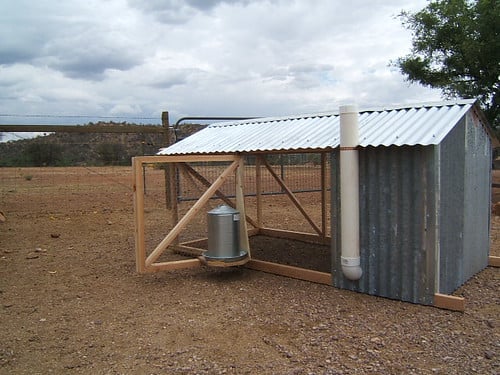
The door is in the center this time, so I can access the coop section, without crawling in from the end. There is a platform for the waterer on the door, so it is easy to get in and out of the run. A 36" piece of 4" plastic pipe, with two elbows on the bottom, is the feeder.
The nest box is made from 1/2" plywood and is removable without tools. This gives an easy access to the coop. The box is built to fit through the hole and drop down into place. The lid has no hinge to leak and locks the box in place with the notches at the top keeping it from being pushed in, or lifted up. It is secured to the box frame at the bottom end by a simple gate hook.
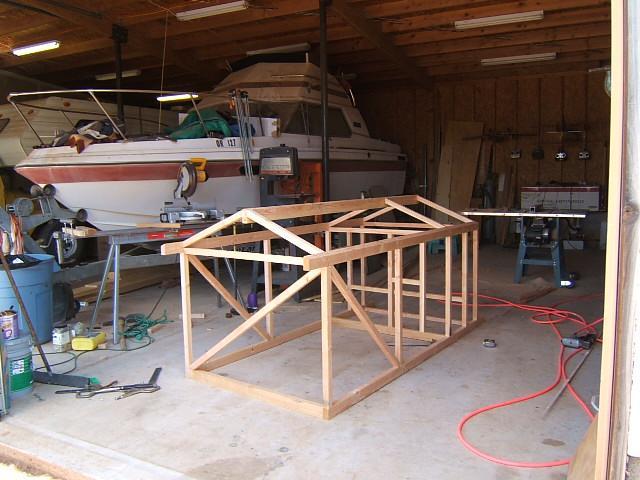
The framing is 2 x 3s for the tops and bottoms of the sidewalls (ripped from 2 x 6), 2 x 4 ridge with a 22 1/2 degree bevel for the 5/12 pitch roof and 2 x 2s for all other members (ripped from 2 x 4). I have a 1" crown stapler that was used for framing, side stapled the way RVs used to be built. 3"~ 3 1/2" deck screws would be a good substitute.
The side wall height was kept at 35", so the 3' wire (I used stucco wire - my bad) could by wrapped onto the top framing and be additionally secured with the roofing panels. The bottoms and end were stapled with a wide crown stapler and 1 x 2 strips attached over that. The siding is corrugated roofing removed from a remodel project.
WHAT DID IT ALL COST?
I always see projects people have done by salvaging, scrounging and stealing materials, without ever telling what it would cost to just run down to Home Depot, or wherever and buy the supplies.
I'm guilty too. This one cost me $70, including the $30 for a new waterer. I decided to figure what it would cost, if I had to go out and buy EVERYTHING. Sometimes, it's just not practical to spend days hunting down freebies. So, here is what it would take and what it would cost:
4 pieces of 10' corrugated roofing $50.00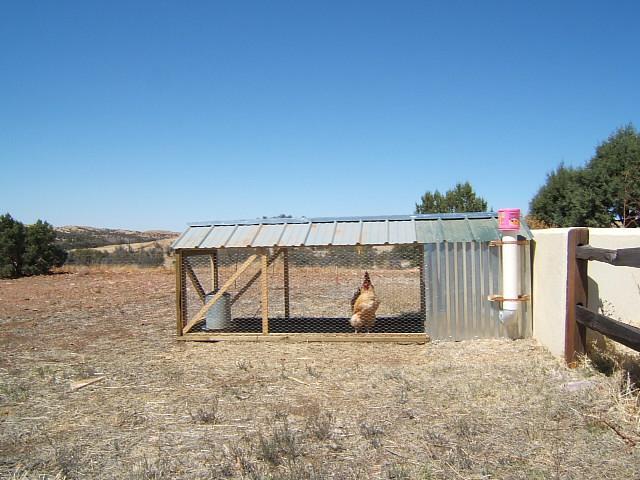
A few changes that were needed, were the addition of a nest box, move the access door to the center, handles for easier moving, a place for the waterer, wider and shorter for fitting in the back of a pickup truck.

The new design has a 4 x 8 floor plan foot print, so it can be hauled in the back of my truck. The handles are part of the roof framing that extend past the roofing. Skids on the right side are the wall framing extended past to provide a place to attach some wheels.
The door is in the center this time, so I can access the coop section, without crawling in from the end. There is a platform for the waterer on the door, so it is easy to get in and out of the run. A 36" piece of 4" plastic pipe, with two elbows on the bottom, is the feeder.


The nest box is made from 1/2" plywood and is removable without tools. This gives an easy access to the coop. The box is built to fit through the hole and drop down into place. The lid has no hinge to leak and locks the box in place with the notches at the top keeping it from being pushed in, or lifted up. It is secured to the box frame at the bottom end by a simple gate hook.
The framing is 2 x 3s for the tops and bottoms of the sidewalls (ripped from 2 x 6), 2 x 4 ridge with a 22 1/2 degree bevel for the 5/12 pitch roof and 2 x 2s for all other members (ripped from 2 x 4). I have a 1" crown stapler that was used for framing, side stapled the way RVs used to be built. 3"~ 3 1/2" deck screws would be a good substitute.

The side wall height was kept at 35", so the 3' wire (I used stucco wire - my bad) could by wrapped onto the top framing and be additionally secured with the roofing panels. The bottoms and end were stapled with a wide crown stapler and 1 x 2 strips attached over that. The siding is corrugated roofing removed from a remodel project.
WHAT DID IT ALL COST?
I always see projects people have done by salvaging, scrounging and stealing materials, without ever telling what it would cost to just run down to Home Depot, or wherever and buy the supplies.
I'm guilty too. This one cost me $70, including the $30 for a new waterer. I decided to figure what it would cost, if I had to go out and buy EVERYTHING. Sometimes, it's just not practical to spend days hunting down freebies. So, here is what it would take and what it would cost:
3 - 2 x 6 x 8' for framing $10.50
7 - 2 x 4 x 8' $17.50
4 - 1 x 2 x 8' wire cleats $3.20
1/2 sheet of 1/2" plywood $5.00 $10.00 if you have to buy a full sheet
Stucco netting - 16' @ .18 $3.00 $28.00 for a full roll (150')
1 piece of 4" x 4" flashing - ridge cap $8.00
1 piece metal corner trim $4.00
1 pair 3" x 3" door hinges $3.50
2 gate latches $2.00
misc. screws, nails, etc. $15.00 Will be some left over
3 feet of 4" PVC pipe @ .80 - feeder $2.40 $8.00 for a 10' piece
2 - 4" PVC elbows - feeder $5.00
1 - 4" PVC cap - feeder $1.50
3 gallon metal waterer $30.00
Total for everything would be $160.60. More, if you can't buy, or scrounge partial quantities of certain items. Less, if the places you shop have better prices. I think I have about 12 hours of time invested in this project. The next one would take less. I was doing as much thinking, as I was building on this one. There have been concerns about the metal tractor being too hot in the summertime. Bob's tractor has a painted metal roof and stays comfortable in the sun. I'm going to paint the roof and walls on the new coop with white roof coating. Here is the link to a Florida energy study showing the heat reflective properties of white metal roofs: http://www.metalroofing.com/v2/content/news/inthenews/inthenews_florida_cont.cfm