I've been lurking here on and off for some time collecting ideas and admiring all the hard work that everyone's put into their chicken coops. I finally have some space for chickens again, so I started designing them a home. Thought I'd give back to the community a bit. I'll try to add pictures and descriptions as I go through the build process.
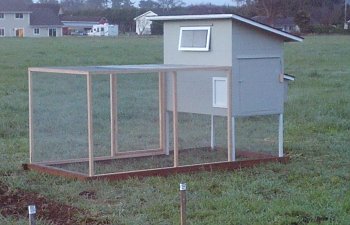
The basic coop is roughly 5 feet wide, 3 feet deep and 6 feet tall. The run is approximately 5 feet wide, 10 feet deep and 4 feet tall (only 2 foot tall under the coop).

(click any of the images for a larger view)
It took me few days to learn how to use Sketchup so I could model the design and have the measurements all planned out. I figure I could have just kind of made it up as I went along, but having the plans printed out to refer to saved me from making a lot of mistakes that would have wasted wood. I have the Sketchup plans if anyone wants them. I tried to attach them here, but I don't have permission to do so (how do I get permission?)
The basic frame is made entirely out of 2in x 2in x 8ft lumber. Since the exterior of the coop will be covered in 3/8in plywood & 1/2in hardware cloth I only used a single screw in each of the joints to hold it together during construction. The base (skids) are made from 2in x 4in x 10ft pressure treated lumber.
I had originally planned on using 1/2in plywood, but the price of 1/2 inch plywood compared to 3/8 inch plywood was really dramatic. I ended up using a scrap piece of 1/2 inch plywood only for the floor of the coop. The rest (including the roof) I built out of the 3/8 inch plywood.
The sliding door for the coop was made out of the piece that came from the window in the front of the coop. The slots for the slider were some scraps of 1/2 inch plywood (so that the 3/8 inch plywood would have a little room to slide)
The coop painted inside and out with a high quality sealing primer.
I ended up adding some triangle pieces of wood above the doors and window to keep water from just running down the side and getting to the inside of the coop. The window was half of a panel from our greenhouse that took flight and got destroyed. Because I wanted the coop to match the house, I went ahead and put roofing felt, flashing and asphalt shingles on it. I regret the heavy roofing material now, but it looks fantastic.
I also added a vent to the back side of the coop (right under the roof) because on really hot days (even with the window wide open) the coop seemed too hot to me. The small vent lets cool air in from the back of the coop and allows the hot air to escape out the window.
The (mostly) completed coop. I added wheels so I could move it around, but with the roofing shingles I picked out to match the house (and our gopher hole filled back yard) it was just too much of a pain in the neck to wrestle around the yard by myself. If you used a lighter roofing material I think it would be a lot more portable, but even then, just dragging it would not be easy. Wheels are a must for this size coop if you want to move it around. I will try to find some pictures of the coop when I had the wheels on it.
Now that I have had the coop for several months and there are 7 full grown chickens living in it I can tell you that unless you move your chicken tractor on at least a weekly basis, the chickens will completely clear the area of grass. It seemed that the chickens were happiest when I moved the coop about every 3-4 days. I love the height of the coop. It's SO easy to clean out. I just set the wheelbarrow next to the side door, remove the piece of wood that keeps the pine shavings in and rake everything right out. It takes less than 5 minutes to clean out the coop, hose it down and put new shavings & nesting material in.
I have an automatic watering system installed on one side of the nest boxes and a home-made 4in PVC food hopper that I can quickly fill from the outside when checking for eggs.
The only problem I have found is that the door to the run tends to warp out of shape easily because I just screwed it in the corners and hoped that the 1/2 inch hardware cloth would stiffen it up... It didn't work very well. I am planning to add in a diagonal brace to give it better support when I'm not feeling lazy")
The coop doesn't move anymore. It's semi-permanently installed in our fenced garden. We don't close the run or coop doors anymore. The chickens just have free run of the entire garden (over 1000 square feet) that is surrounded by deer fencing (3/4 inch squares) buried a the base.
I'll try to remember to take some more pictures and post them here. If you have any questions, feel free to ask.
******** below is unrelated to the actual chicken tractor ******************
As a side note - I ended up getting 2 adult hens and 5 baby chicks. I was afraid to put the babies in with the hens, so I ended up building a nursery coop (no nest boxes) out of one sheet of 3/8 inch plywood I had from another project. I didn't even bother to use any framing on the nursery coop. I just used my pneumatic stapler and some wood glue to throw it together. The nursery coop only took about an hour to build and we painted it the same day. No roofing material on it, just a base of primer/sealer and about 3 coats of exterior latex paint. It held up (and was water tight) through several rain storms. The nursery coop does not have any legs, we just hammered in four 1in x 2in x 2ft wooden stakes, cut them off somewhat level and set the coop on top of the stakes. The ramp was another scrap of plywood (I think 6in wide by 24in long) and some 1/2in scraps of plywood cut to 6 inch lengths. I bought the vent at a hardware store for about $3.00. The door is hinged with a couple of 1 inch galvanized hinges and has a simple eye hook and latch to keep it closed at night. I also put a door on the left side (not visible in the photo) so I could clean it out easily. Wish I had put a big door on both sides, because it was still a pain in the neck to clean out.
The hens are all about the same size now and we're getting about 4 eggs a day (the 2 youngest chicks have not started laying yet - maybe a few more weeks). I gave the nursery coop away to a neighbor that was in need of something for his chicks and from what I hear it's still holding together and being used for new chicks as needed.
The basic coop is roughly 5 feet wide, 3 feet deep and 6 feet tall. The run is approximately 5 feet wide, 10 feet deep and 4 feet tall (only 2 foot tall under the coop).
(click any of the images for a larger view)
It took me few days to learn how to use Sketchup so I could model the design and have the measurements all planned out. I figure I could have just kind of made it up as I went along, but having the plans printed out to refer to saved me from making a lot of mistakes that would have wasted wood. I have the Sketchup plans if anyone wants them. I tried to attach them here, but I don't have permission to do so (how do I get permission?)
The basic frame is made entirely out of 2in x 2in x 8ft lumber. Since the exterior of the coop will be covered in 3/8in plywood & 1/2in hardware cloth I only used a single screw in each of the joints to hold it together during construction. The base (skids) are made from 2in x 4in x 10ft pressure treated lumber.
I had originally planned on using 1/2in plywood, but the price of 1/2 inch plywood compared to 3/8 inch plywood was really dramatic. I ended up using a scrap piece of 1/2 inch plywood only for the floor of the coop. The rest (including the roof) I built out of the 3/8 inch plywood.
The sliding door for the coop was made out of the piece that came from the window in the front of the coop. The slots for the slider were some scraps of 1/2 inch plywood (so that the 3/8 inch plywood would have a little room to slide)
The coop painted inside and out with a high quality sealing primer.
I ended up adding some triangle pieces of wood above the doors and window to keep water from just running down the side and getting to the inside of the coop. The window was half of a panel from our greenhouse that took flight and got destroyed. Because I wanted the coop to match the house, I went ahead and put roofing felt, flashing and asphalt shingles on it. I regret the heavy roofing material now, but it looks fantastic.
I also added a vent to the back side of the coop (right under the roof) because on really hot days (even with the window wide open) the coop seemed too hot to me. The small vent lets cool air in from the back of the coop and allows the hot air to escape out the window.
The (mostly) completed coop. I added wheels so I could move it around, but with the roofing shingles I picked out to match the house (and our gopher hole filled back yard) it was just too much of a pain in the neck to wrestle around the yard by myself. If you used a lighter roofing material I think it would be a lot more portable, but even then, just dragging it would not be easy. Wheels are a must for this size coop if you want to move it around. I will try to find some pictures of the coop when I had the wheels on it.
Now that I have had the coop for several months and there are 7 full grown chickens living in it I can tell you that unless you move your chicken tractor on at least a weekly basis, the chickens will completely clear the area of grass. It seemed that the chickens were happiest when I moved the coop about every 3-4 days. I love the height of the coop. It's SO easy to clean out. I just set the wheelbarrow next to the side door, remove the piece of wood that keeps the pine shavings in and rake everything right out. It takes less than 5 minutes to clean out the coop, hose it down and put new shavings & nesting material in.
I have an automatic watering system installed on one side of the nest boxes and a home-made 4in PVC food hopper that I can quickly fill from the outside when checking for eggs.
The only problem I have found is that the door to the run tends to warp out of shape easily because I just screwed it in the corners and hoped that the 1/2 inch hardware cloth would stiffen it up... It didn't work very well. I am planning to add in a diagonal brace to give it better support when I'm not feeling lazy
The coop doesn't move anymore. It's semi-permanently installed in our fenced garden. We don't close the run or coop doors anymore. The chickens just have free run of the entire garden (over 1000 square feet) that is surrounded by deer fencing (3/4 inch squares) buried a the base.
I'll try to remember to take some more pictures and post them here. If you have any questions, feel free to ask.
******** below is unrelated to the actual chicken tractor ******************
As a side note - I ended up getting 2 adult hens and 5 baby chicks. I was afraid to put the babies in with the hens, so I ended up building a nursery coop (no nest boxes) out of one sheet of 3/8 inch plywood I had from another project. I didn't even bother to use any framing on the nursery coop. I just used my pneumatic stapler and some wood glue to throw it together. The nursery coop only took about an hour to build and we painted it the same day. No roofing material on it, just a base of primer/sealer and about 3 coats of exterior latex paint. It held up (and was water tight) through several rain storms. The nursery coop does not have any legs, we just hammered in four 1in x 2in x 2ft wooden stakes, cut them off somewhat level and set the coop on top of the stakes. The ramp was another scrap of plywood (I think 6in wide by 24in long) and some 1/2in scraps of plywood cut to 6 inch lengths. I bought the vent at a hardware store for about $3.00. The door is hinged with a couple of 1 inch galvanized hinges and has a simple eye hook and latch to keep it closed at night. I also put a door on the left side (not visible in the photo) so I could clean it out easily. Wish I had put a big door on both sides, because it was still a pain in the neck to clean out.
The hens are all about the same size now and we're getting about 4 eggs a day (the 2 youngest chicks have not started laying yet - maybe a few more weeks). I gave the nursery coop away to a neighbor that was in need of something for his chicks and from what I hear it's still holding together and being used for new chicks as needed.