THE COOP IS FINALLY (almost) FINISHED! Planning started over a year ago, but actual construction started on July 7, 2008 and was more or less finished on August 12. Our babies have been in the coop since about August 3 (at about 2 weeks of age), and have been enjoying the run as well since they were 3 weeks old. There is still a little touch up painting to do, and I already broke one window, so I have to fix that, but for the most part everything is finished.
My goal was to use as many existing materials around the house as possible, and to have it look really nice when done, as well as being VERY secure!

This is where the coop and run have to go.
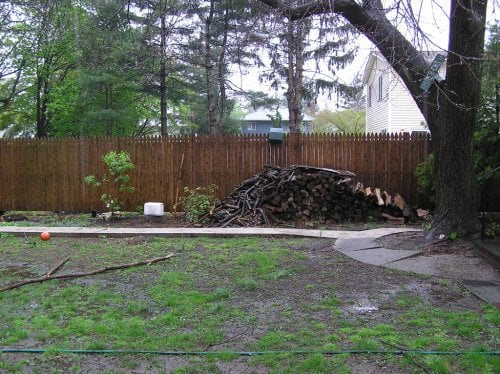
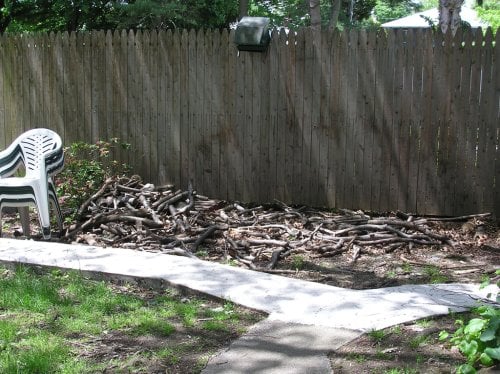
Here is another view of the site. The azalea and the wood pile will have to go!
This is the view of the site from entrance to the back yard at the side of the house. You can barely see the wood pile. I think we will be fine. You would really have to be looking for it to notice it at all. (I think....I hope) (I really can't find any codes or laws outlawing chicken ownership here, but maybe I missed it.) That's a flame colored honeysuckle over the arch, and a pink fragrant rose.
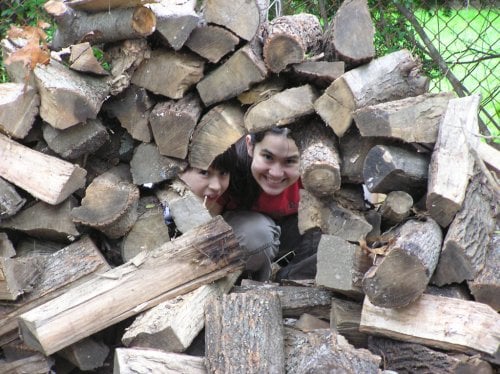
My son, Dylan, (center) and two of his friends moved the wood.
Two forest sprites stacked the wood in its new location. (Really my daughter, Natali, and son Andy)
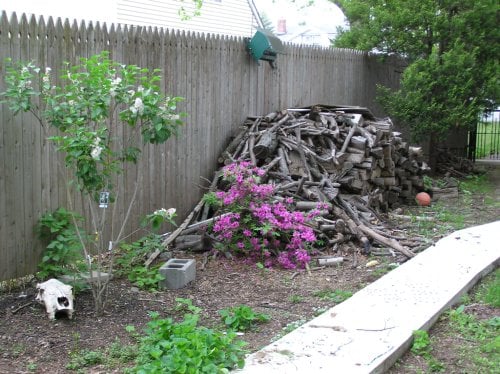
Here the wood pile is almost all gone. Andy stacked all these little pieces up just to the right of this spot. We were going to have a little camp fire in the backyard, but the mosquitoes are so bad, we might wait until fall.
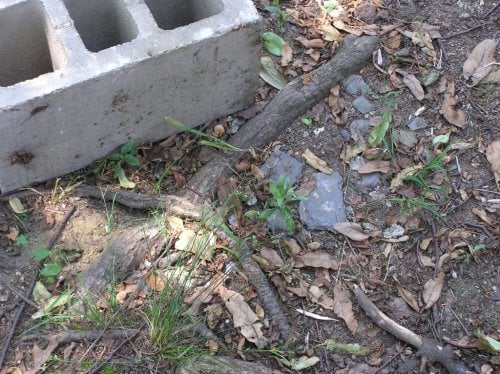
So many tree roots! I was a little slow getting started because I just wasn't sure what to do about these roots! This is by far the worst corner, but all four corners would have been a challenge if I had decided to dig.
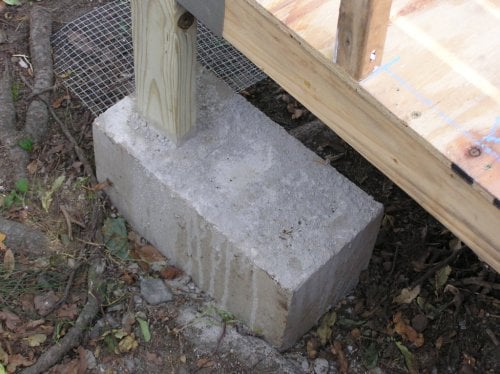
My husband suggested that, instead of digging, I just put the pressure treated 2x4's into concrete blocks and fill them with more concrete. Since I was doing ALL the work myself, I decided to go for it. With the tree roots, I am fairly positive that the ground won't settle too much. And yes, I caved and bought pressure treated. I have replied to threads in which I disdained the use of pressure treated, but I did my research. Cedar doesn't last nearly as long, and the price of Trex was just prohibitive. I think it was $45 for a 4x4 post. Even though I eventually went with 2x4 posts, it still sounded like too much money. So, I, Bluie, used pressure treated for the four vertical coop supports. (Wait until you see the run and I really went wild with pressure treated!)
Also notice that I already have hardware cloth down. That's because I wanted it under that block you see on the far left. With the sidewalk there, the wire couldn't go out, it had to go either down or in. With the tree roots, that left only in.
We had several bags of mortar mix in the garage (all these blocks that I used were also laying around the property after a project we did last summer). For the first block, we (Andy and Dylan and myself) mixed the mortar up before filling the holes. But then I remembered how many bags of cement we have had to throw away because they got damp and became rock hard. So I decided to take a short cut. For the subsequent blocks, we just filled them with the dry mix and then watered them! Basically, they just needed to be heavy and solid. I know it probably won't be as strong, but I think for my purposes it works!
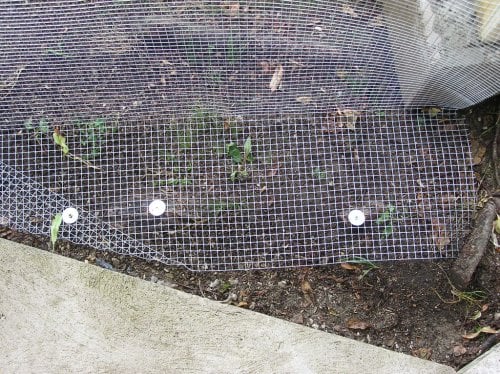
This is looking down at the hardware cloth next to the sidewalk. The sidewalk is at an angle there so that's why the hardware cloth is folded back on itself. Also I took advantage of the tree roots and used fender washers and screws to anchor the hardware to the roots.
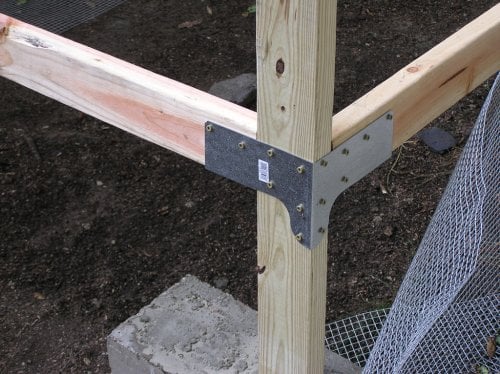
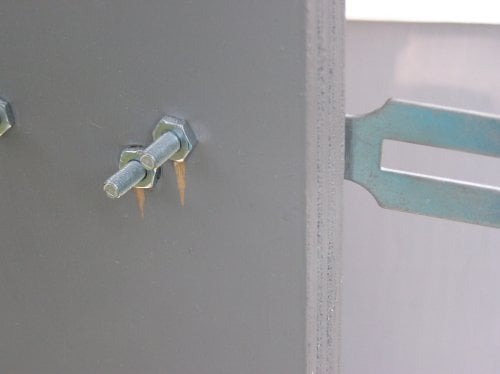
My DH and I were buying things at Home Depot and we saw these corner braces. He insisted that we get them (I thought they were too expensive at $4.50 each). He said that it would make this step a lot easier with me doing it by myself, and he was right. This part was a snap. Unfortunately, I noticed too late that they are not guaranteed to last when used with the new kind of pressure treated wood. I think they will last last long enough though, so I refuse to worry about them.
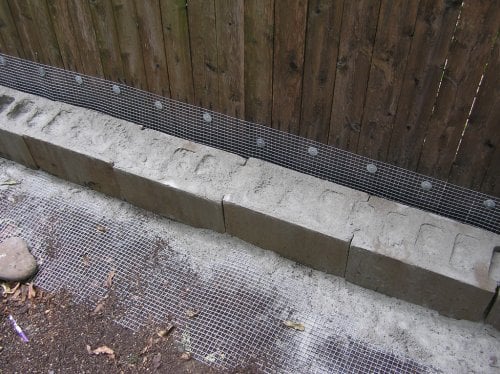
Also near the beginning of the process, we laid a strip of hardware cloth along the bottom of the fence, screwed it to the fence with fender washers, and put a line of concrete blocks on top of the hardware cloth, right next to the bottom of the fence. Because I cannot control or monitor what happens on the other side of the fence, and I cannot put the hardware cloth going out on the other side of the fence, this is what I had to do. Any predator that wants to dig into the run that way, would have to dig under the chain link fence behind the wooden fence, under the wooden fence, under the concrete blocks filled with cement, and then under two feet of hardware cloth. I also used landscape staples to hold the hardware cloth down to the soil. I also encouraged my boys to spill some mortar mix on the hardware cloth and wet it to further hold it down.
Here is Dylan helping!
Here is Andy helping!
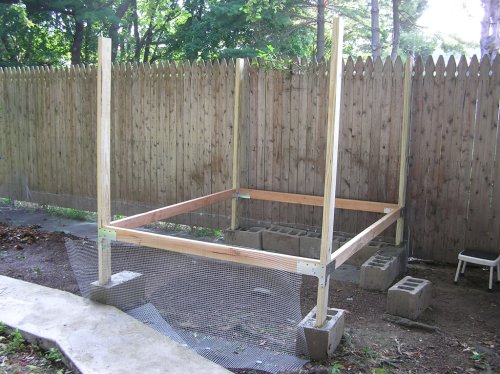
Here you can see the basic framing almost finished. I really have never built anything like this before (bookshelves and such is all). I have always paid attention any time I have ever been around carpenters though. At this point it is remarkably sturdy. I also made several plans, but in the end, I just kind of made it up as I went along. I considered the space and the materials I had available, and did a lot of thinking before each major step.
Another of my goals was to keep the highest point of the coop below the top of the fence. (Stealthy!) The far side is pitched a little lower than the near side, but only by maybe 4-5 inches. I couldn't do more than that because already I will have to duck all the time when I go under the overhang on that side.
Here is the first wall up. With the exception of the four pressure treated 2x4's, all this lumber and plywood was just laying around. Some of it was left over from other projects, some was scavenged from old projects that were demolished. All the 2x2's I used for the framing were ripped from 2x4's or 2x3's on DH's table saw.
We always seem to collect slate and rocks and stuff. We had these big, thick, heavy pieces of slate in the back corner of the yard. DH helped me to arrange them around the roots to cover and reinforce the protection of the "apron" of hardware cloth.
This is the only thing DH physically helped me with. More mortar mix was found in the garage and we surrounded the big slates with it. We have bags and bags of landscape pebbles in the back (with the slate and other rocks) so I pressed a bunch into some of the wet mortar to make it look pretty. No predator is gonna get in this way! (Knock wood)
Here is an up close view of the pebbles in the cement on top of the hardware cloth.
To seal off the little gap between the coop and the fence, I attached a narrow piece of hardware cloth to the vertical at that corner and wrapped it around and screwed it to the fence with fender washers. The part that is stapled will be covered later with plywood.
Well, I went quite while without taking any pictures. We got our babies in the mail (seven chicks ordered, seven chicks in perfect condition received!) and I knew I had to get them out of the house SOON (DH and DS have asthma). So I put my head down and worked hours everyday getting this coop done. At this point, they have obviously been living in here for a while. They chicks love their coop and wood shavings (But not as much as their run-more on that later!). The open door was intended as the clean out door but we use it as the door to check on the babies. They like to jump out and get on our shoulders so we put this plastic mesh up to keep them in when the door is open unless we are ready for them.
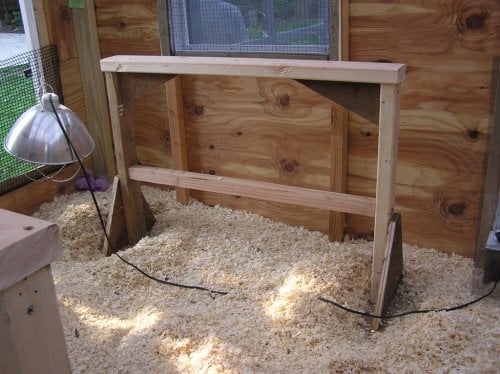
I went ahead and made these roosts, even though the chickens are still a little small for them. (We have seen a couple of poops on the tops, so somebody is going up there!) I just wanted to clean up and put the tools away so I just did it. They are two feet tall and freestanding. I can take them out for easy cleaning, and rearrange if I want. I think the chickens will like a view out the window too!
The little purple bear was a comfort to them in their first two weeks, especially for Buffy the BO.
Here is Andy looking in the chicken door. I worried about mosquitoes so I put up a little curtain of window screen. I don't think I needed to worry!
Here is in inside view of the roof. These are Suntuf panels, in translucent white. I bought four, and I think they were about $18 each. I bought the special self sealing screws. However, if you don't put those screws in exactly perpendicular, you will get a leak. I had to buy some sealant and put around every screw and I still have a couple of stubborn small leaks. I love the light though, and since the chickens spend ALL day in the run, they don't get too hot and they can go under the coop for guaranteed shade! Maybe I will get some eggs during the winter months too!
Of course, at 4 weeks old they do not need these nest boxes but again I just wanted to put the tools away and get my life back. This wood is from an old Ikea chest of drawers. I didn't put a bottom on them because I never intended to mount them high up. If, in the future, I change my mind, I can slap a bottom on or just prop them up on a box or something. I keep them standing up in the corner for now, I just put them down for the picture.
This is a detail view of the ventilation. At the top of all four walls, I left an opening from 1 to 3 inches wide. I covered every opening with hardware cloth and window screen. I have or will put aluminum flashing over areas vulnerable to rain or snow.
This is Andy covered with chickens. When we first put them in the coop, we made a smaller space by putting a two foot high strip of 1/4inch foam core across the middle of the coop (we have several sheets laying around. I guess you could say we are packrats!). Andy couldn't resist climbing into the wood shavings and chilling with his peeps. He wanted to spend the night on the other side of the foam core but Dad said no.
Here is detail shot of how I attached the hasps to the 3/4 plywood clean out door. I attached the hinges the same way. I used super long wood screws to attach stuff to the frame. I bought the wood for the two big coop doors. At Home Depot, they had 1/4 sheets of 3/4 inch birch plywood. I think they were about $12 each. The doors were about 42 inches tall by 23 inches wide, so there was not too much waste. For the door above, all went well and it was really fast and easy to make a sturdy door.
Here is one of my windows. I cut a sheet of thin plexiglas a little smaller than the window opening. I screwed on 3/4 inch strips of wood, then attached the hinges to the strips of wood. This window works fine, but the one on the opposite side of the coop, I cut the plexi a little too big and it got stuck and I broke it trying to open it. I already bought the replacement plexi but I still have to redo it. If I had it to do over, I would spend the money and buy the thick plexi. The thin is just too flimsy. All windows have hardware cloth and window screen.
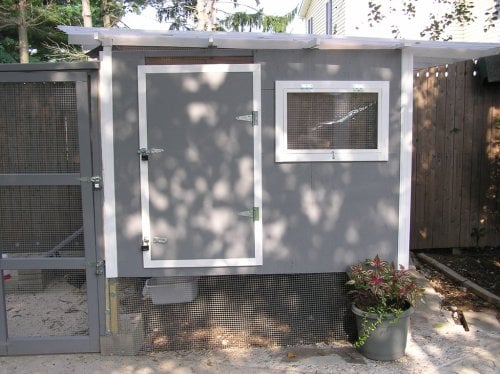
Here is the entire coop. The door on the left by the plant is the one that worked the way it was supposed to. I messed up the one on the right. When I was cutting it on the table saw, it got away from me and the saw blade threw the plywood and made a big gash in the top. (All arms and fingers were ok!) I wasn't about to go and buy more plywood, so I just ripped some 1x2's and framed it out, disguising the gash. I now think it looks prettier and stronger. I had to get longer bolts to attach the hasps and hinges. I put two hasps on each door because I was afraid that a 'coon would pull out the bottom corner of one of the doors.
On the right side of the coop you can see that there is a big roof overhang. That's because the door on that side is supposed to be for feeding, watering and egg collection, daily chores, so we will need protection from rain (but we have to duck. I am 5'7", and the lowest point is probably one inch lower than that). On the left, under the overhang, you can see the flashing that protects the ventilation from rain. I have one more little piece of flashing that I plan to put over the top of this door.
Here is a detail of the flashing.
This is the chicken door and ramp. I used half round to make the steps. The paving stones at the bottom of the ramp we had laying around from when DH made a sidewalk for his sister. The big gray bin holds DE, and the dishpan has dust bath material, which they haven't figured out yet. They love dustbaths, they just don't recognize the dishpan as a dust bath location.
Here is the chicken door closed and locked. One more layer of protection. I actually plan to keep this door open 24/7, once they learn to go to bed by themselves at night and they are fully feathered. But there might be a time when I want to lock them in or out.
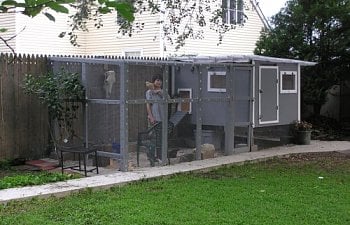
Here is the whole run side of the coop. If you look closely, you can see the cracks in the window that I broke. Oh, by the way, I used the gray paint because we had two gallons of it in the garage.
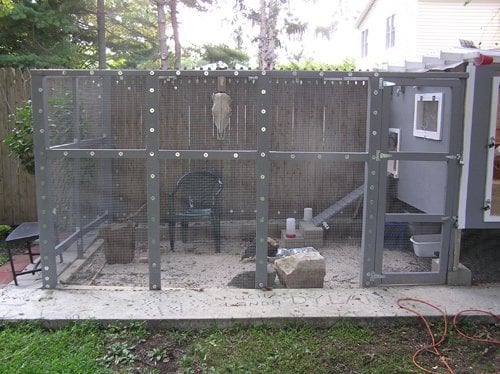
This is the completed run. All vertical supports are pressure treated. 4
x4 posts on the corner and to the left of the door. 2x4's every where else. There are less tree roots here so I was able to plant the 4x4's a little over a foot in the ground and then add cement. There are horizontal PT 2x4's on the ground on the two sides. The hardware cloth was stapled to those horizontals before they went down, and folded around, and they are below the level of the sidewalk on the near side. On the short side on the left, the hardware cloth extends out from the run for two feet, and is covered with pavers. All the hardware cloth is "buttoned on" with screws and fender washers. The top of the run is criss-crossed with 2x3's and 2x2's, and covered with "buttoned on" hardware cloth. I slid the hardware cloth around the horizontal support attached to the wooden fence and stapled it, inside the run, to the fence. ( I might add some better pictures of this). I made a threshold for the run door out of two scrap pieces of pressure treated 2x4's, stacked one on top of the other, which made the threshold about level with the sidewalk.
Here is a view of just the run.
Here is a different view of the run.
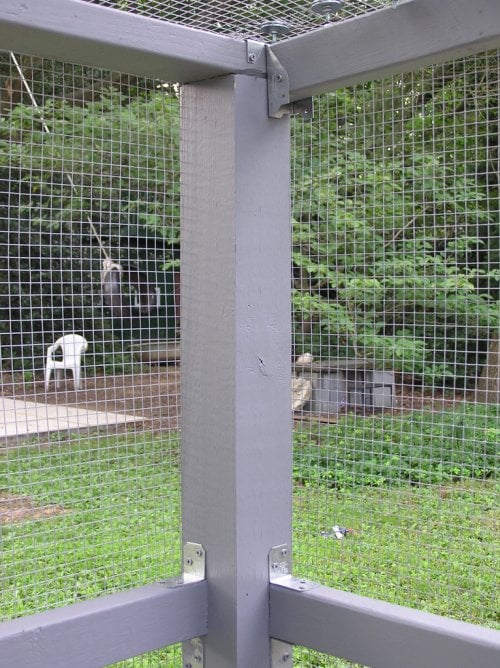
This shows the details of the run. I used dozens of these corner braces. I got the special braces for the top to hold the 2x3's that went across the run. I notched those to match the 2x2 that went down the middle of the length of the run. Up in the corner, you can see where I used nuts, bolts, locking washers and fender washers to fix a mistake. I was trimming the overlap of the hardware cloth, and I trimmed it too much, so I had to join two pieces of hardware cloth. I didn't like the idea of "sewing" the two pieces together with wire, so I "buttoned" it together. Much easier!
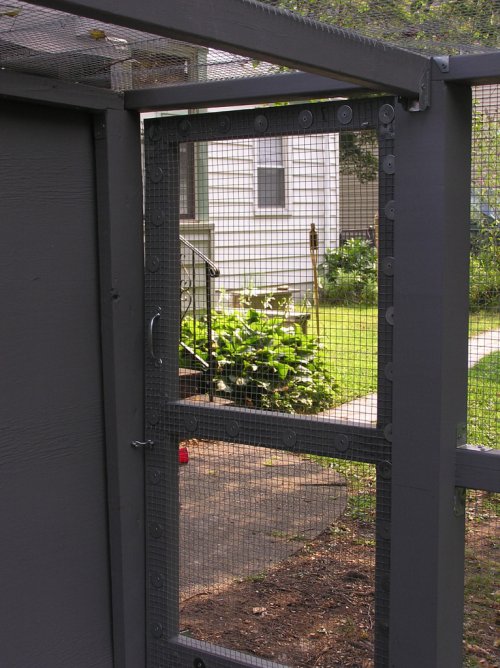
This is the inside of the run door. I buttoned the hardware cloth on the inside here, instead of the outside like on the rest of the run. Why? I have no idea! I put a handle 'cause we had no place to grab onto and pull the door closed, and a little latch. I have a screen door spring, I just have to get the tools out again and put it on. I constantly used a level to get things plumb, but apparently I goofed on the vertical support to the left of the door. I didn't realize this until I had the door on, but it feels very strong, and we pretended to be raccoons and pulled on the locked door and we think it is quite secure.
Here is a detail of the threshold for the run door that I made out of two leftover pieces of pressure treated 2x4's.
This pic shows the bottom of the run "wall". I stapled the hardware cloth to this pressure treated 2x4 first and then put the 2x4 in place. The hardware cloth extends about a foot into the run, and the staples are now on the bottom of the 2x4. Sand covers the hardware cloth.
This is the run roof. The hardware cloth of the side extends in one piece across the roof. It is attached on top with fender washers and screws, just like the sides.
Here is a detail of the run roof. I used the table saw to notch the supports, so the top of the roof was a flat surface to attach the hardware cloth to. I put one long wood screw through both supports everywhere they crossed. I also painted all the pieces before I assembled them so I didn't have to paint over my head! I sent DS Andy up on the roof to put in any fender washer/screws that I couldn't reach from the side, because I wasn't sure if the roof would support my weight. We laid wide boards across the supports for him to lay on to spread out his weight. He weighs about 105 pounds, and the roof didn't sag or budge at all when he was up there.
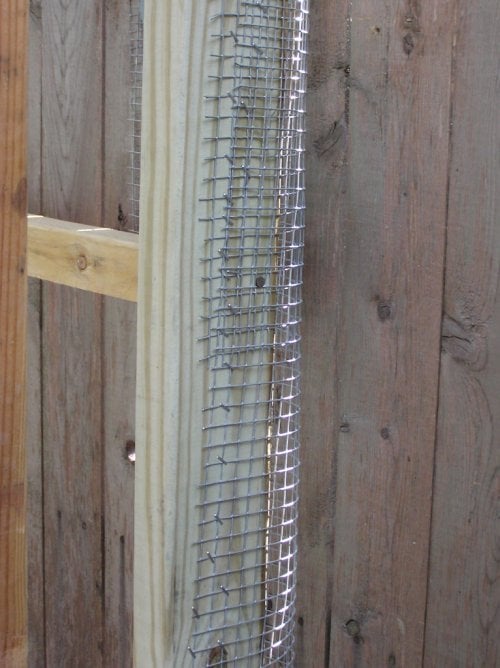
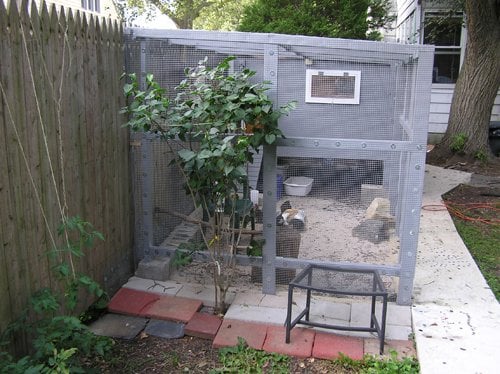
Here is the fence that forms one side of the run. The pieces of hardware cloth that went over the roof come down inside the run and are screwed to the fence. Any hardware cloth I had leftover, I stapled to the fence. I didn't have enough to cover the entire area, but I don't feel like spending $40 on another roll of hardware cloth just to cover this fence. I feel pretty confident that raccoons can't claw through a wooden fence. If I begin to see gnawed areas, I will get myself to Home Depot quick!
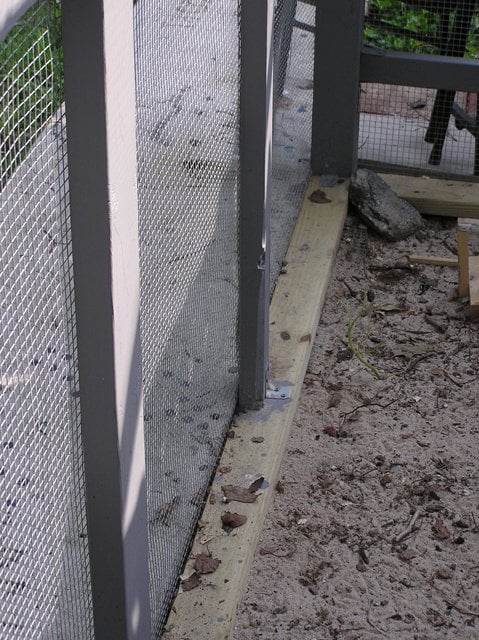
This was an awkward area of the run, where the end wall met the fence. There was a gap between the vertical 2x4 and the fence because the 2x4 was cemented into a concrete block. (Tree root area) I just wrapped the hardware cloth from the end of the run around the 2x4 and screwed it to the fence inside the run. I still had a little gap at the bottom and I patched it with more hardware cloth. There are about three layers in this one spot.
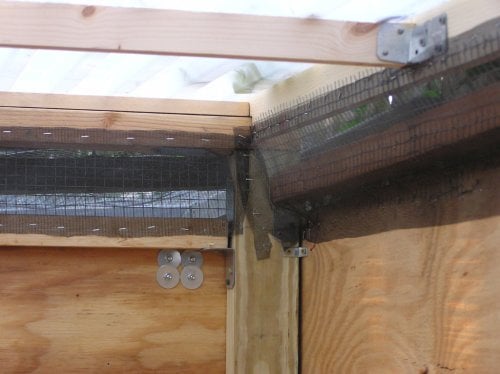
This area at the top of the same 2x4 was a little tricky too, but not as bad as the bottom.
Here are Morphie (GLW) and Ozzie (Australorp) enjoying their outside roost. I have had my eye on that rotten stump for a while. I figure the chickens will have lots of fun tearing it apart to get to the bugs inside.
Andy sitting in the run holding Big Poofy (EE).
Onigiri (silkie) having a drink of water.
Onigiri on Andy's lap.
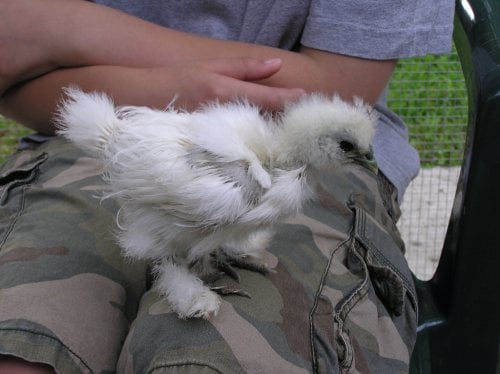
Boss Man (partridge silkie) on the big rock. We had these rocks in the back of the yard too.
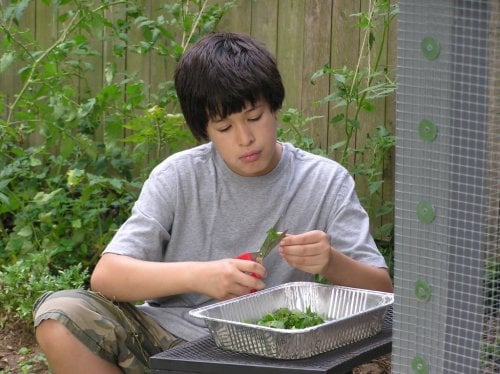
Andy cutting up "salad" for the chickens. See my tomato plants in the background? August 15 and NO Tomatoes Yet! Sigh! I can build a coop and run but I can't grow tomatoes!
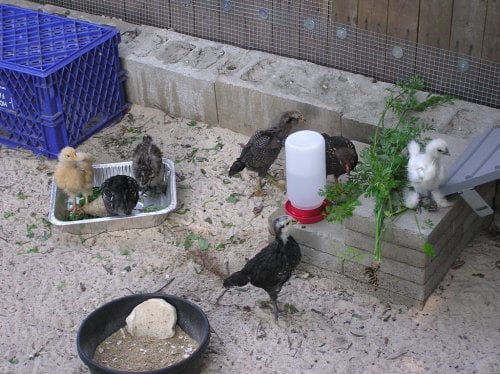
They have nearly finished their salad. That's Queen Anne's Lace next to the waterer. But can they eat a bagel? NO! All day, and they never touched the bagel! I got that horse bowl at the feed store. Someone on the forum talked about them. I love it. Heavy rubber, indestructable. I plan to put the outside water in it in the winter, and just pop the ice out two or three times a day and put fresh.
Andy and the lovely Zelda the brave!
Natali all covered up with chickens! What a nice bunch of chicks! You can see the hardware cloth for the run laying on the ground in the background before I got very far on run construction.
With team work, and perserverance, we can get that one little tiny plant that is growing under this board!
Joy is having a chick sleep on your leg.
Andy is apparently good with many kinds of birds and wildlife. Here he is at the Bronx Zoo with a golden headed quetzel tasting his finger!
Here is DH's project. He didn't ask how much I was spending on the coop and run, and I didn't ask how much he was spending on the GTO.
The entire space between sidewalk and fence is about 7 feet wide. The run is 11 feet long and 5 1/2 feet tall on one side and 6 feet tall by the fence. I have ordered a silver gray tarp from A1Tarps.com that will just fit the top of the run. They have lots of colors and sizes of tarps. I will probably use the tarp during long periods of rain or when snow is expected. I know I will have to keep the snow swept off. The coop is 7 feet by about 5 1/2 feet. Under the coop is 2 feet high, and the coop itself is about 4 feet high. My biggest expense was definitely the hardware cloth. I bought four rolls, 3 feet by 25 feet, at $40 a roll. I bought hundreds of fender washers, several boxes of screws and nails, the Suntuf roofing panels, the hasps, hinges, padlocks, etc. Almost all the lumber was found or salvaged, as were all the stones, blocks, paint and most of the cement. That's it!
I hope you enjoyed looking at my coop and run. I have to give a lot of credit to the people of BYC, as everything I know about coops and runs, I learned on BYC! Phew! I sure am glad that's over!
My goal was to use as many existing materials around the house as possible, and to have it look really nice when done, as well as being VERY secure!
This is where the coop and run have to go.
Here is another view of the site. The azalea and the wood pile will have to go!
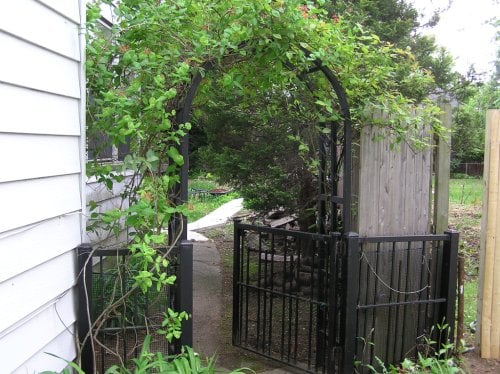
This is the view of the site from entrance to the back yard at the side of the house. You can barely see the wood pile. I think we will be fine. You would really have to be looking for it to notice it at all. (I think....I hope) (I really can't find any codes or laws outlawing chicken ownership here, but maybe I missed it.) That's a flame colored honeysuckle over the arch, and a pink fragrant rose.

My son, Dylan, (center) and two of his friends moved the wood.
Two forest sprites stacked the wood in its new location. (Really my daughter, Natali, and son Andy)
Here the wood pile is almost all gone. Andy stacked all these little pieces up just to the right of this spot. We were going to have a little camp fire in the backyard, but the mosquitoes are so bad, we might wait until fall.
So many tree roots! I was a little slow getting started because I just wasn't sure what to do about these roots! This is by far the worst corner, but all four corners would have been a challenge if I had decided to dig.
My husband suggested that, instead of digging, I just put the pressure treated 2x4's into concrete blocks and fill them with more concrete. Since I was doing ALL the work myself, I decided to go for it. With the tree roots, I am fairly positive that the ground won't settle too much. And yes, I caved and bought pressure treated. I have replied to threads in which I disdained the use of pressure treated, but I did my research. Cedar doesn't last nearly as long, and the price of Trex was just prohibitive. I think it was $45 for a 4x4 post. Even though I eventually went with 2x4 posts, it still sounded like too much money. So, I, Bluie, used pressure treated for the four vertical coop supports. (Wait until you see the run and I really went wild with pressure treated!)
Also notice that I already have hardware cloth down. That's because I wanted it under that block you see on the far left. With the sidewalk there, the wire couldn't go out, it had to go either down or in. With the tree roots, that left only in.
We had several bags of mortar mix in the garage (all these blocks that I used were also laying around the property after a project we did last summer). For the first block, we (Andy and Dylan and myself) mixed the mortar up before filling the holes. But then I remembered how many bags of cement we have had to throw away because they got damp and became rock hard. So I decided to take a short cut. For the subsequent blocks, we just filled them with the dry mix and then watered them! Basically, they just needed to be heavy and solid. I know it probably won't be as strong, but I think for my purposes it works!
This is looking down at the hardware cloth next to the sidewalk. The sidewalk is at an angle there so that's why the hardware cloth is folded back on itself. Also I took advantage of the tree roots and used fender washers and screws to anchor the hardware to the roots.
My DH and I were buying things at Home Depot and we saw these corner braces. He insisted that we get them (I thought they were too expensive at $4.50 each). He said that it would make this step a lot easier with me doing it by myself, and he was right. This part was a snap. Unfortunately, I noticed too late that they are not guaranteed to last when used with the new kind of pressure treated wood. I think they will last last long enough though, so I refuse to worry about them.
Also near the beginning of the process, we laid a strip of hardware cloth along the bottom of the fence, screwed it to the fence with fender washers, and put a line of concrete blocks on top of the hardware cloth, right next to the bottom of the fence. Because I cannot control or monitor what happens on the other side of the fence, and I cannot put the hardware cloth going out on the other side of the fence, this is what I had to do. Any predator that wants to dig into the run that way, would have to dig under the chain link fence behind the wooden fence, under the wooden fence, under the concrete blocks filled with cement, and then under two feet of hardware cloth. I also used landscape staples to hold the hardware cloth down to the soil. I also encouraged my boys to spill some mortar mix on the hardware cloth and wet it to further hold it down.
Here is Dylan helping!
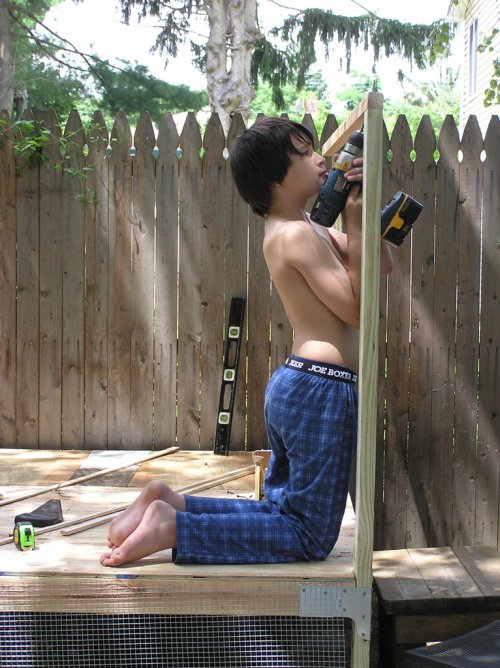
Here is Andy helping!
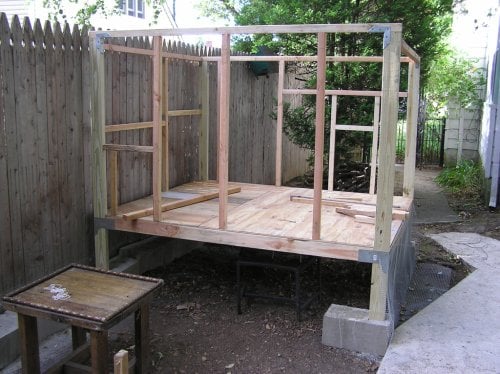
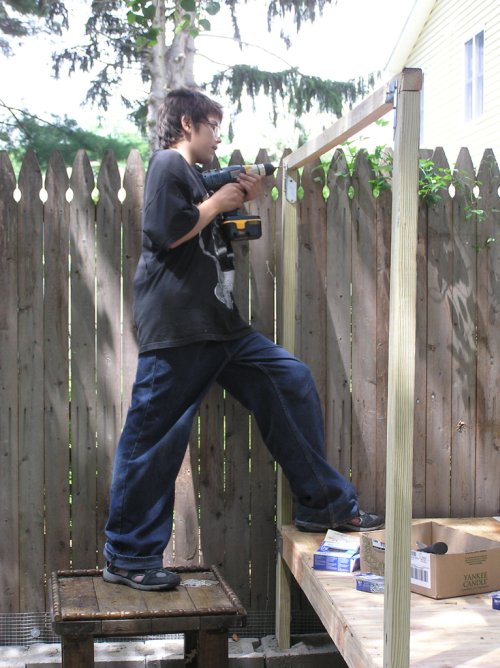
Here you can see the basic framing almost finished. I really have never built anything like this before (bookshelves and such is all). I have always paid attention any time I have ever been around carpenters though. At this point it is remarkably sturdy. I also made several plans, but in the end, I just kind of made it up as I went along. I considered the space and the materials I had available, and did a lot of thinking before each major step.
Another of my goals was to keep the highest point of the coop below the top of the fence. (Stealthy!) The far side is pitched a little lower than the near side, but only by maybe 4-5 inches. I couldn't do more than that because already I will have to duck all the time when I go under the overhang on that side.
Here is the first wall up. With the exception of the four pressure treated 2x4's, all this lumber and plywood was just laying around. Some of it was left over from other projects, some was scavenged from old projects that were demolished. All the 2x2's I used for the framing were ripped from 2x4's or 2x3's on DH's table saw.
We always seem to collect slate and rocks and stuff. We had these big, thick, heavy pieces of slate in the back corner of the yard. DH helped me to arrange them around the roots to cover and reinforce the protection of the "apron" of hardware cloth.
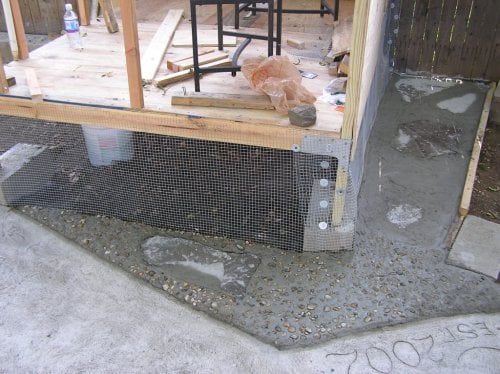
This is the only thing DH physically helped me with. More mortar mix was found in the garage and we surrounded the big slates with it. We have bags and bags of landscape pebbles in the back (with the slate and other rocks) so I pressed a bunch into some of the wet mortar to make it look pretty. No predator is gonna get in this way! (Knock wood)
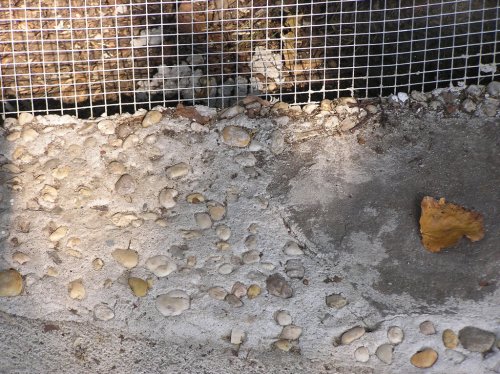
Here is an up close view of the pebbles in the cement on top of the hardware cloth.
To seal off the little gap between the coop and the fence, I attached a narrow piece of hardware cloth to the vertical at that corner and wrapped it around and screwed it to the fence with fender washers. The part that is stapled will be covered later with plywood.
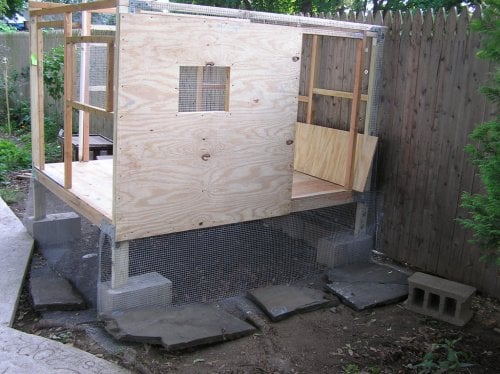
Well, I went quite while without taking any pictures. We got our babies in the mail (seven chicks ordered, seven chicks in perfect condition received!) and I knew I had to get them out of the house SOON (DH and DS have asthma). So I put my head down and worked hours everyday getting this coop done. At this point, they have obviously been living in here for a while. They chicks love their coop and wood shavings (But not as much as their run-more on that later!). The open door was intended as the clean out door but we use it as the door to check on the babies. They like to jump out and get on our shoulders so we put this plastic mesh up to keep them in when the door is open unless we are ready for them.
I went ahead and made these roosts, even though the chickens are still a little small for them. (We have seen a couple of poops on the tops, so somebody is going up there!) I just wanted to clean up and put the tools away so I just did it. They are two feet tall and freestanding. I can take them out for easy cleaning, and rearrange if I want. I think the chickens will like a view out the window too!
The little purple bear was a comfort to them in their first two weeks, especially for Buffy the BO.
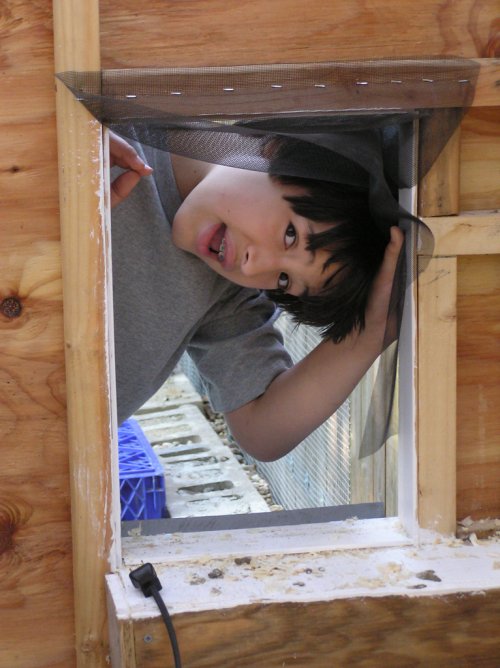
Here is Andy looking in the chicken door. I worried about mosquitoes so I put up a little curtain of window screen. I don't think I needed to worry!
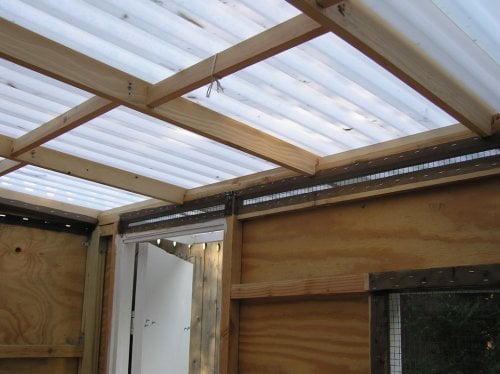
Here is in inside view of the roof. These are Suntuf panels, in translucent white. I bought four, and I think they were about $18 each. I bought the special self sealing screws. However, if you don't put those screws in exactly perpendicular, you will get a leak. I had to buy some sealant and put around every screw and I still have a couple of stubborn small leaks. I love the light though, and since the chickens spend ALL day in the run, they don't get too hot and they can go under the coop for guaranteed shade! Maybe I will get some eggs during the winter months too!
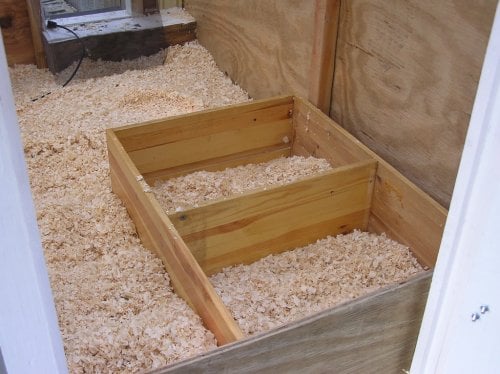
Of course, at 4 weeks old they do not need these nest boxes but again I just wanted to put the tools away and get my life back. This wood is from an old Ikea chest of drawers. I didn't put a bottom on them because I never intended to mount them high up. If, in the future, I change my mind, I can slap a bottom on or just prop them up on a box or something. I keep them standing up in the corner for now, I just put them down for the picture.
This is a detail view of the ventilation. At the top of all four walls, I left an opening from 1 to 3 inches wide. I covered every opening with hardware cloth and window screen. I have or will put aluminum flashing over areas vulnerable to rain or snow.
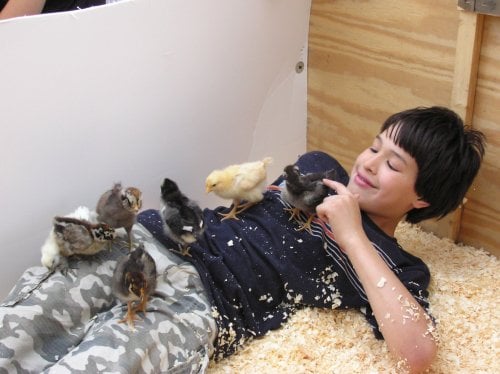
This is Andy covered with chickens. When we first put them in the coop, we made a smaller space by putting a two foot high strip of 1/4inch foam core across the middle of the coop (we have several sheets laying around. I guess you could say we are packrats!). Andy couldn't resist climbing into the wood shavings and chilling with his peeps. He wanted to spend the night on the other side of the foam core but Dad said no.
Here is detail shot of how I attached the hasps to the 3/4 plywood clean out door. I attached the hinges the same way. I used super long wood screws to attach stuff to the frame. I bought the wood for the two big coop doors. At Home Depot, they had 1/4 sheets of 3/4 inch birch plywood. I think they were about $12 each. The doors were about 42 inches tall by 23 inches wide, so there was not too much waste. For the door above, all went well and it was really fast and easy to make a sturdy door.
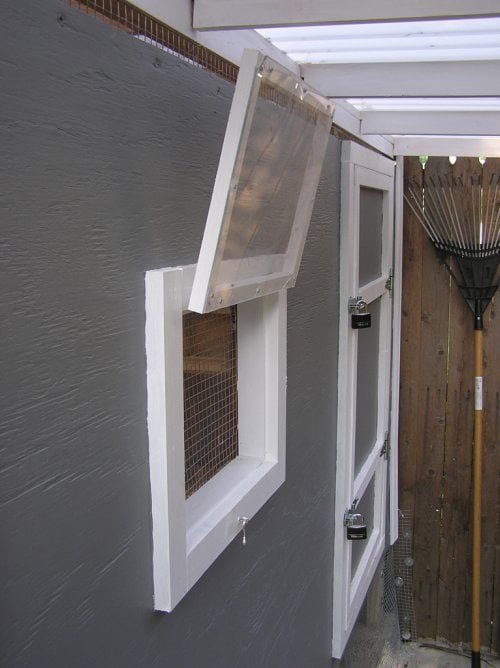
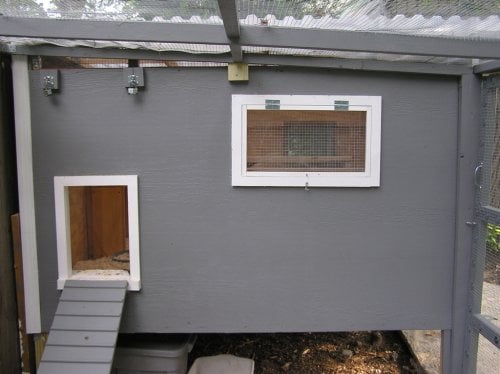
Here is one of my windows. I cut a sheet of thin plexiglas a little smaller than the window opening. I screwed on 3/4 inch strips of wood, then attached the hinges to the strips of wood. This window works fine, but the one on the opposite side of the coop, I cut the plexi a little too big and it got stuck and I broke it trying to open it. I already bought the replacement plexi but I still have to redo it. If I had it to do over, I would spend the money and buy the thick plexi. The thin is just too flimsy. All windows have hardware cloth and window screen.

Here is the entire coop. The door on the left by the plant is the one that worked the way it was supposed to. I messed up the one on the right. When I was cutting it on the table saw, it got away from me and the saw blade threw the plywood and made a big gash in the top. (All arms and fingers were ok!) I wasn't about to go and buy more plywood, so I just ripped some 1x2's and framed it out, disguising the gash. I now think it looks prettier and stronger. I had to get longer bolts to attach the hasps and hinges. I put two hasps on each door because I was afraid that a 'coon would pull out the bottom corner of one of the doors.
On the right side of the coop you can see that there is a big roof overhang. That's because the door on that side is supposed to be for feeding, watering and egg collection, daily chores, so we will need protection from rain (but we have to duck. I am 5'7", and the lowest point is probably one inch lower than that). On the left, under the overhang, you can see the flashing that protects the ventilation from rain. I have one more little piece of flashing that I plan to put over the top of this door.
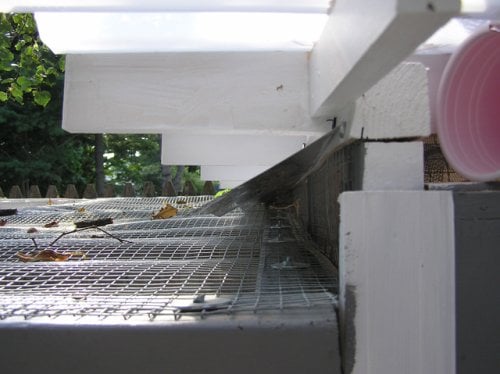
Here is a detail of the flashing.
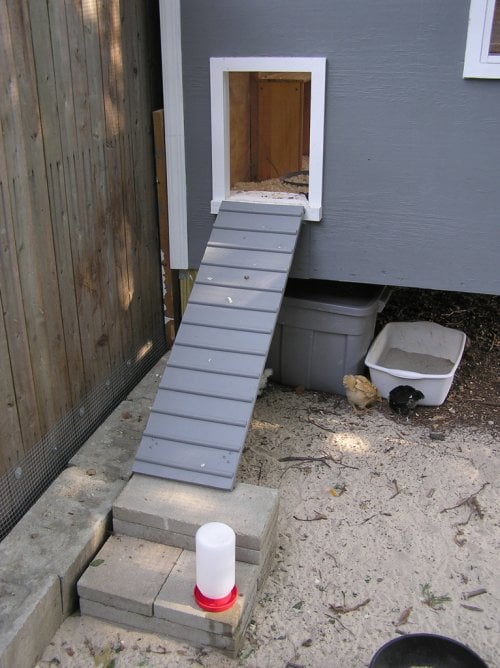
This is the chicken door and ramp. I used half round to make the steps. The paving stones at the bottom of the ramp we had laying around from when DH made a sidewalk for his sister. The big gray bin holds DE, and the dishpan has dust bath material, which they haven't figured out yet. They love dustbaths, they just don't recognize the dishpan as a dust bath location.

Here is the chicken door closed and locked. One more layer of protection. I actually plan to keep this door open 24/7, once they learn to go to bed by themselves at night and they are fully feathered. But there might be a time when I want to lock them in or out.
Here is the whole run side of the coop. If you look closely, you can see the cracks in the window that I broke. Oh, by the way, I used the gray paint because we had two gallons of it in the garage.
This is the completed run. All vertical supports are pressure treated. 4
x4 posts on the corner and to the left of the door. 2x4's every where else. There are less tree roots here so I was able to plant the 4x4's a little over a foot in the ground and then add cement. There are horizontal PT 2x4's on the ground on the two sides. The hardware cloth was stapled to those horizontals before they went down, and folded around, and they are below the level of the sidewalk on the near side. On the short side on the left, the hardware cloth extends out from the run for two feet, and is covered with pavers. All the hardware cloth is "buttoned on" with screws and fender washers. The top of the run is criss-crossed with 2x3's and 2x2's, and covered with "buttoned on" hardware cloth. I slid the hardware cloth around the horizontal support attached to the wooden fence and stapled it, inside the run, to the fence. ( I might add some better pictures of this). I made a threshold for the run door out of two scrap pieces of pressure treated 2x4's, stacked one on top of the other, which made the threshold about level with the sidewalk.
Here is a view of just the run.
Here is a different view of the run.
This shows the details of the run. I used dozens of these corner braces. I got the special braces for the top to hold the 2x3's that went across the run. I notched those to match the 2x2 that went down the middle of the length of the run. Up in the corner, you can see where I used nuts, bolts, locking washers and fender washers to fix a mistake. I was trimming the overlap of the hardware cloth, and I trimmed it too much, so I had to join two pieces of hardware cloth. I didn't like the idea of "sewing" the two pieces together with wire, so I "buttoned" it together. Much easier!
This is the inside of the run door. I buttoned the hardware cloth on the inside here, instead of the outside like on the rest of the run. Why? I have no idea! I put a handle 'cause we had no place to grab onto and pull the door closed, and a little latch. I have a screen door spring, I just have to get the tools out again and put it on. I constantly used a level to get things plumb, but apparently I goofed on the vertical support to the left of the door. I didn't realize this until I had the door on, but it feels very strong, and we pretended to be raccoons and pulled on the locked door and we think it is quite secure.
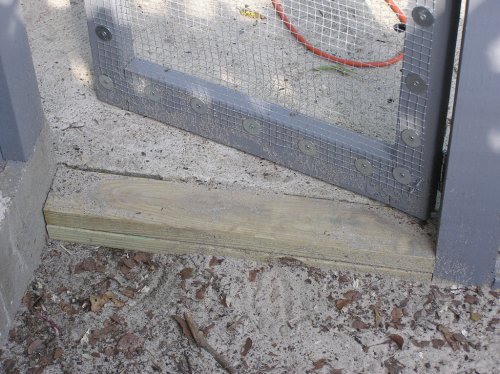
Here is a detail of the threshold for the run door that I made out of two leftover pieces of pressure treated 2x4's.
This pic shows the bottom of the run "wall". I stapled the hardware cloth to this pressure treated 2x4 first and then put the 2x4 in place. The hardware cloth extends about a foot into the run, and the staples are now on the bottom of the 2x4. Sand covers the hardware cloth.
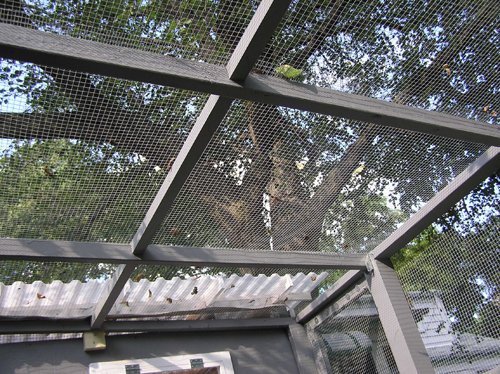
This is the run roof. The hardware cloth of the side extends in one piece across the roof. It is attached on top with fender washers and screws, just like the sides.
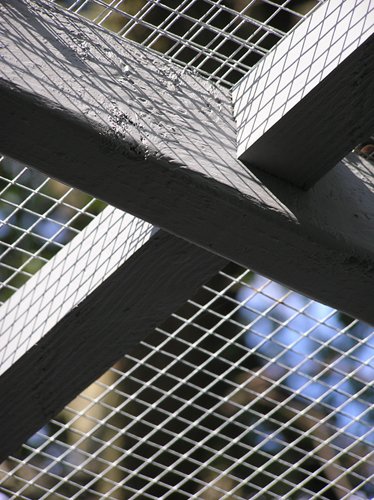
Here is a detail of the run roof. I used the table saw to notch the supports, so the top of the roof was a flat surface to attach the hardware cloth to. I put one long wood screw through both supports everywhere they crossed. I also painted all the pieces before I assembled them so I didn't have to paint over my head! I sent DS Andy up on the roof to put in any fender washer/screws that I couldn't reach from the side, because I wasn't sure if the roof would support my weight. We laid wide boards across the supports for him to lay on to spread out his weight. He weighs about 105 pounds, and the roof didn't sag or budge at all when he was up there.
Here is the fence that forms one side of the run. The pieces of hardware cloth that went over the roof come down inside the run and are screwed to the fence. Any hardware cloth I had leftover, I stapled to the fence. I didn't have enough to cover the entire area, but I don't feel like spending $40 on another roll of hardware cloth just to cover this fence. I feel pretty confident that raccoons can't claw through a wooden fence. If I begin to see gnawed areas, I will get myself to Home Depot quick!
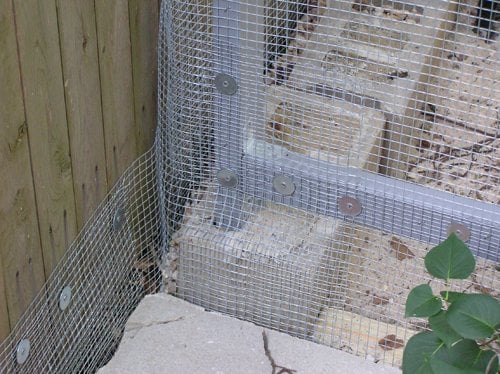
This was an awkward area of the run, where the end wall met the fence. There was a gap between the vertical 2x4 and the fence because the 2x4 was cemented into a concrete block. (Tree root area) I just wrapped the hardware cloth from the end of the run around the 2x4 and screwed it to the fence inside the run. I still had a little gap at the bottom and I patched it with more hardware cloth. There are about three layers in this one spot.

This area at the top of the same 2x4 was a little tricky too, but not as bad as the bottom.
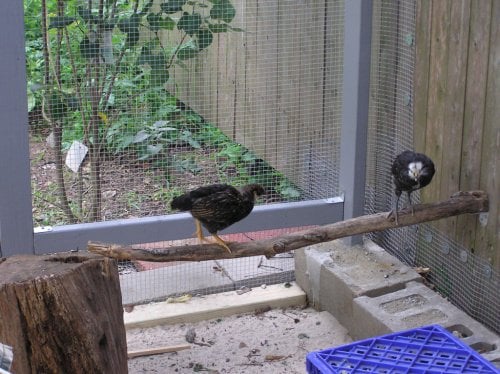
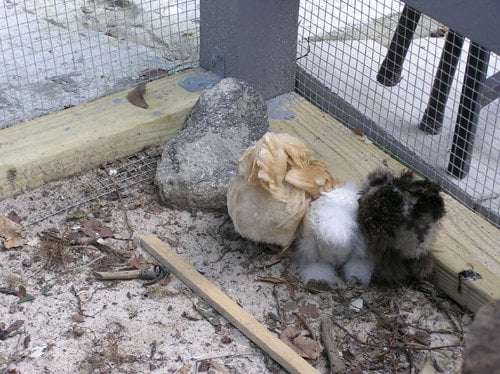
Here are Morphie (GLW) and Ozzie (Australorp) enjoying their outside roost. I have had my eye on that rotten stump for a while. I figure the chickens will have lots of fun tearing it apart to get to the bugs inside.

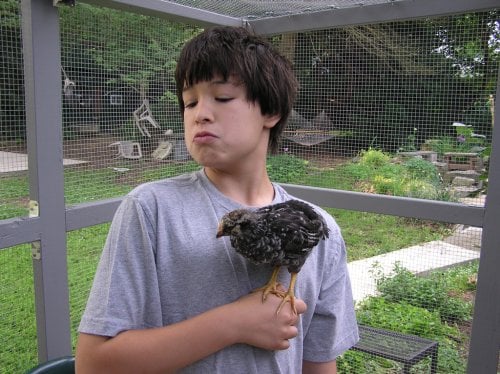
Andy sitting in the run holding Big Poofy (EE).
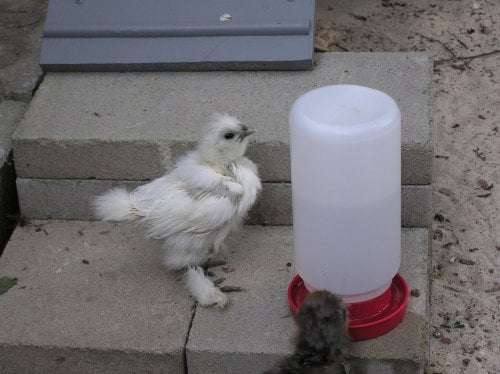
Onigiri (silkie) having a drink of water.
Onigiri on Andy's lap.
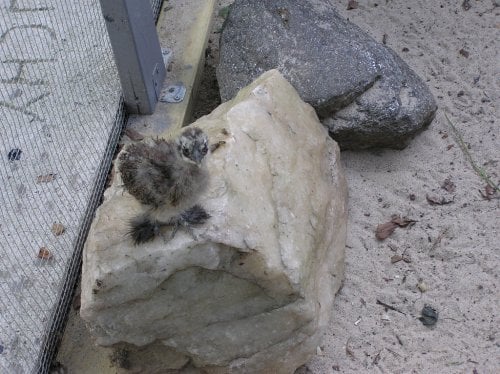
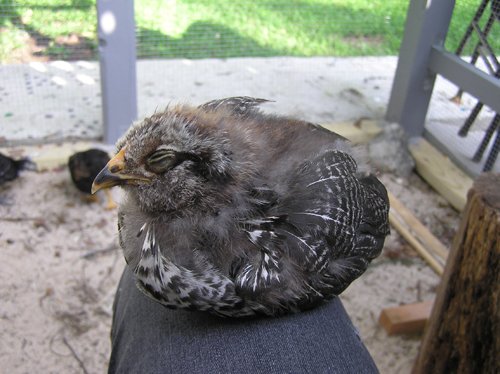
Boss Man (partridge silkie) on the big rock. We had these rocks in the back of the yard too.
Andy cutting up "salad" for the chickens. See my tomato plants in the background? August 15 and NO Tomatoes Yet! Sigh! I can build a coop and run but I can't grow tomatoes!
They have nearly finished their salad. That's Queen Anne's Lace next to the waterer. But can they eat a bagel? NO! All day, and they never touched the bagel! I got that horse bowl at the feed store. Someone on the forum talked about them. I love it. Heavy rubber, indestructable. I plan to put the outside water in it in the winter, and just pop the ice out two or three times a day and put fresh.
Andy and the lovely Zelda the brave!
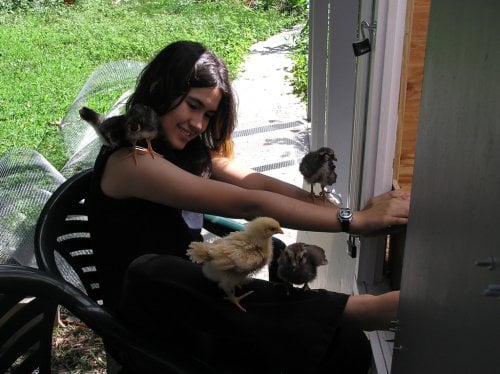
Natali all covered up with chickens! What a nice bunch of chicks! You can see the hardware cloth for the run laying on the ground in the background before I got very far on run construction.
With team work, and perserverance, we can get that one little tiny plant that is growing under this board!
Joy is having a chick sleep on your leg.

Andy is apparently good with many kinds of birds and wildlife. Here he is at the Bronx Zoo with a golden headed quetzel tasting his finger!
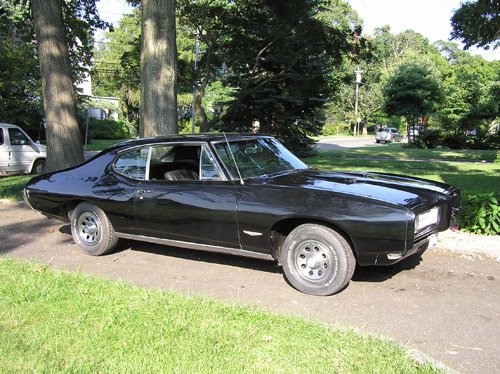
Here is DH's project. He didn't ask how much I was spending on the coop and run, and I didn't ask how much he was spending on the GTO.

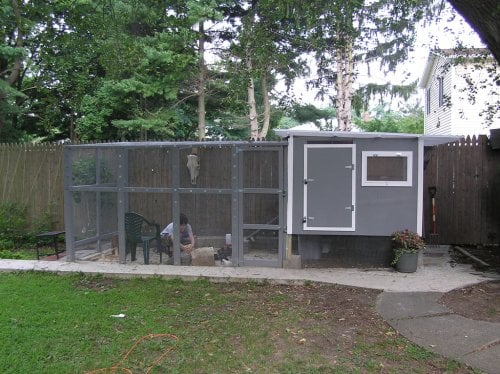
The entire space between sidewalk and fence is about 7 feet wide. The run is 11 feet long and 5 1/2 feet tall on one side and 6 feet tall by the fence. I have ordered a silver gray tarp from A1Tarps.com that will just fit the top of the run. They have lots of colors and sizes of tarps. I will probably use the tarp during long periods of rain or when snow is expected. I know I will have to keep the snow swept off. The coop is 7 feet by about 5 1/2 feet. Under the coop is 2 feet high, and the coop itself is about 4 feet high. My biggest expense was definitely the hardware cloth. I bought four rolls, 3 feet by 25 feet, at $40 a roll. I bought hundreds of fender washers, several boxes of screws and nails, the Suntuf roofing panels, the hasps, hinges, padlocks, etc. Almost all the lumber was found or salvaged, as were all the stones, blocks, paint and most of the cement. That's it!
I hope you enjoyed looking at my coop and run. I have to give a lot of credit to the people of BYC, as everything I know about coops and runs, I learned on BYC! Phew! I sure am glad that's over!