I had been to the local feed store and the guy had in there this little teeny tiny church that he had built. It was sooo cute with it's little steeple, etc.
We already knew that we wanted to build an old west themed group of coops, so the church became the first choice.
This was the first coop I had ever built, and I knew what I wanted and how I wanted it to look.
I had to tell DH that this was my project, and not to say anything unless my idea just wasn't right. He politely complied, and just made suggestions as the project progressed. Some of them I agreed with, some not, but overall it came out to be exactly what I had envisioned.
The overall size is 4 ft x 4 ft, and the run is basically 4 x 8 ft. (plus the 4' under the coop itself). I wired the bottom around the legs so that gave them extra run space.
This is the base. We used cut landscape timbers for the legs, and untreated lumber for the rest of the coop. I used those weird plastic tiles for the floor for ease of clean out. Cheaper than Linoleum, and only had to buy what was needed to cover the floor, since they come in 1 ft square size.
Here, the walls are up
Rafters
A bunch of my pics got inadvertently deleted off the camera memory card, so I am missing all the other pics of the build, but here is the finished product before the run was added:
Can you see the little brass bells in the steeple? They were my Grandma's. I got them when she passed away, and thought this was a good use for them.
On this side under the coop, I also put a door that lifts up . That is where their feed and water are.
I did this for 3 reasons:
1. Easy access for feeding and watering
2. To keep the feed and water out of the coop
3. To protect their feed from rain.
The back is all door, for ease of cleaning, and I'm so glad I did that!
Ooops, this pic is before the trim got painted...LOL
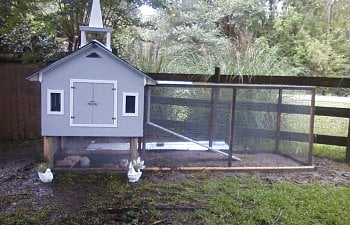
and here is what it looks like now, after the run was added:
For the ramp I used a 1"x8'x6' and paint stir sticks (crosswise) stapled to the 1"x8' for traction.
The run is just butted up against the coop and there is wire stapled between the legs of coop and the run uprights. The top of the run is tucked in under the rafter ends. This way it is portable, which I am also glad to have thought of, seeing as how we have to move it soon!! DH will just pull the staples, and we can transport each section separately! He is going to have to find help to lift the coop into the truck, because too heavy for me!! The only thing I wish I had done was to put a door in the side of the run. I can add that though, will probably do it when it is moved. The base of the run is landscape timbers, but all the uprights and around the top is 2x4 material that DH ripped in half with the table saw. We did that to reduce the weight of the run, and the cost of materials.
Inside I just throw some pine shavings(large size), and when it comes time to clean, I shovel it out through the back door, and throw more in. Couldn't be easier or quicker to clean out. Conveniently, my compost pile is just on the opposite side of the small fence to the left of the coop (in the above pic) so I get a shovel full and toss it right over the fence!!
I just used plastic containers inside for nest boxes. I put 2 in, but there's only 2 hens, and they use the same nest...LOL
I did put a roosting pole in there as well and made it so that it could be removed for cleaning, but I don't think they use it at all. I always see them huddled together near the front window. I know they have been on it, but they don't use it at night, like I expected them to. Oh well. Due to the lack of overhead space, I put the roosting pole only about 4 inches off the floor. All chickens in this coop are bantams, so they didn't need lots of head room, and even if they used the pole, they still have plenty of room.
I also covered the inside of the windows with 1/2" hardware cloth so nothing can get in or out.
We have raccoons, so I used spring type hook and eyes to lock each door. Next time I think I'll use small hasps and carabiners, will be easier to open when my carpal tunnel is acting up, but the spring hooks are working!
My DH's cat loves to sit on the steeple platform. His name is Rolo. I have been calling him "QuasiRolo" after Quasimoto. I cannot find the pics of him 'roosting' atop the steeple platform, but will edit to post that later, when I get another pic of him doing it...LOL
Sometimes I look out the window to find QuasiRolo lounging under the nearest tree just watching the chickens do their thing....
Here's a pic of my cat Nibbles sitting on the steeple. She must have taken over and not allowing QuasiRolo up there anymore...LOL
The windows are covered with Tyvek because we are still having a few cold nights.
Materials used:
3 sheets 1/2" plywood
5 1/2 8' landscape timbers
10 2x4x8 for interior framing and split lengthwise for run.
16 1'x1' plastic floor tiles.
12 hinges
4 spring type hooks and eyes
Shingles
5 small wooden drawer pulls
1 8' 1x2 for Steeple framing
1 wooden cross from Michael's craft store for top
1 gallon Grey semi gloss paint
1 pint white gloss door and trim paint
5 8' lengths of various trim (the plastic stuff, because it is cheaper and it lasts outside)
1 4'x1 1/2" dowel (roost)
1 small box of 3" painted deck screws
many 1 1/2 inch screws
Some roofing nails
Staples and brads for trim
about 30' of 4' wide hardware cloth and 8' chicken wire (top of run, ran out of HW cloth, and had the chicken wire already)
All together I spent about $100, maybe $125. Lots of stuff was given to us for this coop by friends who had materials that were not being used. We bought the plywood, flooring, trim, dowel, paint, screws, brads, nails, hardware, and the cross.
Thanks for looking-
I love the way it turned out.