Little Red Hen Coop

I am trying to write this information as simple as I can.
Built this coop after looking at several member's coops and their details and ideas. So we are grateful to those who take time to post pictures and information.
I used OSB 4' x 8' x 5/16" plywood, Douglas Fir boards, box of 1 inch screws, box of 3 inch screws, roofing paper, roof shingles, hinges, chicken wire, red barn paint, white barn paint and any scrap boards and plywood I could find.
I am still updating and fixing the coop as I find material or have some spare cash. I did buy some of the materials and also used old free wood from friends and family to keep my costs down.
Started by pre-painting most of the materials. Painted the plywood red and the boards white.
'
This is the 2 x 4 board frame. I started by cutting my corner boards at 6' (height), so i could cover my sides with the plywood and still have 2' legs below the coop.
At this height my girls have some protection and I can easily clean out and repair the coop. I built the sides 4' and 8' to keep from having to cut my plywood. This is a picture of the frame. Yes the floor is 4' x 8' too.
Some of the red painted plywood.
Here is the coop after I added the plywood to the frame. I used a piece of plywood for a temporary roof.
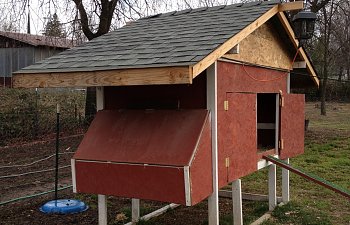
Notice the 18" cut on the 4' section of plywood wall (above). I did this so I could use one side to replace the floor and for a clean-out. The same on the other side to attach my 3 nests.
Added a 2" x 6" x 8' board with indoor/outdoor carpet for a ramp for the girls (chickens). Yes we have one rooster, but I still call out "girls" when I have food and they come running. I didn't realize they have such personality.
Ended up building the nests taller than the 18" opening. With the steeper lid the girls cannot perch on the top of the lid. I used 3 hinges to secure the lid.The nests are about 16" wide x 20" deep x 12" - 28 " slanted height.
Screwed down (2) 2 x 4 boards for a roost. My girls sleep on the boards at night. Wood chips were placed on the floor. I rake the chips around twice a week and replace it every few months. The 3" plywood I had cut off I used above to hod the wood chips in the coop.
A mounted dual bulb fixture with an on and off switch was added in the coop for lighting so we can see in there at night if needed. We would not recommend using the lighting for heat, because it is a fire hazard.
Below are some more pictures for detail.
Access ramp and small door for the girls and rooster to enter. The small door is important. It keeps bigger animals out of our coop allowing for protection of our girls. The door size was cut at 8" by 10".
The back of the coop has 2 large doors for easy access. 2 hinges were used on each door. and 1 locking latch.
Underside of coop. I will be upgrading the support legs on this coop soon, due to the extra weight I added when the roof was installed..
Inside the coop showing access to the nests. Concerned the holes were too small, but apparently not. The girls like the entrance to the nests this small. Nest openings are 5 3/4" by 13 1/2". You may need slightly bigger openings if you have larger hens. The nests also allow my girls to lay late or early eggs and to escape a temporary confrontation with other hens as they sometimes need a private space from the group. So I allow them access to the nests at all times.
Inside of coop showing corner top.
I have since removed the golf balls. The girls now only lay eggs in the nests. I am no longer searching the yard for eggs.
Eggs from Ameraucana, Rhode Island Reds, and White Brahma.
In case you are curious, my Reds and Brahma lay the brown eggs, the Ameraucana lays the green and avocado colored eggs.
An idea of what supplies are needed to complete coop are: 24- 2" x 4" x 8', 10- 4' x 8' OSB plywood, chicken wire, 6- 1" x 2" x 8' boards for trim or as needed, 8 door or cabinet hinges, 3- gate latches for doors and to secure nest top door from predators, 2 cans of red and of white barn paint, 5- packages of roof comp shingles, 1- roll of roofing paper, 3" and 1" deck screws, 1" roofing nails, bag of wood shavings and 10 hens.
The girls and the Brahma rooster. 1 red hen is in the nest.
Placed plywood triangle cuts to cover peak of roof, but out from walls to allow ventilation. I am still building and have touch up paint and trim to complete this coop. I have used reclaimed wood and other donated supplies to cut my cost. But a good roof and a coat of paint and you cannot tell which wood is new or old. You can modify this roof to be cheaper but just as protective by using the flat roof idea I originally had on this coop. I hope this inspires you to have chickens and to be creative with your coop.
Thank you
I am trying to write this information as simple as I can.
Built this coop after looking at several member's coops and their details and ideas. So we are grateful to those who take time to post pictures and information.
I used OSB 4' x 8' x 5/16" plywood, Douglas Fir boards, box of 1 inch screws, box of 3 inch screws, roofing paper, roof shingles, hinges, chicken wire, red barn paint, white barn paint and any scrap boards and plywood I could find.
I am still updating and fixing the coop as I find material or have some spare cash. I did buy some of the materials and also used old free wood from friends and family to keep my costs down.
Started by pre-painting most of the materials. Painted the plywood red and the boards white.
'This is the 2 x 4 board frame. I started by cutting my corner boards at 6' (height), so i could cover my sides with the plywood and still have 2' legs below the coop.
At this height my girls have some protection and I can easily clean out and repair the coop. I built the sides 4' and 8' to keep from having to cut my plywood. This is a picture of the frame. Yes the floor is 4' x 8' too.
Some of the red painted plywood.
Here is the coop after I added the plywood to the frame. I used a piece of plywood for a temporary roof.
Notice the 18" cut on the 4' section of plywood wall (above). I did this so I could use one side to replace the floor and for a clean-out. The same on the other side to attach my 3 nests.
Added a 2" x 6" x 8' board with indoor/outdoor carpet for a ramp for the girls (chickens). Yes we have one rooster, but I still call out "girls" when I have food and they come running. I didn't realize they have such personality.
Ended up building the nests taller than the 18" opening. With the steeper lid the girls cannot perch on the top of the lid. I used 3 hinges to secure the lid.The nests are about 16" wide x 20" deep x 12" - 28 " slanted height.
Screwed down (2) 2 x 4 boards for a roost. My girls sleep on the boards at night. Wood chips were placed on the floor. I rake the chips around twice a week and replace it every few months. The 3" plywood I had cut off I used above to hod the wood chips in the coop.
A mounted dual bulb fixture with an on and off switch was added in the coop for lighting so we can see in there at night if needed. We would not recommend using the lighting for heat, because it is a fire hazard.
Below are some more pictures for detail.
Access ramp and small door for the girls and rooster to enter. The small door is important. It keeps bigger animals out of our coop allowing for protection of our girls. The door size was cut at 8" by 10".
The back of the coop has 2 large doors for easy access. 2 hinges were used on each door. and 1 locking latch.
Underside of coop. I will be upgrading the support legs on this coop soon, due to the extra weight I added when the roof was installed..
Inside the coop showing access to the nests. Concerned the holes were too small, but apparently not. The girls like the entrance to the nests this small. Nest openings are 5 3/4" by 13 1/2". You may need slightly bigger openings if you have larger hens. The nests also allow my girls to lay late or early eggs and to escape a temporary confrontation with other hens as they sometimes need a private space from the group. So I allow them access to the nests at all times.
Inside of coop showing corner top.
I have since removed the golf balls. The girls now only lay eggs in the nests. I am no longer searching the yard for eggs.
Eggs from Ameraucana, Rhode Island Reds, and White Brahma.
In case you are curious, my Reds and Brahma lay the brown eggs, the Ameraucana lays the green and avocado colored eggs.
An idea of what supplies are needed to complete coop are: 24- 2" x 4" x 8', 10- 4' x 8' OSB plywood, chicken wire, 6- 1" x 2" x 8' boards for trim or as needed, 8 door or cabinet hinges, 3- gate latches for doors and to secure nest top door from predators, 2 cans of red and of white barn paint, 5- packages of roof comp shingles, 1- roll of roofing paper, 3" and 1" deck screws, 1" roofing nails, bag of wood shavings and 10 hens.
The girls and the Brahma rooster. 1 red hen is in the nest.
Placed plywood triangle cuts to cover peak of roof, but out from walls to allow ventilation. I am still building and have touch up paint and trim to complete this coop. I have used reclaimed wood and other donated supplies to cut my cost. But a good roof and a coat of paint and you cannot tell which wood is new or old. You can modify this roof to be cheaper but just as protective by using the flat roof idea I originally had on this coop. I hope this inspires you to have chickens and to be creative with your coop.
Thank you