SIMPLE LIVING CHICKEN COOP
I'm only 15 years old and I built this coop all by my self. The only help i had was by my parents who just got supplies for me. I Did all of the building myself. I hope you like the Article I put a lot of time into it. Not to mention the 60 + pictures that I took while making it. Enjoy!
Purpose
The purpose of this project is to make a Chicken Coop to hold 13 Chickens and provide them safety and comfort for maximum egg production and happy chickens.
Initial Idea
- A few months ago, my family moved back to the house I am in now. We had chickens here before, but we had to give them away since we were moving. When we got back, I decided that I want chickens again. Only this time, I was planning on getting more than the initial six that I got last time. This time, I wanted fifteen! Also, I didn't want just one type. I wanted a bunch of different types that would produce White, Brown, Blue, and Dark brown eggs. I knew that the little 6' x 4' coop that we had built for the other chickens wouldn't suffice for fifteen growing hens. I then decided to build a new, bigger, and better coop.
Brainstorming
- The first thing I did was figure out how big it needed to be. I used the approx. 4 sq. ft. per chicken estimate and since I was getting 15 chickens, the coop needed to be 60 sq. ft. in area. I also knew that I wanted it to be better quality than the previous one, and be sturdy and nice looking while still being cheap. I had in my mind a simple but attractive coop that would look like a small house that you would draw on paper to represent a house, with an A-frame roof and a rectangular body. Since I wanted to spend as little money as possible, I planned on using the scrap wood that we had in a pile for some of the basic frame. My budget was to try to keep the cost below 100$. Also, I wanted to include an easy way to get the eggs, some type of hatch that I could get the eggs out from without having to go inside the coop. I live in South Carolina so it doesn't get too cold in the winters but the main concern is the blistering summers. I decided the coop needed to have good ventilation. When I got all of my ideas together as well as I could, I started planning.
Planning/Preparation
-When planning my chicken coop, I decided to use a free program called SketchUp. SketchUp is a free 3D model making program that you can use to design 3D objects. If you would like to check it out and/or download it click here http://www.sketchup.com/ I started with a simple design and just basically made it how I invisioned it in my mind while meeting all the criteria I had. Here are a few screenshots of the model
.
As you can see, I just made the frame in this program so I could visualize how to frame it. It actually surprised me how little I strayed away from this design when I actually constructed the coop. (As you will see in future pictures.) My planned process was to make the frame, then install the roof, then the walls, and finally the floor. When I felt like I had done enough planning, I set out to find the perfect spot for the perfect coop. We only live on 1.3 acres so there wasn't much of a choice of where to put it, I had to put it fairly close to the old one. I chose a spot that was flat, but not level (It didn't matter if it was level because the floor is elevated) I then cleared away all the leaves and sticks with a rake and measured where to put the posts. It was really hard for me to get the post holes even since they had to all be in-line with each other at 90 degree angles and after a while of trying to get them perfect I still didn't get them perfectly square. Since the ground was sloped, I had to dig the two back holes deeper than the front ones so that the 4 x 4's would be the same height. I also decided to have a double run system. There are two runs, the smaller, more secure run, and the larger open run. The smaller one would be predator proof, made with hardware cloth or a similar material on the sides and top. When I am home, I will let the chickens into the bigger run made out of a fence with 6" holes that won't keep predators out, but just keep the chickens in for the most part. (I will overlay it with a soft mesh with smaller holes). That way they will only be vulnerable when I am home and awake so I can protect them. After the holes were dug for the coop I began construction.
Materials-
- In order to stay on track with my 100$ or less budget, I tried to use as much reused/old lumber as possible. When looking for 4 x 4's at a local lumber store, we found a large pile of 8 foot 4 x 4's laying outside the business' fence to be thrown away. Most of it still looked in good shape, so we took as much as we could fit on the trailer. We also took some random other pieces of lumber that we thought might be usable later. Here is an APPROXIMATE list of the wood used.
- 2 x 4's
12 footers- 6
8 Footers- 12
6 Footers- 4
- 4 x 4's
8 Footers- 10
- OSB Plywood
4 x 8 Peices- 4
- Wooden Siding
Feet of Siding- 140
Tools
- Circular Saw
- Table Saw
-Hammer
-Reciprocating saw
-Triple Joint ladder
Construction
-The first part of construction was piecing together 4 x 4's. The problem was that the 4 x 4's that I had were only 8 feet long, and I needed 10 foot long ones. To solve this problem, I did something I just call peiceing them together. What I do is cut a notch into two of them, and nail them together so that the two of them become one piece of wood. Here are some pictures to help visualize this.
After I had four 10 foot 4 x 4's, I put them into the holes i dug and tried to square them all to each other. (Make them all be even with each other)
It is really hard to make them all square with each other so the best thing I could figure out to do was to nail scrap pieces of wood to the posts to keep them level and in line.
Then I nailed the outer frame for the floor onto the posts and made sure they were level.
After that I mixed up some quik-rete and poured it into the post holes to keep them stable. {Quik-rete= A brand of fast setting concrete that is cheap and easy to use]
Here's a tip: Don't use old quik-rete that is crumbly and has big chunks in it, because it won't set right. I learned that from experience.
It took a few days to set because it was old and expired but it should have taken 4-5 hours.
When the Concrete set I put in the horizontal supports for the floor.
TIP: When cutting boards to go in between two other boards or posts, cut them about 1/4 to 1/2 and inch too wide so that it is a tight fit and it will be easier to nail and you won't have to have some body hold it in place. This principal applies whenever you have a board going in-between two other things that you will have to nail it to.
Up go the top parts of the framing
And then other parts of the framing. The point of framing is to be able to support the actual wall/floor/roof that you are putting up as well as possible. I added an extra verticle board for more support because 10 feet between the posts is too much of a distance.
I made an area to put the nest boxes on later and made it so I can have the hatch to reach the eggs from outside like I planned.
To tidy up a little, I cut off the tops of the posts so they would be flush with the frame with the help of this nifty little tool, the Jigsaw. Oh yeah, if you use one of these things be very careful and don't cut your leg off or something.


A little Opening for the chickens to get to their run
")
I then started on the large and difficult task of creating the roof. The roof was to be an A frame (same length on both sides and meeting in the middle) Like a simple house. I wanted it to look good too so I decided to make the roof supports go past the top frame board. (You will see what I mean in a second) I decided the best way to start the roof was to make the main support beam that the other small supports would be attached to first, and then put them in one by one.
After the roof was framed, the framing was complete (or so I thought). I later had to add a lot more supports for different reasons, the floor studs so the floor was sturdy and secure, and the walls so I could nail the siding more easily. I then started actually putting the roof on. Since I did this alone, I had great difficulty getting the OSB plywood on the roof supports, but I managed to get it done. What I had to do was nail a small nail into the corner of where I was putting the board, and then in the other corner and place the board down and nail it down all while making sure it is even. It caused a good deal of frustration and a pretty close call when I almost got pushed off the top of the coop by the board but I did it. Because of my bad planning, I didn't take into consideration that plywood comes in 4' x 8' sheets and so i had to do some piecing together to get the roof complete.
When the roof was in place, I needed to some way make it waterproof. My original plan was to use shingles, but we found a shingle like material that comes in rolls and it is cheaper and easier to install so I used that. Before I put it on I put a waterproof material under it that helps keep water out. Putting those on was a very interesting task to put it simply... Every time I tried to push the roll down the roof to nail it down, it kept rolling back so I had to nail it down on one side and then get it down on the other side.
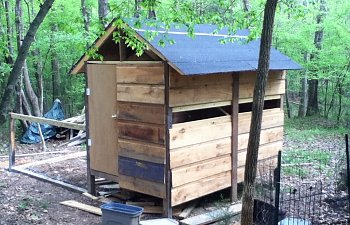
After the Roof I started on the walls. Originally I was going to use OSB plywood for the walls, but my parents told me we had some leftover pine siding from a house addition under the back porch. A few work days and a lot of cutting later, I got three of the walls up. I left the nails sticking part of the way out so that if I needed to, I could take them out and re-position the siding.
The Nails left out part of the way ^
I left a place to put the little egg doors to collect the eggs from later ^
After the walls, I started on the floor. I was going to use good quality plywood, but due to its extremely expensive price decided to go with good ole cheap OSB. Again, my lack of consideration for the size of plywood sheets came to bite me. I had to cut the plywood into a few pieces and fit it all together but it worked out in the end. After I put the first strip in, I discovered that the floor gave too much under my weight, so I put in small pieces of 2 x 4 to give it even more stability.
After a little skilled cutting of the boards to get them to fit with the posts in the way, Viola! I had a sturdy floor.
When The floor was complete I moved on to the run. For the run, I eventually figured that It would need to be the same length as the coop, and 8 feet wide. The reason was that I was planning on using 4' tall hardware cloth and if it was 8' wide then when I put the hardware cloth on top it would fit perfectly. (2 Times 4 is eight for all you people that aren't good at math
When I was getting the concrete out from under the porch I discovered a couple little inhabitants I didn't know about... BABY OPOSSUMS!
Not Finished Yet:
- Run
- Nest Boxes
- Painting
- Top ventilation triangles
No, the coop isn't finished yet, I will add the rest as I finish it.

Things I would change/ have done differently
The only thing I would have changed is the size of the coop. I should have made it more in tune with plywood sizes for ease of building.
TIPS:
-Make sure you do a lot of planning and thinking it through before you actually build a coop. It will save you a lot of money, time, and energy.
-Be aware of the types of wood you will be using and size your coop accordingly.
.-You don't have to use brand new wood. As long as it has its integrity and isn't decayed or eaten by bugs or otherwise messed up, its good to use. This saves a great deal of money
I hope you enjoyed this article! Also I hope that it inspires you since I built this all alone and i'm only 15 and if I can do this, so can you. If you have any questions just ask in the comment box and I will be happy to answer.
Disclaimer: Any links used in this Article are in no way affiliated by business to the author of this article.