This is the Bed & Breakfast A Bed for the hens and breakfast for us!
We took the Purina Mills Chicken Coop plan and changed a few things. For instance, we didn’t like how the nesting boxes were right over the pop door and moved them to the right side. In their place we put a large, square window we acquired at a window store for free that they were tossing out. We did all the construction and assembly in the drive way and dry fitted the entire coop there and then later moved it to it’s home in the garden. The coop can house up to 8 large hens or 12 bantam hens.
Some of the wood is reclaimed that we already had around, like the 4x4 posts and a few pieces of plywood. The other wood we bought from our local lumber company.
Here is the link for the Purina Plan:
http://poultry.purinamills.com/NUTRITIONMANAGEMENT/HenHouseHutchDesign/default.aspx
First, are the completed coop photos:
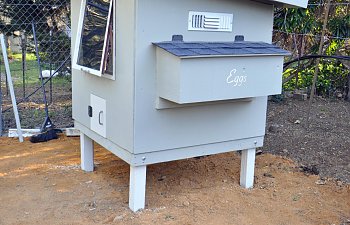
Here's the right side of the coop with the nesting boxes.

The front window, open.
The left side of the coop, with Human-ish sized clean out and access door.
The back side of the coop. Nothing fancy, just another vent.
The Inside of the Nesting Boxes
The inside ( almost done, just need to add the plastic backsplash.)
View from inside the coop:
Next to the gate we put a bird house and a pot of cat grass.
And here is a wide angle view of the Bed & Breakfast's location in the garden:
Where the ladies will be allowed to free range under very strict supervision. (ignore the gray area, it's a stitched photo)
And this is our construction safety supervisor, Molly.
______________________________________________________________________________________________________________________
Okay, now for the actual process of building the coop!
The nest boxes were made first and are 12”x36” with a taper to 14”. Each nest is around 12 inches square. The dividers were made with 1/4 inch plywood and set with chunks of pine we had laying around.
Here is the window we got from the glass shop. It’s 2’x2’ and made the frame is all metal. It’s pretty heavy. It had another window beneath it sans glass that we didn’t need so we took the sawzal and cut it off. A little caulking and paint and it looks a lot better! It was originally a blue color with rust here and there.
This is the basic bone structure of the coop. 4x4 posts with a floor.
Here we have organized chaos! Walls, rafters, floors and everything in between strewn over the driveway and being primed and painted. We used extra paint from the house and flipped the main color and trim colors.
This is the underside of the coop floor all painted so mud and poo doesn’t cake on and rot.
The chicken ladder with 1 coat of paint. Yours Truly had a goober moment and tripped over it, breaking off one of the rungs. Hubby had to make another. Behind the ladder on the retaining wall you can make out the two roosts. All the edges on both the roosting poles and the ladder rungs were sanded into smooth corners.
The weather changed and a storm was coming in a couple days early. So we busted butt and flung paint to get this thing over into the garden where it will live. We extended the garden this year and decided to put the coop and run in a shady spot (that will never be rectified without cutting the neighbors trees down) where nothing grows well.
The chicken run is made up of a 6‘x12’ dog run. We took the two 6 foot sections and put them together and after we get a cattle panel and cover it with hardware cloth we will have a 12‘x12’ chicken run. The coop sits inside. At some point we may add a canopy with hardware cloth or netting to protect the ladies from overhead threats.
Here is the Hubby screwing down the roof. Not pictured is us scampering in the dark to get the tar paper and shingles on before the rain hits.
I took the Dremel and attacked anything sharp and ground it off. One of the issues with using 1/2 inch plywood is that roofing nails and some of the other screws used to attach the nesting box came through and had to be ground off on the inside. I even rounded off the corners on the ceiling vents. Basically if it was a corner, or was sharp it got fixed. I later touched up the paint.
I wanted to add a little something to the nest boxes so I found a fun font and printed out the words "eggs" and got it centered and taped down. I then took my beloved Dremel tool with an etching attachment and went over the paper (it just comes off right along with the wood). Next, I took some white paint and filled in the letters.
Here is how the roosts are attached to the walls:
How we attached the landing strip for the nesting boxes. They are just window blind hangers we had around.
I rounded off all of the corners of the roosts.
The next thing we did was add a gate near the chicken run in the garden fence for easier access.
We took the Purina Mills Chicken Coop plan and changed a few things. For instance, we didn’t like how the nesting boxes were right over the pop door and moved them to the right side. In their place we put a large, square window we acquired at a window store for free that they were tossing out. We did all the construction and assembly in the drive way and dry fitted the entire coop there and then later moved it to it’s home in the garden. The coop can house up to 8 large hens or 12 bantam hens.
Some of the wood is reclaimed that we already had around, like the 4x4 posts and a few pieces of plywood. The other wood we bought from our local lumber company.
Here is the link for the Purina Plan:
http://poultry.purinamills.com/NUTRITIONMANAGEMENT/HenHouseHutchDesign/default.aspx
First, are the completed coop photos:
Here's the right side of the coop with the nesting boxes.
The front window, open.
The left side of the coop, with Human-ish sized clean out and access door.
The back side of the coop. Nothing fancy, just another vent.
The Inside of the Nesting Boxes
The inside ( almost done, just need to add the plastic backsplash.)
View from inside the coop:
Next to the gate we put a bird house and a pot of cat grass.
And here is a wide angle view of the Bed & Breakfast's location in the garden:
Where the ladies will be allowed to free range under very strict supervision. (ignore the gray area, it's a stitched photo)
And this is our construction safety supervisor, Molly.
______________________________________________________________________________________________________________________
Okay, now for the actual process of building the coop!
The nest boxes were made first and are 12”x36” with a taper to 14”. Each nest is around 12 inches square. The dividers were made with 1/4 inch plywood and set with chunks of pine we had laying around.
Here is the window we got from the glass shop. It’s 2’x2’ and made the frame is all metal. It’s pretty heavy. It had another window beneath it sans glass that we didn’t need so we took the sawzal and cut it off. A little caulking and paint and it looks a lot better! It was originally a blue color with rust here and there.
This is the basic bone structure of the coop. 4x4 posts with a floor.
Here we have organized chaos! Walls, rafters, floors and everything in between strewn over the driveway and being primed and painted. We used extra paint from the house and flipped the main color and trim colors.
This is the underside of the coop floor all painted so mud and poo doesn’t cake on and rot.
The chicken ladder with 1 coat of paint. Yours Truly had a goober moment and tripped over it, breaking off one of the rungs. Hubby had to make another. Behind the ladder on the retaining wall you can make out the two roosts. All the edges on both the roosting poles and the ladder rungs were sanded into smooth corners.
The weather changed and a storm was coming in a couple days early. So we busted butt and flung paint to get this thing over into the garden where it will live. We extended the garden this year and decided to put the coop and run in a shady spot (that will never be rectified without cutting the neighbors trees down) where nothing grows well.
The chicken run is made up of a 6‘x12’ dog run. We took the two 6 foot sections and put them together and after we get a cattle panel and cover it with hardware cloth we will have a 12‘x12’ chicken run. The coop sits inside. At some point we may add a canopy with hardware cloth or netting to protect the ladies from overhead threats.
Here is the Hubby screwing down the roof. Not pictured is us scampering in the dark to get the tar paper and shingles on before the rain hits.
I took the Dremel and attacked anything sharp and ground it off. One of the issues with using 1/2 inch plywood is that roofing nails and some of the other screws used to attach the nesting box came through and had to be ground off on the inside. I even rounded off the corners on the ceiling vents. Basically if it was a corner, or was sharp it got fixed. I later touched up the paint.
I wanted to add a little something to the nest boxes so I found a fun font and printed out the words "eggs" and got it centered and taped down. I then took my beloved Dremel tool with an etching attachment and went over the paper (it just comes off right along with the wood). Next, I took some white paint and filled in the letters.
Here is how the roosts are attached to the walls:
How we attached the landing strip for the nesting boxes. They are just window blind hangers we had around.
I rounded off all of the corners of the roosts.
The next thing we did was add a gate near the chicken run in the garden fence for easier access.
") Cheaper than I thought they'd be too!
Cheaper than I thought they'd be too!
I have not had the pop door blow shut, but it does have pretty large hinges on it from our local Restore.
The only thing showing any wear is the ramp to the pop door, but I believe that's just poor wood on the rungs that could be spiffed up.