I had chickens growing up. When my husband declared he was going to build an enclosed garden so that he could conquer the deer problem and grow his own vegetables I decided what better time to include a space for chickens. Chickens and fresh eggs go well with fresh veggies. At first he was not OK with the idea, however, now it is difficult to go to our local breeder for feed without having him come home with a couple of chicks.
My husband and I do not have any basic building skills, however, my brother in law, Owen, who is quite gifted in this area was keen to help. He is of course the master mind behind the design. The first challenge was to create a structure that will be predator proof. We have possums, raccoons, hawks, owls, coyotes...that is probably enough for now. You get the picture. My initial requirements were predator proof, walk in size, ease in cleaning and maintenance, rustic look, and South Austin whimsy. We decided to build a 10 x 10 house with a porch completely enclosed in an aviary.
First step was creating the perimeter. We rented a trencher and dug an 18" trench for a perimeter. We built the base of the aviary out of galvanized pipe and filled the trench with cement. This would prohibit any diggers that thought they would enter the aviary from underneath.
After day 1 the perimeter was complete. we laid some stone at the entry way and left the cement to set.
Next step was to build the frame for the aviary. We continued using galvanized pipe for this.
On day 2 the guys completed the frame.
Once the frame was complete. We wrapped the bottom of the frame in 1/4" hardware cloth up to 3 feet. We wired the hardware cloth onto the bottom pipe using galvanized wire. the second row of hardware cloth was 1" which continued up the remaining side up onto the roof. We used hardware cloth connectors to tie the two pieces of hardware cloth together. Before enclosing the roof we began construction on the hen house. This allowed us to use tin on the roof and incorporate it into the hardware cloth on the aviary roof.
Since we had already enclosed the aviary, the back wall of the hen house was framed and raised as one piece. A window and a barn fan were integrated into the wall. We experience 100+ temperatures in Austin in the summer so keeping the ladies cool is important. The back wall exterior was covered in tin siding.
Next step was to complete the framing. the structure included a front porch. this will provide a step up area to the chicken entrance for the pier and beam structure. It also provides just one of my many whimsical touches.
Once we completed the frame of the house we added the siding and finished the roof of the aviary. We completed the top with 1" hardware cloth attaching them to the galvanized pipe with wire as we did the sides. We stapled the ends to the roof of the house and topped the house roof with tin.
The next focus was interior. We added insulation, sheeting, and framed for additional windows. We also framed for a lower swing door that would allow me to prop it open and sweep out the floor covering for easy cleaning.
At this point the girls are getting pretty big and still living in a box. We completed the minimum for the house that would allow us to move them in. this included finishing the sheeting, window installation, painting and a temporary roost. I chose a tan color for the walls to blend in with the chicken poop so it would at least look clean even if it was not. For the floor I used truck bed liner paint in black called Herculiner. I filled the room with rice hulls and moved the girls in. We ran a temporary extension cord through the window so that we could operate the fan and wait on completion of the wiring. (Owen is an electrician - lucky me
") )
)
The completion of the interior included roosts and nesting boxes. Owen customized the nesting boxes to include a drop bottom. The bottom is one piece and with the release of the latches it drops and I can sweep the remains out with the floor material out the side swing door. Of course they needed to be princess pink.
It gets very hot hear in the summer. so rather than creating baking boxes with access from the outside we installed the boxes inside since the house has easy access with walk in anyway.,
I added finishing touches to keep to my whimsical theme. These included a small chandelier, cedar panels on the ceiling and some tin signs on the wall.
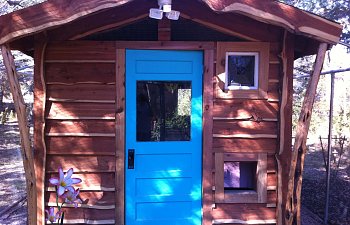
Finally, the finishing exterior touches. Cedar plank siding and cedar posts for the porch. (cedar is cheap and easy to come by in Austin, TX). We tiled the porch with slate for easy clean up, framed the chicken door and the final stained glass window on the front. the chicken door includes an auto open and close for the cold winter months. the front porch light includes a motion detector.
The girls have just started laying. My egg production doubled the day after the chandelier installation. The ambiance was the perfect touch for happy ladies.
Girls approve
sorry Mr. Possum. There is no way you are getting in this place!