This is my second coop since April of 2012, its now October 2012 and after much work and thought the second coop is complete! The goal of the coop was to keep my feathered friends happy and to make it as low maintenance as possible. this will probably be a long write up, but i think there is some good ideas here that any coop can use to make the lives of the of the ones that maintain the coop easier and give them more time to do other things like hug a chicken ")
So where to start.... I guess picture by picture is best:

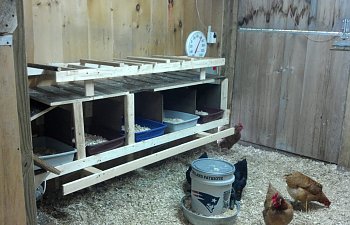
Well here is a pic of the inside of the coop which is located in one of the three stalls we have in our barn. this stall is approximately 10' X 10'. the door you see leads to the outside. We are fortunate to have a barn that was build in the late 90's so its in great shape. the walls are insulated with hard foam and the walls inside and out are all solid boards, this will help in winter some. before we started anything we put down 1/2" hardware cloth and secured it all the way around. we have weasels here in NH and they are evil...... which is also why there are no holes bigger than a 1/2 inch anywhere unless its covered by hardware cloth. Since my barn is attached to my house we don't have to go outside at all during winter or rain to maintain it or collect eggs. so to the left we see a roost above the nesting boxes but i'll come back to those. the nesting boxes are cat litter pans 15"X 18" so plenty big and they are not attached so they can be pulled out and cleaned easily, i did add a piece of wood at the back so when they jump on the front lip of the pans they don't flip up. then a simple piece of strapping in front of the nesting boxes so they have something easy to jump up to when they want into the nesting boxes. nothing in the whole coop touches the floor, its either wall mounted or hung from the ceiling rafters. this makes for easy cleaning. since the floor of the barn is dirt we do the deep litter method and that has worked well for us. the feeder on the floor is obviously a 5 gallon pail, it has holes drilled all around the bottom of bucket with a hole saw then its bolted down to a metal oil drain pan u can get at a good auto parts store and it holds about 35lbs of food. this is nice because you can go a while w/o refilling depending on your flock size.
the above two photo's are of the roosts above the nesting boxes, at the wall side they are mounted with hinges so it can be flipped up and out of the way for easy cleaning, a simple piece of string holds it up. i used mostly strapping and smooth edged pieces of wood for comfort. the idea just popped in my head to put shavings below this roost..... im gonna do that tomorrow
these roosts are on the other side of the stall, again nothing is floor supported and they have a handy ladder to use if they want to. i used old baseball bats and boat oars, they seem very happy with these, chickens don't care if you use top of the line wood or reuse stuff that was going to be thrown out, like the bats and oars.....
these two pics are of the window i added, there was no window before because for horses you can open the top half of the door, not safe for chickens though. i used this window design (about $65 at home depot) because sidewards rain won't come in and the whole window opens unlike a sidewards slider would for maximum ventilation and light. i made a second screen on the outside of 1/2" hardware mesh to keep predators out, window also easily comes out for cleaning.
this is a simple ramp, its a 2"X10" thats 4' long, i used the table saw and cut grooves every 3"s, i did two passes for each groove so it was wide enough for their claws to grab, the ducks had slipping issues with the old ramp and this one they don't slip on even in the rain.
these two pics are of the inside and outside of the inside door (confused?) the openings are all covered and secured with 1/2" or 1/4" hardware cloth. i wend all around the wire with strips of wood for extra security. there was no upper half to the door so i had to make one. i used a slide latch so we have the option of only opening the top should the need arise. the box fan provides extra ventilation and just really keeps the air moving. the cooler is part of my watering system i made (high capacity with chicken nipples) ,
Now for the really cool stuff........
The waterer: https://www.backyardchickens.com/a/summer-winter-chicken-nipple-waterer
This is the amazing automatic coop door opener (little white box above door), sure i paid like $95 for this but sleeping in and not rushing home at night to open/close the door is soooo worth it!!!! i control when it opens and closes with a lamp timer. when the times is turned on the door starts to open and stops itself where you set it, when the timer turns off, the motor resets itself and then when the timer turns on again at night it goes in the opposite direction and stops where you set it, then that process repeats. simple really but soooo helpful. the door is a piece of aluminum plate i cut up and the slides are aluminum c channel i got from home depot. the door closes well below the bottom of the opening. i don't see how any animal could get there paw to open up the door, its very hard to grip and the more you push in the harder it is to lift. i did come up with a latch that the auto door opener can operate but i don't think its necessary.
and the two above pictures are from my camera, yes i have a camera in my coop.... its an ip camera i got from amazon ($72) it pans and tilts, has night vision and audio. i'm going to get another and aim it the other way so i can see everything between the two cams. I LOVE HAVING THE CAMERA'S! i can see and hear my feathered friends anytime day or night from anywhere, i set up the wife/my cell phones to view/hear the camera's. with this view i can see the temperature, check the feed level (notice holes in side of bucket covered with clear plastic from a 2 liter bottle), see if the door is open or closed, and see if we got any eggs. notice how the arm of the thermometer glows and how the door glows next to the other glowing spot, i added reflector strips to those things. i couldn't see the indicator arm of the thermometer and it was hard to tell of the door closed 100%, so if i see the reflector on the door and wall line up i know its closed. simple yet effective! When i show people the video feed on my phone they are amazed that its a live feed and they always get a kick out of it. its really just super handy to have. both this camera and the outside camera record on motion, so if my feathered friends were attacked i would know what did it and when it happened.
This is the outside camera, all the same as the camera above but no audio, still has night vision though. they have more run space than this, just not enough cameras yet.....
The two pics above are of the timers and their uses, i actually use 3 timers, one for the auto coop door, one for the light inside the coop (19w florescent with daylight brightness) since the window doesn't give enough light, and the third timer controls the outside motion lights in the run, the lights would kick on before the coop door closed and they would all go back out in the run then the door would close them out, i use the timer to cut power from like 5pm to 9pm or so that doesn't happen anymore.
and these last 4 pics are just because i could plenty of roosting space for the ladies and gents and a pic of some of the huge eggs i have gotten from them, so far only the red stars have laid, i think one of the easter eggers started laying but i gotta check the camera and see.
So to sum it up, timers are your friend to help make the coop automated, the waterer is amazing but again thats a whole other write up, large quantity feeder, very secure coop design, camera's to remotely view temp, feed, coop door, and for eggs, great ventilation, plenty of light, easy to clean, and plenty of room for all 24 chickens and 2 ducks. I hope this post helped some people with ideas, many of them can be used in a coop that isn't a barn stall. thanks for reading and have a great day. any questions just post a reply.
Edit:
I followed a suggestion from BYC member "coolcanoechic" to use 2X4's wide side up as my roosts because the chickens can more easily cover their feet when its cold and prevent frost bite on their toes. I thought this made sense and was a good idea but then decided to slightly change the configuration of my roosts also. instead of having the roosts perpendicular to the wall i made them parallel to the wall so more birds can fit side by side to keep each other warm, the roost over the nesting boxes still flips up with ease and i also made it easier to see the temperature in the camera during the night time. i took strips of reflectors i got at home depot and cut them thin (about 1/4" or less) and made a 0 for 0 degrees, a 2 for 20 degrees, a 4 for 40 degrees and so on. in these pics the light was on but the flash made the reflectors really glow! im including another camera screen shot of the nighttime with the reflectors, if i move the IR light i put in they won't glow as much and should be a bit easier to read but works good for now. hope this helps somebody, Thanks
As you can see, i have a chicken in the nesting box... for some reason one of my roosters Gandolf who is a grey frizzled cochin and actually has no issue being held, decided to sleep there that night instead of sleeping right up next to his favorite hen.... lovers quarrel maybe?
So where to start.... I guess picture by picture is best:
Well here is a pic of the inside of the coop which is located in one of the three stalls we have in our barn. this stall is approximately 10' X 10'. the door you see leads to the outside. We are fortunate to have a barn that was build in the late 90's so its in great shape. the walls are insulated with hard foam and the walls inside and out are all solid boards, this will help in winter some. before we started anything we put down 1/2" hardware cloth and secured it all the way around. we have weasels here in NH and they are evil...... which is also why there are no holes bigger than a 1/2 inch anywhere unless its covered by hardware cloth. Since my barn is attached to my house we don't have to go outside at all during winter or rain to maintain it or collect eggs. so to the left we see a roost above the nesting boxes but i'll come back to those. the nesting boxes are cat litter pans 15"X 18" so plenty big and they are not attached so they can be pulled out and cleaned easily, i did add a piece of wood at the back so when they jump on the front lip of the pans they don't flip up. then a simple piece of strapping in front of the nesting boxes so they have something easy to jump up to when they want into the nesting boxes. nothing in the whole coop touches the floor, its either wall mounted or hung from the ceiling rafters. this makes for easy cleaning. since the floor of the barn is dirt we do the deep litter method and that has worked well for us. the feeder on the floor is obviously a 5 gallon pail, it has holes drilled all around the bottom of bucket with a hole saw then its bolted down to a metal oil drain pan u can get at a good auto parts store and it holds about 35lbs of food. this is nice because you can go a while w/o refilling depending on your flock size.
the above two photo's are of the roosts above the nesting boxes, at the wall side they are mounted with hinges so it can be flipped up and out of the way for easy cleaning, a simple piece of string holds it up. i used mostly strapping and smooth edged pieces of wood for comfort. the idea just popped in my head to put shavings below this roost..... im gonna do that tomorrow
these roosts are on the other side of the stall, again nothing is floor supported and they have a handy ladder to use if they want to. i used old baseball bats and boat oars, they seem very happy with these, chickens don't care if you use top of the line wood or reuse stuff that was going to be thrown out, like the bats and oars.....
these two pics are of the window i added, there was no window before because for horses you can open the top half of the door, not safe for chickens though. i used this window design (about $65 at home depot) because sidewards rain won't come in and the whole window opens unlike a sidewards slider would for maximum ventilation and light. i made a second screen on the outside of 1/2" hardware mesh to keep predators out, window also easily comes out for cleaning.
this is a simple ramp, its a 2"X10" thats 4' long, i used the table saw and cut grooves every 3"s, i did two passes for each groove so it was wide enough for their claws to grab, the ducks had slipping issues with the old ramp and this one they don't slip on even in the rain.
these two pics are of the inside and outside of the inside door (confused?) the openings are all covered and secured with 1/2" or 1/4" hardware cloth. i wend all around the wire with strips of wood for extra security. there was no upper half to the door so i had to make one. i used a slide latch so we have the option of only opening the top should the need arise. the box fan provides extra ventilation and just really keeps the air moving. the cooler is part of my watering system i made (high capacity with chicken nipples) ,
Now for the really cool stuff........
The waterer: https://www.backyardchickens.com/a/summer-winter-chicken-nipple-waterer
This is the amazing automatic coop door opener (little white box above door), sure i paid like $95 for this but sleeping in and not rushing home at night to open/close the door is soooo worth it!!!! i control when it opens and closes with a lamp timer. when the times is turned on the door starts to open and stops itself where you set it, when the timer turns off, the motor resets itself and then when the timer turns on again at night it goes in the opposite direction and stops where you set it, then that process repeats. simple really but soooo helpful. the door is a piece of aluminum plate i cut up and the slides are aluminum c channel i got from home depot. the door closes well below the bottom of the opening. i don't see how any animal could get there paw to open up the door, its very hard to grip and the more you push in the harder it is to lift. i did come up with a latch that the auto door opener can operate but i don't think its necessary.
and the two above pictures are from my camera, yes i have a camera in my coop.... its an ip camera i got from amazon ($72) it pans and tilts, has night vision and audio. i'm going to get another and aim it the other way so i can see everything between the two cams. I LOVE HAVING THE CAMERA'S! i can see and hear my feathered friends anytime day or night from anywhere, i set up the wife/my cell phones to view/hear the camera's. with this view i can see the temperature, check the feed level (notice holes in side of bucket covered with clear plastic from a 2 liter bottle), see if the door is open or closed, and see if we got any eggs. notice how the arm of the thermometer glows and how the door glows next to the other glowing spot, i added reflector strips to those things. i couldn't see the indicator arm of the thermometer and it was hard to tell of the door closed 100%, so if i see the reflector on the door and wall line up i know its closed. simple yet effective! When i show people the video feed on my phone they are amazed that its a live feed and they always get a kick out of it. its really just super handy to have. both this camera and the outside camera record on motion, so if my feathered friends were attacked i would know what did it and when it happened.
This is the outside camera, all the same as the camera above but no audio, still has night vision though. they have more run space than this, just not enough cameras yet.....
The two pics above are of the timers and their uses, i actually use 3 timers, one for the auto coop door, one for the light inside the coop (19w florescent with daylight brightness) since the window doesn't give enough light, and the third timer controls the outside motion lights in the run, the lights would kick on before the coop door closed and they would all go back out in the run then the door would close them out, i use the timer to cut power from like 5pm to 9pm or so that doesn't happen anymore.
and these last 4 pics are just because i could
plenty of roosting space for the ladies and gents and a pic of some of the huge eggs i have gotten from them, so far only the red stars have laid, i think one of the easter eggers started laying but i gotta check the camera and see.So to sum it up, timers are your friend to help make the coop automated, the waterer is amazing but again thats a whole other write up, large quantity feeder, very secure coop design, camera's to remotely view temp, feed, coop door, and for eggs, great ventilation, plenty of light, easy to clean, and plenty of room for all 24 chickens and 2 ducks. I hope this post helped some people with ideas, many of them can be used in a coop that isn't a barn stall. thanks for reading and have a great day. any questions just post a reply.
Edit:
I followed a suggestion from BYC member "coolcanoechic" to use 2X4's wide side up as my roosts because the chickens can more easily cover their feet when its cold and prevent frost bite on their toes. I thought this made sense and was a good idea but then decided to slightly change the configuration of my roosts also. instead of having the roosts perpendicular to the wall i made them parallel to the wall so more birds can fit side by side to keep each other warm, the roost over the nesting boxes still flips up with ease and i also made it easier to see the temperature in the camera during the night time. i took strips of reflectors i got at home depot and cut them thin (about 1/4" or less) and made a 0 for 0 degrees, a 2 for 20 degrees, a 4 for 40 degrees and so on. in these pics the light was on but the flash made the reflectors really glow! im including another camera screen shot of the nighttime with the reflectors, if i move the IR light i put in they won't glow as much and should be a bit easier to read but works good for now. hope this helps somebody, Thanks
As you can see, i have a chicken in the nesting box... for some reason one of my roosters Gandolf who is a grey frizzled cochin and actually has no issue being held, decided to sleep there that night instead of sleeping right up next to his favorite hen.... lovers quarrel maybe?