Coop's coop is done and the chickens are home!
 I am a first time ' chickener' and started this process after admiring the coops on BYC and Pinterest. Then I jumped in and ordered chickens (5 Brahmas)when a friend ordered his (since he has a brooder), then started my coop. I promised my husband I would be as frugal as possible -so everywhere I noticed a stray wood pile I stopped and asked for their castoffs.
I had always bought every coffee can and jelly jar of screws, bolts, nails and misc. hardware (pop door pulley found in the can of nails - sweet!) the yard sales had to offer so I had quite a selection already. The tin roof pieces came from the salvage yard - enough for the coop and run for $25. I was dismayed about the price of the fencing though - hardware cloth (my nemesis!
)- surrounding the bottom 3 ft of the run and under the coop and buried one foot- and chicken wire for the upper part and under the tin roof cost over $100
. That, the 4 x 8 sheet of plywood ($15) cut in half and used for flooring and roofing, a box of wood screws , and two quarts of paint from the clearance bin ( $3.00 each) were my only big box store buys. I used our old kitchen cabinets - one for the nest box and three of the door frames and doors for the cleanout doors and pop door The flooring is left over vinyl flooring from a kitchen re-do. I found a half roll of foil /plastic insulation, asphalt roll roofing and roof shingles previous owners left in the garage loft. I've also never thrown out a piece of plywood, luan, scrap wood from any project I've ever attempted so I was able to frame, insulate and then panel the coop for the winter months. Upstate NY is frigid!
I wanted to utilize the stained glass window I've had forever, building the window frame was definitely a challenge - it has screening and hardware cloth on the inside. Latches, hinges, zip ties ( my saviors) and metal washers came from the dollar store - when I ran out I drilled and used about $.50 in pennies for the washers- they worked great. The door to the run came off our old dog run, cider blocks from the old garden. The pop door was made from the metal drawer guides from a kitchen drawer and a thick plastic cutting board ($ .50 at the yard sale!) - so i don't have to worry about it warping.
I used 1x2 on the inside of the door openings to hold in the sand, they're removable for big cleanouts.
Since this was made from all salvaged materials - it was a definitely a trial and error process - meaning it took over 6 weeks to piece meal this together. no plans, just me with my old chop saw, a 'baby' jigsaw , and my favorite - the power drill! I received inspiration from the coop in 'Backyard DYI Projects' - June 2013 , and the coops on BYC - this wouldn't be possible without all the tips and hints I gleaned from diligently following all the posts.
I took everyone's advice and went with sand in the coop and run and gravel for the surrounding wet, muddy area - 3 yards= $125.
I'm hoping to make a poop cloth this weekend to attach under the roosts, altho it hasn't been too bad sifting the poop, I'm assuming bigger chicks will bring bigger poop!
It may not be completely level or pass any construction codes, but it works! Oops I forgot to mention the size - the coop itself is 4 X 5 and since they can use the underneath of the coop the total of the fenced run is 4' x 14'. The girls came home at 7 weeks and it only took them 4 -5 days to learn to use the ramp and put themselves to bed at night!
Special thanks: to my daughter who was very accommodating as it was she who painted the coop and had to crawl in it to install the vinyl tack bars and roost - she was glad to use her set building skills from her college play this semester,
: and to my husband and 'exchange daughter' who spend two days shoveling the sand and gravel.
I let my daughters name the girls, so this is what we got: Marsala, Piccata, Parm, Riggie and Tang (Mandarin for soup)
Enjoy the pics!
Salvaged wood pile that started it all.
I built 4 frames for the coop frame and run supports
kitchen cabinet into a nest box
salvaged plywood and cabinet doors
foil insulation was added over the framing........
then plywood and caulked.. .lots and lots of caulk! This was done to all four walls.
opposite side of coop - cleanout door and pop door
metal drawer pulls and cutting board = pop door
hardware cloth buried and covered - see the 'penny' washers?
my daughter is inside installing the roost
completely fenced in - before the tin roof was added
vinyl flooring and fancy window!
clean out door and pop door
this pulley was found in a coffee can of nails -- bonus!
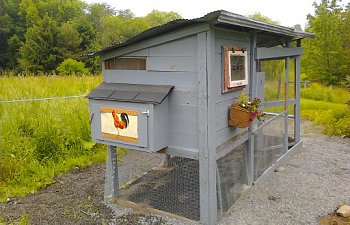
front view with pop door cord
nest box and view of tin roof
screen vent
inside view next box
clean out door - outside the run
clean out door and pop door - inside the run
my workers stomping and rearranging the gravel")
finished!
sand
Hubby and Lucy working on the gravel
-the rooster pic is a placemat from the $1 store.
the girls
Sophie wants to meet them

I had always bought every coffee can and jelly jar of screws, bolts, nails and misc. hardware (pop door pulley found in the can of nails - sweet!) the yard sales had to offer so I had quite a selection already. The tin roof pieces came from the salvage yard - enough for the coop and run for $25. I was dismayed about the price of the fencing though - hardware cloth (my nemesis!


I wanted to utilize the stained glass window I've had forever, building the window frame was definitely a challenge - it has screening and hardware cloth on the inside. Latches, hinges, zip ties ( my saviors) and metal washers came from the dollar store - when I ran out I drilled and used about $.50 in pennies for the washers- they worked great. The door to the run came off our old dog run, cider blocks from the old garden. The pop door was made from the metal drawer guides from a kitchen drawer and a thick plastic cutting board ($ .50 at the yard sale!) - so i don't have to worry about it warping.
I used 1x2 on the inside of the door openings to hold in the sand, they're removable for big cleanouts.
Since this was made from all salvaged materials - it was a definitely a trial and error process - meaning it took over 6 weeks to piece meal this together. no plans, just me with my old chop saw, a 'baby' jigsaw , and my favorite - the power drill! I received inspiration from the coop in 'Backyard DYI Projects' - June 2013 , and the coops on BYC - this wouldn't be possible without all the tips and hints I gleaned from diligently following all the posts.
I took everyone's advice and went with sand in the coop and run and gravel for the surrounding wet, muddy area - 3 yards= $125.
I'm hoping to make a poop cloth this weekend to attach under the roosts, altho it hasn't been too bad sifting the poop, I'm assuming bigger chicks will bring bigger poop!

It may not be completely level or pass any construction codes, but it works! Oops I forgot to mention the size - the coop itself is 4 X 5 and since they can use the underneath of the coop the total of the fenced run is 4' x 14'. The girls came home at 7 weeks and it only took them 4 -5 days to learn to use the ramp and put themselves to bed at night!
Special thanks: to my daughter who was very accommodating as it was she who painted the coop and had to crawl in it to install the vinyl tack bars and roost - she was glad to use her set building skills from her college play this semester,
: and to my husband and 'exchange daughter' who spend two days shoveling the sand and gravel.
I let my daughters name the girls, so this is what we got: Marsala, Piccata, Parm, Riggie and Tang (Mandarin for soup)

Enjoy the pics!
Salvaged wood pile that started it all.
I built 4 frames for the coop frame and run supports
kitchen cabinet into a nest box
salvaged plywood and cabinet doors
foil insulation was added over the framing........
then plywood and caulked.. .lots and lots of caulk! This was done to all four walls.
opposite side of coop - cleanout door and pop door
metal drawer pulls and cutting board = pop door
hardware cloth buried and covered - see the 'penny' washers?
my daughter is inside installing the roost
completely fenced in - before the tin roof was added
vinyl flooring and fancy window!
clean out door and pop door
this pulley was found in a coffee can of nails -- bonus!
front view with pop door cord
nest box and view of tin roof
screen vent
inside view next box
clean out door - outside the run
clean out door and pop door - inside the run
my workers stomping and rearranging the gravel
finished!
sand
Hubby and Lucy working on the gravel
-the rooster pic is a placemat from the $1 store.
the girls
Sophie wants to meet them