Thanks to you all for giving me many different ideas for my coop and run design. This is my story of building the coop that will result in $500 eggs! (I hope they taste good!)
So, to provide these little cuties a safe home when they become egg laying ladies!......btw, those are Issa Hubbard Browns with one, we suspect, brown leghorn.

I started with the idea.....boy there is lots of space under that there pool heater solar panel rack! I bet I can save money by building a coop under there! That could be a safe home for my girls.
Given that I live at 5640 feet of elevation (yes, that's higher than Denver), our winters are pretty cold and snowy. I figured I'd better insulate! What an itchy endeavor.
(It's insulated under that OSB, just got eager with covering when I thought to snap some pics.)
Let the sawing and nailing commence! Got the go-head to buy a new framing nailer from the wifey! (One truth in life, if a man buys a power tool, he will buy more power tools!)
That's my apprentice coop builder under there. working on ventilation security.
For summer time, we thought the girls needed some natural ventilation in the coop, so we build in 3 vents across the floor along the "vaulted" ceiling. Wanting to be sure that no coons, nor other predatory critters can gain entrance, we put down 3 layers of protection (bottom - 1/2 inch hardware cloth, top - 1 inch cage wire topped with 1/2 inch hardware cloth.
Now for some floor insulation containment...OSB mounted on the underside.
Now, we are in business.....warm floor in the winter, cool coop in the summer.
Let's cover that floor with OSB now! My OCD lead me to create the openings in the floor (and on the underside) with my 1/4 round router....A bit type A, don't you think!
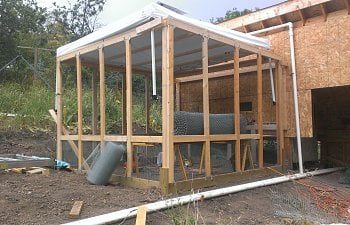
Here it is completely covered and exterior wall framed.
At the far end will be the door.
Closest to you is the "window" again 2Xhardware cloth and 1X cage wire!
View from the outside.
Here along the back wall, I built boxes around the vents to keep the litter material from covering vents.
Sadly, I didn't take any pics during the process of insulating and covering the wall to the left (above).
I covered those walls to the left, built a wall and door covering this side you are looking in above, hung a door with hinges, filled the coop with pine shavings, and viola, a coop for the girls (below)!
Above, you can see the young ladies have a fan (upper left) for their cooling enjoyment.
Middle right behind the girls...I followed some great ideas from you all and created an auto-feeder from an empty wheat bucket and a plastic oil pan from the auto parts store ($4 - sweet!).
Upper right behind the girls, I have hung a "nipple" waterer. This is fed from a bucket hanging outside.
This bucket is plumbed with a toilet filler, hooked to a hose pressurized to keep it full and fresh.
Here's where I had to go next.....
You'll note that from the pictures above and below, there was quite a slope to overcome.
First I rented a tracked Dingo, with a heavy duty front loader bucket, which was fine in the 4 inches of loam, but the clay underneath couldn't even be scratched out. That was a waste of $120!
Next, I rented a mini track hoe, and after scratching out 1 inch of clay at a pass, I managed to level it (actually over level, my son and I had to back fill before setting the base-boards).
Here are some pictures with the run in the beginning of frameing, notice the nice big hole where the slope once was....
...and the soil and clay piled up and pushed out to the left.
In both pictures above and below, you can see the base boards are treated lumber, with 2x4 lumber attached to the wall with 3.5" screws plus hurricane clips.
Why hurricane clips you ask?...short story long, those solar panel racks are now rebuilt heavily engineered versions of the originals that were blown in a severe windstorm where winds exceeded 90 mph. That storm also took out my hot-tub (blew sides off and flew aluminum soffit into control box), blew my 1000+ sq. in. grill and 1000+ sq. in. smoker off my deck!
Hence the hurricane clips...even in the corners!
So, next to the coop, the footings left anywhere from 9 to 11 inches away from the run, so I had to build this small wall, and secure 1/2 inch hardware cloth to the lower 2 feet (coon proofing), since I learned that a raccoon will pull chickens through 1" holes or larger piece by piece.
The lower 2+ feet has the 1/2" hardware cloth all the way around the run.
The transition between the coop and run needed to be predator proof, so, in addition to staples, I used galvenized or stainless screws and fender washers to secure the hardware cloth.
The transition between coop and run again, secured hardware cloth (looks like I missed a screw and washer).
That sports & recreatin' awning is just temporary (had several afternoon thunderstorms), had to keep the tools dry! Can I incorporate one into my next design?
That big roll of fencing is the best part of this. I got a sweet deal on 9 gauge 1" hole chain link fence, 5' wide by 50 feet long, for $1 a foot!
The aviary in the next county did a change order with the fencing contractor that left him with an order of this stuff just lying around. He was eager to get rid of it for any $$, so there it is. I don't think a many critters can get through that!
So, once I tipped the 300 lbs of fencing up onto the sawhorse table I'd set up, I began securing the fencing to the vertical studs by marrying another 2x4 to the backside with the 3.5" decking screws of each wall stud. Also, cut to size studs to cross down there at the 2 foot level.. Essentially, every bit of fencing is sandwiched between 2X4s and screwed together solid.
It was quite a chore rolling out that 300 lbs of chain link. But, I accomplished it, just me and my 4 saw horses, and some scrap OSB (make that 3 saw horses, lost one to bent legs under the load and a funny load angle.
I secured the chain-link to the wall by sistering up 2x4s to the walls (See below).
Below is the inside view of the fencing sandwiched between the 2x4 on the top and sides (not shown, it was also sandwiched on the bottom, as was the top of the hardware cloth.
Below is a picture of the top not yet covered with the fencing. The chain link was rolled out across the top and secured by sandwiching 2x4s again, like the walls.
Here is a shot of the first length of chain link stretched out over the ceiling joists.
Here is a shot of the first ceiling 2x4 sistered up.
Here is the first and section section of chain link secured!
And the view from inside!
Now, where the real fun begins.....my son wired together 6 widths of the 1/2 inch hardware cloth which I stapled down to the 2X6 treated on the ground. I then married up another 2X6 treated with the long 3.5" screws. We'll repeat the entire hurricane clip process on the inside studs everywhere too.
Once that hardware cloth was down, using a rented mini-veyor (sweet if you need to move a lot of material) and a borrowed dingo, we dropped in about 1-2 inches of 1.5" minus gravel for drainage.
Here's my son raking and shoveling gravel while working on building those adolescent muscles to impress the 8th grade girls this fall!
After that, we laid down landscape fabric to keep the run sand from filling in the gravel, and provide drainage for the sand.
(It must be noted that I have been convinced by reading all the message boards here on run and coop materials, sand sounds like the best, easiest to maintain flooring/litter material)
Next we loaded 4-5 inches of sand - up to the top of the base board! (I cooked my wife's Duramax fuel filter casing seals hauling 2.5 to 3 yards of sand up to my house....not really to my house, the Yukon died and wouldn't start only 1/2 mile from my house!)
(Pics of fully sanded run with the girls strutting around in it to be inserted here)
Thanks to my friend Paul for lending me his 4 ton jacks to get the trailer full of sand off my Yukon's hitch!
Thanks to my neighbor Steve for helping me get that trailer up to my house to dump it!
We got as far as filling the run and the coop with sand (after cleaning out the pine shavings in the coop - eeewwww!) Definitely feeling the litter method using sand over pine shavings after that experience. I'll post some more pics shortly.
Now, for some doors! I sandwiched some rigid foam insulation between OSB. (Keep the girls warm in the winter during our cold winters at 5600 feet of elevation)
I also screwed on some sides and top and bottom.
I built a track out of spare trex and set the door in the trex - slides real smooth!
I built the top slide rail from trex as well, but had to mount it under this 2x4. Slides real well!
Open!
Closed!
Open!
Next, I have to show off the ramp the girls have to get in and out of the coop. Again, scrap trex laying around the yard!
I fastened Trex to two treated 2X4. All these pieces were cut 11 inches wide. The ribs were 1.5" width sides ripped off the side of some mocha brown trex. I thought the two colors go together nicely!
Here is a close-up. Needs some deck cleaning solution!
I attached the 2x4s to the frame with some hinges so the kids and I can lift up the ramp and secure it to the ceiling while we clean the run.
Because of the gap and the low spot, I decided to suster up two 11 inch lengths of trex to place in the gap. I had to leave it removable so the hinges still had room to work.
This close-up of the top shows the level walk out that is the transition between the coop and run ramp.
Next on the agenda:
So, to provide these little cuties a safe home when they become egg laying ladies!......btw, those are Issa Hubbard Browns with one, we suspect, brown leghorn.
I started with the idea.....boy there is lots of space under that there pool heater solar panel rack! I bet I can save money by building a coop under there! That could be a safe home for my girls.
Given that I live at 5640 feet of elevation (yes, that's higher than Denver), our winters are pretty cold and snowy. I figured I'd better insulate! What an itchy endeavor.
(It's insulated under that OSB, just got eager with covering when I thought to snap some pics.)
Let the sawing and nailing commence! Got the go-head to buy a new framing nailer from the wifey! (One truth in life, if a man buys a power tool, he will buy more power tools!)
That's my apprentice coop builder under there. working on ventilation security.
For summer time, we thought the girls needed some natural ventilation in the coop, so we build in 3 vents across the floor along the "vaulted" ceiling. Wanting to be sure that no coons, nor other predatory critters can gain entrance, we put down 3 layers of protection (bottom - 1/2 inch hardware cloth, top - 1 inch cage wire topped with 1/2 inch hardware cloth.
Now for some floor insulation containment...OSB mounted on the underside.
Now, we are in business.....warm floor in the winter, cool coop in the summer.
Let's cover that floor with OSB now! My OCD lead me to create the openings in the floor (and on the underside) with my 1/4 round router....A bit type A, don't you think!
Here it is completely covered and exterior wall framed.
At the far end will be the door.
Closest to you is the "window" again 2Xhardware cloth and 1X cage wire!
View from the outside.
Here along the back wall, I built boxes around the vents to keep the litter material from covering vents.
Sadly, I didn't take any pics during the process of insulating and covering the wall to the left (above).
I covered those walls to the left, built a wall and door covering this side you are looking in above, hung a door with hinges, filled the coop with pine shavings, and viola, a coop for the girls (below)!
Above, you can see the young ladies have a fan (upper left) for their cooling enjoyment.
Middle right behind the girls...I followed some great ideas from you all and created an auto-feeder from an empty wheat bucket and a plastic oil pan from the auto parts store ($4 - sweet!).
Upper right behind the girls, I have hung a "nipple" waterer. This is fed from a bucket hanging outside.
This bucket is plumbed with a toilet filler, hooked to a hose pressurized to keep it full and fresh.
Here's where I had to go next.....
You'll note that from the pictures above and below, there was quite a slope to overcome.
First I rented a tracked Dingo, with a heavy duty front loader bucket, which was fine in the 4 inches of loam, but the clay underneath couldn't even be scratched out. That was a waste of $120!
Next, I rented a mini track hoe, and after scratching out 1 inch of clay at a pass, I managed to level it (actually over level, my son and I had to back fill before setting the base-boards).
Here are some pictures with the run in the beginning of frameing, notice the nice big hole where the slope once was....
...and the soil and clay piled up and pushed out to the left.
In both pictures above and below, you can see the base boards are treated lumber, with 2x4 lumber attached to the wall with 3.5" screws plus hurricane clips.
Why hurricane clips you ask?...short story long, those solar panel racks are now rebuilt heavily engineered versions of the originals that were blown in a severe windstorm where winds exceeded 90 mph. That storm also took out my hot-tub (blew sides off and flew aluminum soffit into control box), blew my 1000+ sq. in. grill and 1000+ sq. in. smoker off my deck!
Hence the hurricane clips...even in the corners!
So, next to the coop, the footings left anywhere from 9 to 11 inches away from the run, so I had to build this small wall, and secure 1/2 inch hardware cloth to the lower 2 feet (coon proofing), since I learned that a raccoon will pull chickens through 1" holes or larger piece by piece.
The lower 2+ feet has the 1/2" hardware cloth all the way around the run.
The transition between the coop and run needed to be predator proof, so, in addition to staples, I used galvenized or stainless screws and fender washers to secure the hardware cloth.
The transition between coop and run again, secured hardware cloth (looks like I missed a screw and washer).
That sports & recreatin' awning is just temporary (had several afternoon thunderstorms), had to keep the tools dry! Can I incorporate one into my next design?
That big roll of fencing is the best part of this. I got a sweet deal on 9 gauge 1" hole chain link fence, 5' wide by 50 feet long, for $1 a foot!
The aviary in the next county did a change order with the fencing contractor that left him with an order of this stuff just lying around. He was eager to get rid of it for any $$, so there it is. I don't think a many critters can get through that!
So, once I tipped the 300 lbs of fencing up onto the sawhorse table I'd set up, I began securing the fencing to the vertical studs by marrying another 2x4 to the backside with the 3.5" decking screws of each wall stud. Also, cut to size studs to cross down there at the 2 foot level.. Essentially, every bit of fencing is sandwiched between 2X4s and screwed together solid.
It was quite a chore rolling out that 300 lbs of chain link. But, I accomplished it, just me and my 4 saw horses, and some scrap OSB (make that 3 saw horses, lost one to bent legs under the load and a funny load angle.
I secured the chain-link to the wall by sistering up 2x4s to the walls (See below).
Below is the inside view of the fencing sandwiched between the 2x4 on the top and sides (not shown, it was also sandwiched on the bottom, as was the top of the hardware cloth.
Below is a picture of the top not yet covered with the fencing. The chain link was rolled out across the top and secured by sandwiching 2x4s again, like the walls.
Here is a shot of the first length of chain link stretched out over the ceiling joists.
Here is a shot of the first ceiling 2x4 sistered up.
Here is the first and section section of chain link secured!
And the view from inside!
Now, where the real fun begins.....my son wired together 6 widths of the 1/2 inch hardware cloth which I stapled down to the 2X6 treated on the ground. I then married up another 2X6 treated with the long 3.5" screws. We'll repeat the entire hurricane clip process on the inside studs everywhere too.
Once that hardware cloth was down, using a rented mini-veyor (sweet if you need to move a lot of material) and a borrowed dingo, we dropped in about 1-2 inches of 1.5" minus gravel for drainage.
Here's my son raking and shoveling gravel while working on building those adolescent muscles to impress the 8th grade girls this fall!
After that, we laid down landscape fabric to keep the run sand from filling in the gravel, and provide drainage for the sand.
(It must be noted that I have been convinced by reading all the message boards here on run and coop materials, sand sounds like the best, easiest to maintain flooring/litter material)
Next we loaded 4-5 inches of sand - up to the top of the base board! (I cooked my wife's Duramax fuel filter casing seals hauling 2.5 to 3 yards of sand up to my house....not really to my house, the Yukon died and wouldn't start only 1/2 mile from my house!)
(Pics of fully sanded run with the girls strutting around in it to be inserted here)
Thanks to my friend Paul for lending me his 4 ton jacks to get the trailer full of sand off my Yukon's hitch!
Thanks to my neighbor Steve for helping me get that trailer up to my house to dump it!
We got as far as filling the run and the coop with sand (after cleaning out the pine shavings in the coop - eeewwww!) Definitely feeling the litter method using sand over pine shavings after that experience. I'll post some more pics shortly.
Now, for some doors! I sandwiched some rigid foam insulation between OSB. (Keep the girls warm in the winter during our cold winters at 5600 feet of elevation)
I also screwed on some sides and top and bottom.
I built a track out of spare trex and set the door in the trex - slides real smooth!
I built the top slide rail from trex as well, but had to mount it under this 2x4. Slides real well!
Open!
Closed!
Open!
Next, I have to show off the ramp the girls have to get in and out of the coop. Again, scrap trex laying around the yard!
I fastened Trex to two treated 2X4. All these pieces were cut 11 inches wide. The ribs were 1.5" width sides ripped off the side of some mocha brown trex. I thought the two colors go together nicely!
Here is a close-up. Needs some deck cleaning solution!
I attached the 2x4s to the frame with some hinges so the kids and I can lift up the ramp and secure it to the ceiling while we clean the run.
Because of the gap and the low spot, I decided to suster up two 11 inch lengths of trex to place in the gap. I had to leave it removable so the hinges still had room to work.
This close-up of the top shows the level walk out that is the transition between the coop and run ramp.
Next on the agenda:
- post pics of the roost sytem (mostly completed)
- fashion the pulley system to open and close the door from outside the run
- route and sand all the sharp corners to ensure that covering tarp doesn't get shredded by anything sharp
- secure the tarp to the roof to give them shade and shelter from the sun and elements
- create mounting system for auto-feeder and auto-waterer
- install electrical in coop to run fan, lights, and heat (if needed)
- install ventilation fan inside coop to keep the fresh air moving (at least in summer)
- install light fixtures
- fashion portal or window to peek into the coop at at night
- Finish insullating last wall and nesting box access door
- Carpet nesting boxes with sweet excess artificial turf
- Install nesting boxes.