This tractor was adapted from a design by an intern at the Kerr Center in Poteau, OK. The design is pretty neat with panels that can be opened to allow access to the inside of the coop from the rear, and from inside the run. The original design was a little smaller than I wanted so I scaled it up. Due to the size and weight of this thing, I call it a chicken "mobile home." The overall run dimensions are 10' L x 8' W x 5' H. The Coop is 4' L x 8' W x 4' H (at the rear) and 4'6" at the front. Here are the plans I sketched up to start with:
I designed the coop to utilize mostly standard length lumber to reduce the amount of cutting as much as possible.
I started by laying out the base of the run. The 10' long side was a 4x4x10 and the 8' side was a 2x4. I used "L" brackets and 2 1/2" deck screws. All of the lumber that will be in contact with the ground is pressure treated, the rest was just regular lumber.
Next were the vertical supports for the coop. The rear boards were 6' H and the front were 6 1/2" H. I cut the ends of the verticals at an angle to allow for the slope of the roof. I think the "pitch" of the roof is 1.5 inches of height for every 12". Then I made the base of the floor. The floor of the coop was set 24" off the ground. I placed the floor "joists" 24" on center. At this time I didn't realize that by making the floor inside the uprights that the floor would overhang the outside joists and moved them later, before I put the floor in. My 8 year old daughter was inspecting my work. It met her approval!
All of the horizontal wall supports were next. They were placed to give support for the hinged panels, the nest boxes and a place to attach the plywood. Note I moved the outside floor joists to be between the uprights to make the floor 4x8 feet.
I put in the floor next. I notched out (1 1/2 x 3 inches) the corners of a 4x8' sheet of 19/32" plywood, to allow space for the vertical supports. I figured it would be easier to handle a half sheet, so I cut it in half across the long side (that way the middle joist would fill the gap made by the cut, and attached the floor with 1 1/2" deck screws.
After the floor was in, I started on the platform that would become the nest boxes. I put a 2x4 across the inside of the coop so it was 13 1/2" from the other one. Then I cut and screwed from the bottom the "floor" of the nest boxes.
The dividers were done next and screwed in. I made them tall enough to be screwed into the horizontal 2x4 that the hinge for the back panel was to be located. The dividers are 13 1/2" deep and 15 1/2" tall.
Then I took what was left of the sheet of plywood that made the floor and dividers for the nest boxes and make a sloped "roof" for the boxes. This is to keep the birds from roosting on top of the nest boxes. I cut a notch in the top corners of the roof so it could lean on the upright, then screwed it in place. I used screws to attach the top corner of the divider to the roof.
Here's a view of the rear of the coop to this point. The two outside nest boxes are quite large because I started from the center and worked out from it. The 4 nest boxes are 13" wide. I didn't want to make the same size nest box and have a small cavity on the sides for things to get stuck so I made some "penthouses" for the fortunate hens that pick them.
At this point I decided to move it out of the shop and into the driveway. I had about 2" on either side to spare when I moved it through the door opening. Next I framed in the run using 5' long 2x4s. The run extends 6' out from the front edge of the coop and is 8' wide. I put vertical support half way between the corners on each side. There is also a horizontal board about 6" off the ground running across the run. This will hold the ramp up off the ground so you can move the "mobile home" without having to lift the ramp off the ground.
All the framework is done at this point. I wired in the sides of the run using 4x2 welded wire fencing. It was attached using 1 1/4" galvanized poultry netting staples. I left the top open for now so it will be easier to work on the coop and paint the front. For the walls, I decided to use 19/32" plywood. It doesn't get too cold here in OK so I didn't want to insulate the walls and floor. It can get quite hot in the summer, so I made the coop considering that. The panel for the back of the coop was cut along the length 18" from the edge and a hinge put on to allow the coop to be opened from the outside in the back. This is to allow access to the nest boxes and to clean out the floor. I plan on using deep litter so it will be easier to turn the material this way.
I put a latch on each bottom corner of the panel to keep it closed. I cut a small scrap of plywood of the same thickness and attached it to the 2x4 just below the panel and use small carabiners to "lock" the latches.
The sides of the coop were cut from one 4x8' sheet of plywood. The windows were cut using a plunge cut with a circular saw, then the corners finished with a jigsaw. I put hinges on the top of the window and stapled hardware cloth from the inside. The hardware to hold the windows closed and opened will be shown later.
For the front panel, I cut a whole sheet of plywood in half lengthwise and attached half of it for the top of the front. The other half I cut out the pop door and put hinges on the panel and pop door. The front of the panel is done and can be raised from inside the run to help with cleaning or more importantly to allow added airflow during the heat of summer.
For the roost inside, just a regular 8' 2x4 was used. From the reading I did, 2x4s are recommended for roosts because the chickens can get a more relaxing rest by not having to balance themselves as much as with a round pole or something like that. And, the 2x4 is much more readily available!
The floor and walls of the coop done, next was to put on the roof. I allowed for a 12" overhang all the way around so the roof would be 10' x 6'. I used 2x4s to give support for the roof where the joints were and cut two sheets of plywood (15/32 for the roof) to be 6' x 4'. I used the scrap 2' from that to make the middle of the roof. My plan was to use shingles since I thought I had a couple of bundles already.
Come to find out, I didn't have the shingles I thought I did. I know I had them at the last house we owned and thought I had them here. So, on to plan two. I took off the plywood and after changing the supports to 2x4s spaced 24" apart, used galvanized corrugated steel for the roof. The sheets of steel were 8' long so I changed the over hang on the back to 18" instead of 12" and left the rest to overhang the front, about 2 1/2 feet. The steel was attached with piercing screws with neoprene washers built in.
It was at this point that a friend of ours had a young Roo that she needed to find a new home for. She lives in the city limits and they are not allowed to keep Roos there, so we took him in and gave him a home. We put a tarp over the top of the run to be able keep him in and still be able to finish the coop. Here's how the coop looks the day we put him in. The gate was put on using spring loaded screen door hinges, and I used a 2x4 to give the opening side of the gate a "stop." I used a clamp to keep it closed until I put on the latch to keep it closed.
I used a barrel bolt latch to keep the gate closed about 12" from the bottom. I used some plywood scraps to allow the bolt to line up with the middle of the gate and drilled a hole for the bolt to slide into. Below you can see the 2x4 behind the gate to keep it from swinging into the run. I also put a hook latch about 12" from the top with an "eye" bolt to hold the top closed. We have a lot of predators around here so I wanted to make sure the gate would stay closed. I also put 24" wide 1/2" hardware cloth around the perimeter to keep the raccoons from reaching in and grabbing anything. The openings at the top of the coop was also "screened in" using the 1/2" hardware cloth.
I attached the wheels using some big hinge straps that the axle of the wheels I had would fit snugly in. I screwed the hinge straps onto the 4x4s using lag bolts. The wheels can be removed by taking a c-clip off the axle. After getting everything attached, I found out that the wheels are not tall enough to reach the ground, so in the near future I'll be taking it all off and attaching it to the bottom of the 4x4. That should give plenty of clearance to move the mobile home around. I'll update with photos when I'm done with that.
A good coat of primer and it's ready for painting.
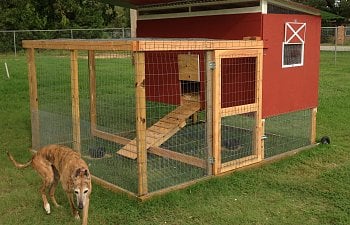
My 9 year old who is demonstrating the coop above wanted it to look like a barn so we tried our best to make it look like one. She is such a good helper!
We painted the pop door and windows white then masked them with some painters tape before putting the red coat on them. Here's how it turned out. You can see the hardware used to keep the windows and pop door open. The screen holders rotate to allow opening, the barrel bolts hold them open, and the latch the bolt slides through works as a little handle to grip.
The ramp was made 48" x 15" and I used a couple of 2x4s on the bottom to give some rigidity to the ramp and to hold it in place on the 2x4 running across the run. The "treads" are the same plywood cut 1" wide and spaced 3 1/2" apart. I just used a piece of 2x4 for the spacing. I attached a 2x4 to the underside of the floor for the top of the ramp to rest on also.
All in all, I spent less that $500 and have a very solid chicken "mobile home." The pullets we are expecting are staying with a friend who says they are not quite ready to stay outside, but as soon as they are fully feathered out we will be getting 9 easter eggers. Any helpful ideas or questions are welcome and I will gladly answer any questions.