Though I am interested, I don’t have a lot of opportunity to explore “green” building techniques and designs. This Suburban chicken coop is my opportunity to put some ideas to the test.
I got my chicks in mid-May so that I had to get a coop built before they outgrew their brooder. I got 10 "Rare Breed Egg laying" assortment from Meyer Hatchery(http://www.meyerhatchery.com/) in Polk, OH.
They start the "fluffy butt" posing right way!1 Golden Campine, 1 Sicilian Buttercup, 2 Golden Lakenvelders, 3 Silver Lakenvelders and 3 White Cochins.
The site:
Back corner of the yard – already holds the compost bins. The wife asked that it at least fit in (maybe look like the shed) – in my mind, no problem . . . in practice, I think I got close (enough).
The ground is almost all clay = so it gets and stays pretty wet. So, I dug out the clay and started with a base of about 15 inches limestone and surrounded it with hardware cloth to deter digging predators. I also ran a piece of conduit underground from the shed into coop area for future lighting plans.
The base plate sits on cinder blocks and the hardware cloth is wrapped and stapled to the top of the base. This design will leave about 3-4 inches between the gravel and the 2x4 base plate to allow for ventilation into the coop & to keep the wood dry.
The base is 4’x6’ – half covered floor and half open to soil.
Of course, I’d rather be building this on a several acre plot; however, living on less that a quarter acre in town, I have been relegated to the back corner of the yard. So, in limited space, I went up – effectively a two-story coop. I can’t help myself – I don’t do well with ‘Keep it simple’.
This picture to the right shows the spacing to maintain a ridge vent to facilitate airflow in from under the base plate and out through the ridge.
I had been thinking about and searching for remodeling ideas for our house and about energy efficiency –one area for improvement is insulation and ventilation for the roof. A clay tile roof adds energy efficiency due to the air space between the tile and the roof deck. Metal roofs can be installed similarly to include Above Sheathing Ventilation (ASV). The air flow in this design reduces heat transfer into and out of the building/attic, thereby reducing heating and cooling needs. (Current research is being done by the Dept. of Energy Oak Ridge National Laboratory. Search for ASV and cool/cold roof). It's popular in a few areas of the country, but I think it could be beneficial everywhere if more widely adopted.
I modified and combined a number of designs that I found. I covered the first roof deck in tar paper and then added 2”x4” spacers and 2" foam insulation. Finally, I added the second roof deck to be shingled.
Ventilated siding / sheathing - I covered the walls with tar paper for moisture protection - sounded like an OK idea at the time. Then I added 1x2" furring strips as a spacer - based on the same principle as with the cool roof. Screen was stapled around the bottom and top of the furring strips, covering the openings to keep out bugs as much as possible.
Steel roof (Decra roofing: http://www.decra.com/). I really liked the look and quality of the Decra Shingles. This was my way of trying it out before deciding to use it on my whole house . Installation was very manageable and I am very pleased with the results. Most people have been very surprised to find out that it is a steel roof. I also like its expected lifetime (50yrs) and that it can be reused or recycled when removed. I originally planned to cover the ridge with a roll out ridge vent, but to maximize airflow I removed the ridge vent and used wooden spacers and more screen.
Insulated walls - really? you want to differentiate "overkill" and "more overkill"?
Removable floor (note: brackets to hold 2"x4" cross support/plywood floor). Does require some contortion to get in, but the entire coop is small enough to reach almost everything from the doors.
I made sure everything was done inside before they moved in - haven't needed to have the floor out since and don't see that there should be a need.
Community next box - found this idea just before I was ready to install the nest boxes. I have 10 chickens (right now) and I've seen three in the nest box at a time. They like the dark end of the nest box - that's where all the eggs have been laid. In the nest box, I use pine shavings. I wanted to try each of several materials - for comparison and/or variety. Pine shavings work nicely enough and aren't too expensive.
Natural roost made from Poplar branches (blown down day of installation - a sign? convenient coincidence.)
Yes, everything is painted white inside - I wanted to seal the wood, it was not an aesthetic decision. I know that it will never be white again.
") I also happened to have been given a large galvanized metal tray that I cut to fit the floor hoping it will provide more protection to the wood. I'm pleased to say that the airflow in this design keeps the straw remarkably dry.
I also happened to have been given a large galvanized metal tray that I cut to fit the floor hoping it will provide more protection to the wood. I'm pleased to say that the airflow in this design keeps the straw remarkably dry.
View from the front, through hardware cloth window and from the back, through the lower door - Plank/ladder to loft and pop door. The pop door is opened by a cable and pulleys that runs to the cabinet on the opposite end and is opened/closed from outside the coop and run.
Inside the top door there is a board to keep straw from falling out. I'm using the Deep Litter method underneath the roosts. Every night when I close up the coop, I toss in a handful of scratch or BOSS. They love it and it keeps the litter well turned and dry. I have since doubled the height of the kickboard and added a surround for the ladder/plank opening. They get very serious when digging for scratch and straw gets everywhere.
On the bottom, one half is covered in sand - provides a nice grit source. The other half is soil to which have added sand and fireplace ash. It should be cooler in the summer and provide a dry place for dust bathing. So, and of course, they use the deep litter as their favorite place for a dust bath. I've since replaced the waterer with a plastic bell-style so that I can add ACV to the water, which I couldn't do with the galvanized waterer.
This is the PVC feeder (Based upon PVC Chicken feeder by MrSsrt33:
Move in day! July 6th. My goal was 6/30 - but I really didn't know what I was getting into. I had some drawings, but much was mentally designed and redesigned as I commuted to work all week.
I added a string of LED lighting around the top and bottom for supplemental fall/winter lighting (24' rope light snaked). I also installed a light fixture for the top and bottom - though I've not finished the electric yet. I am still running the LED lights off an extension cord. The LED lights provide much more light than I expected, so the other lights probably won't be necessary -except maybe for a little heat. I know, chickens don't need it. They are dry and protected from drafts which is enough; however, I did get the Sicilian Buttercup in the mix and she's not designed for Ohio winters. Enough heat to keep the water mostly defrosted on nights below 17 or 18degF.
The First Egg! (and nest egg golf balls) From one of the White Cochins, no less (my only brown egg layer) – I expected them to be the last to mature and to start laying (from what I’ve read). Of course, I let my girls (human daughters) “discover” it.
This is the sprout feeder I've worked on through the winter. (Based upon info at: http://www.workdaychickenpictures.c...011/1/19_A_feeder_for_the_sprouted_wheat.html)
It's a very cool idea - except my BOSS isn't sprouting well and while the Forage Oats I found grow great, the chickens don't show as much interest as in just getting to the BOSS. Recently got some wheat to try.
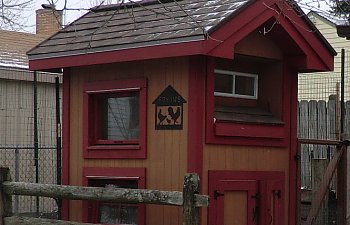
Doors, windows and trim.
In the picture below, the door on the left is access to the bottom to change the waterer and the door on the right is the cabinet that holds the gravity feeder and Pop Door cable. I'll keep crumbles and scratch/BOSS in there as well once I can eliminate the extension cord and can latch the door.
Suet-like treat made with Lard, scratch, crumbles, BOSS and bread crumbs. (Ideas from: http://communitychickens.blogspot.com/2013/01/cake-for-chickens.html)
The run enclosed a double bin compost system - which they love. And worms watch out when I start turning!
This first year the run also had sunflowers - because they predated the chickens. They provided nice shade and extra color. Don't suppose I'll ever grow anything there again.