Starting with the kids' old playhouse, we are slowly (very slowly!!) fixing it and the addition to it into a habitable place for the chickens. We started with 17 chickens (2 roos) and now have 11 hens and 1 roo. The playhouse was too small for anything but sleeping at that time. So now, even though we don't have as many, we still want to give them plenty of room for the coming winter if they want to stay inside. Plenty left to do, but at least we can now see our progress! With lots of scrap wood, some deals on cheap lumber, not much knowledge, and no real coop plans, we're making the "house" a "home". We'll be redoing the run, too, when we get that far!
We bought these 17 chickens in April, so have had them for about 6 months. They're about 3 years old, at my best guess. Not real friendly, but I am able to catch them now. They also know the hand that feeds them and come running when they hear me; of course looking for a treat! They can't free-range as there are too many predators around and I'm also afraid I couldn't corral them back in once they were out!
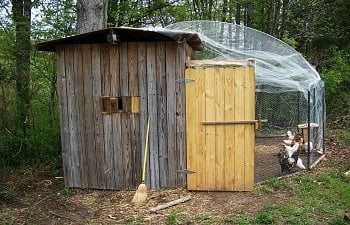
From its former place, perched on 4 foot 4x4s and closer to the house, we (meaning hubby in this case!) moved the playhouse with a tractor to this spot away from the house and closer to our garden, set back a little into the woods. We didn't have much time to get ready for the arrival of our adult chickens as the previous owners wanted them gone pretty quick - so most of what you see in this picture was done in a day - moving, quick run with netting over it, and the door into the run. It's a start. The building is approximately 6 x 6 inside.

Here is a close up. The treated lumber is pretty weathered after almost 15 years as a playhouse. As a playhouse, the door was just an opening in the wall. We made the door by just cutting into the wall and putting it on hinges. Rather rustic!
The two cages contain the second Roo, who, at that time, I called "Mr. Roo-in-the-Cage" and Lucy, who had been pecked on her back until it bled. She is healing here. She healed fine and now enjoys her days with the rest of the flock.
View from inside the run. The back door was cut just like the front door, from the wall. We don't have a "chicken door". The floor of this coop is actually about 7-8 inches off the ground and the wall goes to the ground. The board covers that hole, as there isn't enough space under there for the chickens to play and the floor joists cut off more of that space.
Close up of back entrance (from inside the run). The black is gone now. I pressure-washed the outside a few weeks ago.
The front door is what all the walls inside look like. We don't plan on putting anything else on them, like plywood, but I did paint them. We covered all the windows with boards at first and later you'll see that I stapled up hardware cloth. Also the spaces at the top were covered with hardware cloth and the north(right side in this pic) and south were boarded up - for predator proofing.
Side view of the area.
My first attempt at a nesting box!
It may not be fancy but the chickens didn't seem to care! I thought the slanted roof would keep them off of it, but obviously, I was wrong. It got initiated VERY quickly!! I even put some slippery shower board on the roof, but that didn't stop them!
South side of the inside. I put a small roost spot in the left-hand corner, but of course, this wasn't enough space for everyone.
Their first roost.
I made two more nesting boxes and all of them were placed on the north side of the coop with the original pooboard. Couldn't seem to make up my mind where I wanted things so when I made the new pooboard, I switched sides!
New poo-board put in on south wall of coop.
Another view of pooboard.
Hardware cloth was put on the windows. We lost 3 chickens from some predator - never did come back, nor do we know what it was. But the boards were torn down and I stapled the hardware cloth up the same day I found 2 dead, torn apart chickens and one in bad shape. She lasted a week, then died. This is what the outside of the playhouse looks like after I pressure washed it. All the black is gone - yeah!
North wall inside the coop.
Their first "feeding shelter". I had (2) 7-8" metal troughs and they were NOT big enough for these hungry girls. Later made a 3 foot wooden trough feeder with holes in the hinged top, but holes were only big enough until the feed went down. So the top now stays open, and there is room for everyone!
Side view of the first "feeding shelter". Back of feeder is toward the north, where most of the weather comes from. It kept the food dry.
This is their second "feeding shelter". A little longer, more enclosed and with a 3' feed trough. They are sure hungry little critters!
After reading about waterers here in BYC, I decided to use the idea and made this type of waterer. I bought a bigger pan for the bottom, but this 5-gallon bucket ensured that they would always have water!
Ahh, paint! I painted the inside of the little house and it looks SO much better...brighter...cheerier... This is from inside looking out into the new addition. We made this hardware cloth door when putting up the walls of the new part as the old door went on the new part!
Wall in little coop...at last - painted!
I had some help until I put up a barrier from the run! Painted pooboard back in place.
Roost and pooboard back in place.
They looked, gawked, squawked and otherwise carried on at the new look! I'm sure they were saying, "thank-you"!!
Couldn't figure out what was going on in there.
View from new part looking in. I think I'll paint the ceiling a light blue with clouds - guess where I saw that idea!!!! Just using left over paint from our house now!
Old nesting box with a new look! Hubby says we have very intelligent chickens since they can now read!
Another view! Not quite done.
Everything back in place. I nailed some boards together into a box for the nesting boxes to set on under the pooboard.
View from addition.
New addition framed up. Roof slants to south. The woods to the left is mostly on a downhill slope, so the water will stay away from the coops.
Addition with walls on.
This is the north view of the new addition. We put a new roof over the old coop to match the new part. The part with the plastic on it is going to be a spot for our "special" chicken, Greenie. I will probably make an album about her story. Most of it is already written in "What Did Your Chickens Do Today" thread. This part will also be enclosed for winter and have a little run with it. She is now my pet and gets to free-range whenever I'm out there.
This is all we have done for now. I'll post more pictures as we go. It's not fancy, won't win any prizes, but I love it - and seems all the chickies do, too!!! Not sure yet what color I'll paint the outside but hope to get that done before it gets too cold. Have to put some rock around the perimeter for drainage, windows, hinged window covers, etc., etc., etc. - my list could go on for awhile!
Thinking about a name for this building: How about "Little Hen House in the Big Woods"? I had thought about "The Little Red Hen House", but red paint is too expensive! (and I only have 3 red hens - Golden Comets or some mix, not sure!) Maybe "Big Coop" and "Little Coop". Any suggestions?
Thanks for looking!
December 2013:
It's been awhile and although we've not gotten a lot more done, there are a few things that I've accomplished! The plans have changed just a little bit. No longer will have a special pen for Greenie, as she died in November from a prolapse problem. I miss her following me around the yard!
As the cold came in November, I read up on one of the forums about winterizing. So I did a few things to the inside of the Little Coop, (now named!) for the anticipation of cold weather. It only lasted a few weeks, but more is bound to come. Little Coop had BIG spaces between the wall boards, so I nailed a few boards to the outside in a few places to cover up the cracks, then decided that I would stuff hay in-between the 2x4s of the walls on the inside and cover the hay with fabric. I only covered the spots that the chickens could reach, so they wouldn't pull it all out. Some of the places covered are out of reach, but it was easier to just cover the whole side or section. Here are a few pictures of the "padded cell" now:
Area above the roost.
North wall.
I also carpeted the roost. Wrapped a piece all the way around and nailed at the bottom of the 2x4. They seemed to like it on the few cold nights we've had so far. Coldest is about 15 as of today. It'll keep help their feet warm as they sleep!
Carpeted roost and insulated wall.
Seems the nice, bright, white paint has disappeared that I laboriously painted! Didn't stay clean-looking for long!
I put this inside feeder in the north wall, too, so they could have some midnight snacks! It is above the long strip of fabric. That part has hay beneath it, too. That North Wind doth blow!
Snack Time!
Inside the Big Coop, I've partitioned off the "People Stuff" into a 4x8 spot on the north end and left them an area of about 8x10 to explore. Put another nest box up on a bale of hay since I found an egg up there today! Hope they get the hint! They love this new addition, even though it's not done! When the door was opened for the first time, they all came on through, after watching me rearrange things through the hardware cloth door of the Little Coop. They squawked and clucked and make a good loud racket! Explored all over, pecked at the bare floor (not sure what they found there to eat!), and jumped the bales of hay as high as they could go. I've rearranged it several times, trying to utilize the space better and give them some spots to "get away from it all".
Here are some pictures of them being chickens!
One lone chicken at this time!
Looks like a long way down. You go first, Miss Fluff! (There are only 2 bales of hay here, so it's about 4 feet up!) You can see the nest box on the left. An egg was left for me on top of the bales today, before I put the nest box there!
Getting ready to jump!
We plan to make a long, narrow window on this south wall at about the 4' height and another one on the east wall. It's dark in the Big Coop right now, but come spring and fair weather, windows and paint will make a big difference, I think. Ugh - more painting - not my favorite thing to do. I bought some very light colored paint for the inside walls - which will be covered with 1/4' plywood, too. (Much easier to paint than between 2x4s!) Found some maroonish color for the floor - porch paint, and a light blue for the outside of all of it - Little and Big Coops. Just gotta wait now for the right temperatures!
Looking into the Big Coop from inside the Little Coop.
Things To Do Yet: 9 hens, 1 roo
1. Windows - they will just be holes with hardware cloth over them and home-made shutters for winter time and blowing rains.
2. Make a permanent wall to divide their space and mine! Make a door between the two and a door inside my space to access the run from there.
3. Put up the 1/4" plywood.
4. Paint inside and outside.
5. Finish predator proofing the Big Coop. (Right now it's not - there are a few holes and I shut the door at night, since they all roost in the VERY SECURE NOW Little Coop!)
6. Make some chicken stairs so they can play around at different levels, if they want.
7. Put stone around the bottom of the walls on the outside for drainage - got some free small rocks that'll do the trick!
8. Finish the RUN! Got the fencing - it'll be enough for the sides and top of the run. Family project cleared the area of trees and brush a few weeks ago. Can't wait!
9. Make a chicken door inside the big coop for entrance directly to the new run (when it's done!)
10. Well, you get the picture - still lots to do... does it ever end? Thanks for looking again!
October 2014: 7 hens,0 roos.
Looks like it's been a YEAR since I've been on here. Life gets too busy at times. We finished the run. This plastic fencing was found on Craigslist and we got PLENTY!! Hasn't been through a winter yet, nor snow, leaves, etc., on the top of the run, but it is quite sturdy and I think it will hold up just fine. It is buried on the outside at the bottom, about 6-10 inches straight down from the bottom board and then curving out. Saw that on here somewhere and it made sense to me! So I don't think anything is going to dig underneath the fence.
The entire run is about 16' wide X 25' long.
I repainted some of the inside of the Little Coop and even though the chickens don't seem to care what is on their walls, I do! I didn't paint all the way down because I've found out that anything around their ground level doesn't stay clean! Especially in the back of the poo-board! Oh well . . .they are chickens, after all . .
Flower border is all the way around the top of the Little Coop.
Clouds on roof of Little Coop. There is a sun on the other side.
Several more chickens died of our first flock.last May and June. We sold our rooster and the remaining 3 white hens in August and bought 4, one-year old chickens. Maybe someone can tell me what kind they are. One of them lays a very light green egg and the rest seem to be very pale brown. So we have our (3) Golden Comets and (4) of an unknown breed. None of them are laying much.
We are only getting about 1-2 eggs every other day.
There was some molting going on, but not so much right now. Previous owners of the newcomers said they got 4 eggs every day, but now we've had them since August. Seems they've had time to adjust to their new roommates and environment. So anyway, back to the coops:
This is inside the coop looking east at the run door.
Inside the run looking at their (hopefully) dry shelter. May put up half of a wall there to help keep the weather out of this little spot. The open part is on the west side, so it doesn't get a lot of weather, but with the winter we had last year.... who knows!?
Closer look at shelter and chicken door to Big Coop, which will also lead them to the Little Coop where the roost and nest boxes are.
Top construction of run.
Looking west from the Little Coop door into the run.
Other side of the run, looking west, from the shelter.
Here is just a peek of the coop through the trees. Eventually, this brush will all be cleared away so we can see the coop from the house.
So, we still have stuff to do - major thing is to get it all painted on the outside. Other things are: windows in the Big Coop, paint the inside of the Big Coop ( I have all the paint!),and do some little things inside the Big Coop (another roost for one). Then, since the roost and poo-board setup is in the Little Coop, to nail up some boards on the outside to close up some of the cracks. Not going to stuff hay in the walls and make a padded cell this winter! Would like something a little more permanent.
Then, who knows? There's plenty of room for some more chickens . . .
We bought these 17 chickens in April, so have had them for about 6 months. They're about 3 years old, at my best guess. Not real friendly, but I am able to catch them now. They also know the hand that feeds them and come running when they hear me; of course looking for a treat! They can't free-range as there are too many predators around and I'm also afraid I couldn't corral them back in once they were out!
From its former place, perched on 4 foot 4x4s and closer to the house, we (meaning hubby in this case!) moved the playhouse with a tractor to this spot away from the house and closer to our garden, set back a little into the woods. We didn't have much time to get ready for the arrival of our adult chickens as the previous owners wanted them gone pretty quick - so most of what you see in this picture was done in a day - moving, quick run with netting over it, and the door into the run. It's a start. The building is approximately 6 x 6 inside.
Here is a close up. The treated lumber is pretty weathered after almost 15 years as a playhouse. As a playhouse, the door was just an opening in the wall. We made the door by just cutting into the wall and putting it on hinges. Rather rustic!
The two cages contain the second Roo, who, at that time, I called "Mr. Roo-in-the-Cage" and Lucy, who had been pecked on her back until it bled. She is healing here. She healed fine and now enjoys her days with the rest of the flock.
View from inside the run. The back door was cut just like the front door, from the wall. We don't have a "chicken door". The floor of this coop is actually about 7-8 inches off the ground and the wall goes to the ground. The board covers that hole, as there isn't enough space under there for the chickens to play and the floor joists cut off more of that space.
Close up of back entrance (from inside the run). The black is gone now. I pressure-washed the outside a few weeks ago.
The front door is what all the walls inside look like. We don't plan on putting anything else on them, like plywood, but I did paint them. We covered all the windows with boards at first and later you'll see that I stapled up hardware cloth. Also the spaces at the top were covered with hardware cloth and the north(right side in this pic) and south were boarded up - for predator proofing.
Side view of the area.
My first attempt at a nesting box!
It may not be fancy but the chickens didn't seem to care! I thought the slanted roof would keep them off of it, but obviously, I was wrong. It got initiated VERY quickly!! I even put some slippery shower board on the roof, but that didn't stop them!
South side of the inside. I put a small roost spot in the left-hand corner, but of course, this wasn't enough space for everyone.
Their first roost.
I made two more nesting boxes and all of them were placed on the north side of the coop with the original pooboard. Couldn't seem to make up my mind where I wanted things so when I made the new pooboard, I switched sides!
New poo-board put in on south wall of coop.
Another view of pooboard.
Hardware cloth was put on the windows. We lost 3 chickens from some predator - never did come back, nor do we know what it was. But the boards were torn down and I stapled the hardware cloth up the same day I found 2 dead, torn apart chickens and one in bad shape. She lasted a week, then died. This is what the outside of the playhouse looks like after I pressure washed it. All the black is gone - yeah!
North wall inside the coop.
Their first "feeding shelter". I had (2) 7-8" metal troughs and they were NOT big enough for these hungry girls. Later made a 3 foot wooden trough feeder with holes in the hinged top, but holes were only big enough until the feed went down. So the top now stays open, and there is room for everyone!
Side view of the first "feeding shelter". Back of feeder is toward the north, where most of the weather comes from. It kept the food dry.
This is their second "feeding shelter". A little longer, more enclosed and with a 3' feed trough. They are sure hungry little critters!
After reading about waterers here in BYC, I decided to use the idea and made this type of waterer. I bought a bigger pan for the bottom, but this 5-gallon bucket ensured that they would always have water!
Ahh, paint! I painted the inside of the little house and it looks SO much better...brighter...cheerier... This is from inside looking out into the new addition. We made this hardware cloth door when putting up the walls of the new part as the old door went on the new part!
Wall in little coop...at last - painted!
I had some help until I put up a barrier from the run! Painted pooboard back in place.
Roost and pooboard back in place.
They looked, gawked, squawked and otherwise carried on at the new look! I'm sure they were saying, "thank-you"!!
Couldn't figure out what was going on in there.
View from new part looking in. I think I'll paint the ceiling a light blue with clouds - guess where I saw that idea!!!! Just using left over paint from our house now!
Old nesting box with a new look! Hubby says we have very intelligent chickens since they can now read!
Another view! Not quite done.
Everything back in place. I nailed some boards together into a box for the nesting boxes to set on under the pooboard.
View from addition.
New addition framed up. Roof slants to south. The woods to the left is mostly on a downhill slope, so the water will stay away from the coops.
Addition with walls on.
This is the north view of the new addition. We put a new roof over the old coop to match the new part. The part with the plastic on it is going to be a spot for our "special" chicken, Greenie. I will probably make an album about her story. Most of it is already written in "What Did Your Chickens Do Today" thread. This part will also be enclosed for winter and have a little run with it. She is now my pet and gets to free-range whenever I'm out there.
This is all we have done for now. I'll post more pictures as we go. It's not fancy, won't win any prizes, but I love it - and seems all the chickies do, too!!! Not sure yet what color I'll paint the outside but hope to get that done before it gets too cold. Have to put some rock around the perimeter for drainage, windows, hinged window covers, etc., etc., etc. - my list could go on for awhile!
Thinking about a name for this building: How about "Little Hen House in the Big Woods"? I had thought about "The Little Red Hen House", but red paint is too expensive! (and I only have 3 red hens - Golden Comets or some mix, not sure!) Maybe "Big Coop" and "Little Coop". Any suggestions?
Thanks for looking!
December 2013:
It's been awhile and although we've not gotten a lot more done, there are a few things that I've accomplished! The plans have changed just a little bit. No longer will have a special pen for Greenie, as she died in November from a prolapse problem. I miss her following me around the yard!
As the cold came in November, I read up on one of the forums about winterizing. So I did a few things to the inside of the Little Coop, (now named!) for the anticipation of cold weather. It only lasted a few weeks, but more is bound to come. Little Coop had BIG spaces between the wall boards, so I nailed a few boards to the outside in a few places to cover up the cracks, then decided that I would stuff hay in-between the 2x4s of the walls on the inside and cover the hay with fabric. I only covered the spots that the chickens could reach, so they wouldn't pull it all out. Some of the places covered are out of reach, but it was easier to just cover the whole side or section. Here are a few pictures of the "padded cell" now:
Area above the roost.
North wall.I also carpeted the roost. Wrapped a piece all the way around and nailed at the bottom of the 2x4. They seemed to like it on the few cold nights we've had so far. Coldest is about 15 as of today. It'll keep help their feet warm as they sleep!
Carpeted roost and insulated wall.Seems the nice, bright, white paint has disappeared that I laboriously painted! Didn't stay clean-looking for long!
I put this inside feeder in the north wall, too, so they could have some midnight snacks! It is above the long strip of fabric. That part has hay beneath it, too. That North Wind doth blow!
Snack Time!Inside the Big Coop, I've partitioned off the "People Stuff" into a 4x8 spot on the north end and left them an area of about 8x10 to explore. Put another nest box up on a bale of hay since I found an egg up there today! Hope they get the hint! They love this new addition, even though it's not done! When the door was opened for the first time, they all came on through, after watching me rearrange things through the hardware cloth door of the Little Coop. They squawked and clucked and make a good loud racket! Explored all over, pecked at the bare floor (not sure what they found there to eat!), and jumped the bales of hay as high as they could go. I've rearranged it several times, trying to utilize the space better and give them some spots to "get away from it all".
Here are some pictures of them being chickens!
One lone chicken at this time!
Looks like a long way down. You go first, Miss Fluff! (There are only 2 bales of hay here, so it's about 4 feet up!) You can see the nest box on the left. An egg was left for me on top of the bales today, before I put the nest box there!
Getting ready to jump!We plan to make a long, narrow window on this south wall at about the 4' height and another one on the east wall. It's dark in the Big Coop right now, but come spring and fair weather, windows and paint will make a big difference, I think. Ugh - more painting - not my favorite thing to do. I bought some very light colored paint for the inside walls - which will be covered with 1/4' plywood, too. (Much easier to paint than between 2x4s!) Found some maroonish color for the floor - porch paint, and a light blue for the outside of all of it - Little and Big Coops. Just gotta wait now for the right temperatures!
Looking into the Big Coop from inside the Little Coop.Things To Do Yet: 9 hens, 1 roo
1. Windows - they will just be holes with hardware cloth over them and home-made shutters for winter time and blowing rains.
2. Make a permanent wall to divide their space and mine! Make a door between the two and a door inside my space to access the run from there.
3. Put up the 1/4" plywood.
4. Paint inside and outside.
5. Finish predator proofing the Big Coop. (Right now it's not - there are a few holes and I shut the door at night, since they all roost in the VERY SECURE NOW Little Coop!)
6. Make some chicken stairs so they can play around at different levels, if they want.
7. Put stone around the bottom of the walls on the outside for drainage - got some free small rocks that'll do the trick!
8. Finish the RUN! Got the fencing - it'll be enough for the sides and top of the run. Family project cleared the area of trees and brush a few weeks ago. Can't wait!
9. Make a chicken door inside the big coop for entrance directly to the new run (when it's done!)
10. Well, you get the picture - still lots to do... does it ever end? Thanks for looking again!
October 2014: 7 hens,0 roos.
Looks like it's been a YEAR since I've been on here. Life gets too busy at times. We finished the run. This plastic fencing was found on Craigslist and we got PLENTY!! Hasn't been through a winter yet, nor snow, leaves, etc., on the top of the run, but it is quite sturdy and I think it will hold up just fine. It is buried on the outside at the bottom, about 6-10 inches straight down from the bottom board and then curving out. Saw that on here somewhere and it made sense to me! So I don't think anything is going to dig underneath the fence.

I repainted some of the inside of the Little Coop and even though the chickens don't seem to care what is on their walls, I do! I didn't paint all the way down because I've found out that anything around their ground level doesn't stay clean! Especially in the back of the poo-board! Oh well . . .they are chickens, after all . .

Flower border is all the way around the top of the Little Coop.
Clouds on roof of Little Coop. There is a sun on the other side. 
Several more chickens died of our first flock.last May and June. We sold our rooster and the remaining 3 white hens in August and bought 4, one-year old chickens. Maybe someone can tell me what kind they are. One of them lays a very light green egg and the rest seem to be very pale brown. So we have our (3) Golden Comets and (4) of an unknown breed. None of them are laying much.
We are only getting about 1-2 eggs every other day.
 This is inside the coop looking east at the run door.
Inside the run looking at their (hopefully) dry shelter. May put up half of a wall there to help keep the weather out of this little spot. The open part is on the west side, so it doesn't get a lot of weather, but with the winter we had last year.... who knows!?
Closer look at shelter and chicken door to Big Coop, which will also lead them to the Little Coop where the roost and nest boxes are.
Top construction of run.
Looking west from the Little Coop door into the run.
Other side of the run, looking west, from the shelter.
Here is just a peek of the coop through the trees. Eventually, this brush will all be cleared away so we can see the coop from the house.
This is inside the coop looking east at the run door.
Inside the run looking at their (hopefully) dry shelter. May put up half of a wall there to help keep the weather out of this little spot. The open part is on the west side, so it doesn't get a lot of weather, but with the winter we had last year.... who knows!?
Closer look at shelter and chicken door to Big Coop, which will also lead them to the Little Coop where the roost and nest boxes are.
Top construction of run.
Looking west from the Little Coop door into the run.
Other side of the run, looking west, from the shelter.
Here is just a peek of the coop through the trees. Eventually, this brush will all be cleared away so we can see the coop from the house.So, we still have stuff to do - major thing is to get it all painted on the outside. Other things are: windows in the Big Coop, paint the inside of the Big Coop ( I have all the paint!),and do some little things inside the Big Coop (another roost for one). Then, since the roost and poo-board setup is in the Little Coop, to nail up some boards on the outside to close up some of the cracks. Not going to stuff hay in the walls and make a padded cell this winter! Would like something a little more permanent.
Then, who knows? There's plenty of room for some more chickens . . .