UPDATE 3/12/14
It's been a while, I know, things come up. here are a few pictures of the coop progress. More to come
UPDATE 11/10/13
I thought I would throw it out there on my designs of the coop, when I first started looking I found great coops but nothing really stuck out for the one I wanted to build, until I came across this one style of a coop (not sure which one I found first) here are the links in no particular order
Wichita Cabin Coop
The Taj Mahal
Two Dog Farm
Boisemarkers Chicken Coop
There was a few more from other websites that are nearly the same principal design as well, I didnt really go off a plan and draw out the dimensions, I just kind of went on the fly so far of what will fit and look good.
So I have been wanting to build a coop for a while now, then get chickens but things kept coming up and never got around to building one, so I decided I would buy some chicks and it would force me to make time to build a coop, it worked, 3 weeks ago my wife and I got four chicks at a local feed store.
1 Rhode Island Red, 3 Easter Eggers

I started this two weekends ago, only have time on the weekends to work on it a few hours during the week. I chose this unused spot in the corner of my backyard. My goal is to make the coop 99% of redwood for rot resistance and I want to stay organic as possible without stains, paints, water sealers etc. I wanted to make it big enough for a few more chickens if the need arises, but mostly during the day they will probably free range the yard.
So it may be a bit of an overkill on the foundation but the layout is 6x10ft
I also dug another 12in deep and put chicken wire down further (part of the overkill but there has been racoons in the neighborhood) I would rather be safe than sorry that a critter got in the coop and made dinner out of my breakfast production line.
after I got the blocks all level I poured some just add water cement mix in the blocks and on the sides and just flooded the area
I let it set up overnight and added the top caps and leveled off the dirt (still have more dirt then when I started)
Started the initial framing
I had to take a little time and build a bigger brooder, the chicks are not that photogenic. they are almost 4 weeks old here 10/25/13
That is as far as I have built. Hopefully this weekend I will get to work on it more. I figure it will be a few more weekends by then, my chicks will be almost 2 months and should be able to stay outside. Im in the San Diego area so it stays pretty warm up till Jan.
11/8/13 Okay, have not gotten as much time as I hope, but I would rather take my time than rush and not have it come out as I would liked. I also got two more chicks. They are olive eggers, had to get two to complete my flock.... for now.
Its hard to tell but I started putting up the hardware cloth on the left side of the coop in the picture below
I have been acclimating my weimaraner to her sisters so far shes been doing really well, lets keep it that way.
you can see on the back wall, I found a few pallets and took them apart and using the wood for the back of the coop, I just have to find a few more. My wife is quite upset with me, she is always on the lookout for pallets for her hobby projects.
UPDATE 11-17-13
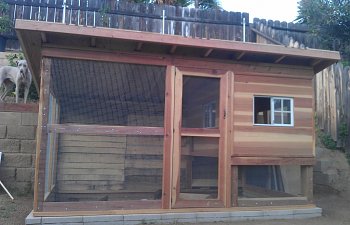
here is what the wall looks like with three pallets taken apart. Saved a few bucks and it gives it a neat look. I still want to put some sort of trim on it.
Temporary fit of the roof, used three 4x8 sheets of plywood
so here is some more pictures, of the progress, the coop is pretty much done now I just have to upload the pictures
This is Mo short for Mojave, the RIR, and below is her first egg
Mo's egg on the left, fake egg on the right
It's been a while, I know, things come up. here are a few pictures of the coop progress. More to come
UPDATE 11/10/13
I thought I would throw it out there on my designs of the coop, when I first started looking I found great coops but nothing really stuck out for the one I wanted to build, until I came across this one style of a coop (not sure which one I found first) here are the links in no particular order
Wichita Cabin Coop
The Taj Mahal
Two Dog Farm
Boisemarkers Chicken Coop
There was a few more from other websites that are nearly the same principal design as well, I didnt really go off a plan and draw out the dimensions, I just kind of went on the fly so far of what will fit and look good.
So I have been wanting to build a coop for a while now, then get chickens but things kept coming up and never got around to building one, so I decided I would buy some chicks and it would force me to make time to build a coop, it worked, 3 weeks ago my wife and I got four chicks at a local feed store.
1 Rhode Island Red, 3 Easter Eggers
I started this two weekends ago, only have time on the weekends to work on it a few hours during the week. I chose this unused spot in the corner of my backyard. My goal is to make the coop 99% of redwood for rot resistance and I want to stay organic as possible without stains, paints, water sealers etc. I wanted to make it big enough for a few more chickens if the need arises, but mostly during the day they will probably free range the yard.
So it may be a bit of an overkill on the foundation but the layout is 6x10ft
I also dug another 12in deep and put chicken wire down further (part of the overkill but there has been racoons in the neighborhood) I would rather be safe than sorry that a critter got in the coop and made dinner out of my breakfast production line.
after I got the blocks all level I poured some just add water cement mix in the blocks and on the sides and just flooded the area
I let it set up overnight and added the top caps and leveled off the dirt (still have more dirt then when I started)
Started the initial framing
I had to take a little time and build a bigger brooder, the chicks are not that photogenic. they are almost 4 weeks old here 10/25/13
That is as far as I have built. Hopefully this weekend I will get to work on it more. I figure it will be a few more weekends by then, my chicks will be almost 2 months and should be able to stay outside. Im in the San Diego area so it stays pretty warm up till Jan.
11/8/13 Okay, have not gotten as much time as I hope, but I would rather take my time than rush and not have it come out as I would liked. I also got two more chicks. They are olive eggers, had to get two to complete my flock.... for now.
Its hard to tell but I started putting up the hardware cloth on the left side of the coop in the picture below
I have been acclimating my weimaraner to her sisters so far shes been doing really well, lets keep it that way.
you can see on the back wall, I found a few pallets and took them apart and using the wood for the back of the coop, I just have to find a few more. My wife is quite upset with me, she is always on the lookout for pallets for her hobby projects.
UPDATE 11-17-13
here is what the wall looks like with three pallets taken apart. Saved a few bucks and it gives it a neat look. I still want to put some sort of trim on it.
Temporary fit of the roof, used three 4x8 sheets of plywood
so here is some more pictures, of the progress, the coop is pretty much done now I just have to upload the pictures
This is Mo short for Mojave, the RIR, and below is her first egg
Mo's egg on the left, fake egg on the right