Here's a description, and photos, of my new chicken coop. It was modeled after the coop created by the Baldessaris of Wichita. Many, many thanks to them!
And thanks, also, to...yes...the HENleys...Chick---en--ma-a-a-a-n! and ChickenMama.
My coop-building journey started on a cold, gray, northwest December day last year. Sub-freezing temperatures didn't dampen my enthusiasm as I worked from dawn to dusk most weekends.
I'm a do-it-yourselfer with no great experience in building projects. With limited knowledge...and even fewer tools, I began.
First came a few holes in the ground as I started the foundation. Once that was done I put up the framework.

I also began putting up the hardware cloth around the run. We live right up against the Capitol Forest near Olympia and there are plenty of critters in the woods that will seek to do our girls harm...so hardware cloth it is. Pricey, but worth it.
Also well worth the money were the boxes of screws that I used in place of nails. I don't believe there is a nail in the entire coop. I had a lot of do-overs and the screws were priceless in my opinion. That was Chick---en---ma-a-a-ns! best suggestion.
I could show you a hundred detail photos of the construction here but Mr. Baldessari and BoiseMarker have quite a few of those that you can check out on BYC.
One thing that took a LOT of time was staining all of the wood. I did each surface of each board twice, once with one kind of stain... and again with another (Top Secret...unless, of course, you ask.) The result, you will see, was pretty spectacular.
Here are a few early shots of that process.
First coat on the right. Second on the left.
No doubt the most significant difference from the Baldessari coop was in the choice to put cedar siding up around the coop, siding that matches our house and garage. Since you see the coop when you first drive up to the house, the curb appeal, or, ahem... "coop appeal", had to be there. Fortunately I had quite a bit of clapboard siding left over from a previous project.
Here's a picture of the cedar-sided door in the construction phase and a view of the coop alongside the house.
Something else not found in the Wichita Cabin Coop that I added here was a 1/2 ", 3' long, hardware cloth "skirt" all around the run. Mostly rock underneath.That ought to keep any predator busy...and exhausted. Pity the poor fool that tries!
About the only other thing done differently was my adding some anti-skid paper for the girls as they come down the plank into the run.
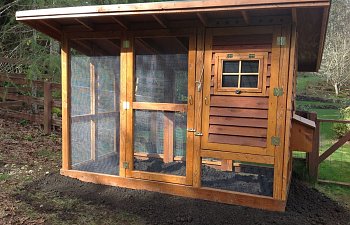
So, after two or three months, here are some shots of the (nearly) finished project. I may add some more pics as the girls get into their new "digs".
Almost ready...
And, of course, every project needs a project manager.
This is Cosmo!
Questions?
And thanks, also, to...yes...the HENleys...Chick---en--ma-a-a-a-n! and ChickenMama.
My coop-building journey started on a cold, gray, northwest December day last year. Sub-freezing temperatures didn't dampen my enthusiasm as I worked from dawn to dusk most weekends.
I'm a do-it-yourselfer with no great experience in building projects. With limited knowledge...and even fewer tools, I began.
First came a few holes in the ground as I started the foundation. Once that was done I put up the framework.
I also began putting up the hardware cloth around the run. We live right up against the Capitol Forest near Olympia and there are plenty of critters in the woods that will seek to do our girls harm...so hardware cloth it is. Pricey, but worth it.
Also well worth the money were the boxes of screws that I used in place of nails. I don't believe there is a nail in the entire coop. I had a lot of do-overs and the screws were priceless in my opinion. That was Chick---en---ma-a-a-ns! best suggestion.
I could show you a hundred detail photos of the construction here but Mr. Baldessari and BoiseMarker have quite a few of those that you can check out on BYC.
One thing that took a LOT of time was staining all of the wood. I did each surface of each board twice, once with one kind of stain... and again with another (Top Secret...unless, of course, you ask.) The result, you will see, was pretty spectacular.
Here are a few early shots of that process.
First coat on the right. Second on the left.
No doubt the most significant difference from the Baldessari coop was in the choice to put cedar siding up around the coop, siding that matches our house and garage. Since you see the coop when you first drive up to the house, the curb appeal, or, ahem... "coop appeal", had to be there. Fortunately I had quite a bit of clapboard siding left over from a previous project.
Here's a picture of the cedar-sided door in the construction phase and a view of the coop alongside the house.
Something else not found in the Wichita Cabin Coop that I added here was a 1/2 ", 3' long, hardware cloth "skirt" all around the run. Mostly rock underneath.That ought to keep any predator busy...and exhausted. Pity the poor fool that tries!
About the only other thing done differently was my adding some anti-skid paper for the girls as they come down the plank into the run.
So, after two or three months, here are some shots of the (nearly) finished project. I may add some more pics as the girls get into their new "digs".
Almost ready...
And, of course, every project needs a project manager.
This is Cosmo!
Questions?
")