Let me start by saying that I've wanted to get backyard chickens for a few years now and with a little resistance from my husband, I had put it off. I knew I had to take the time to do the proper research to do it right and with the help of BackyardChickens.com, and all of it's valuable information, we decided this was the year and now we cannot wait for fresh eggs in August!

It started as an old garden shed that was on our property.
First, I removed the old brittle corrugated fiberglass siding.
Next, I built a platform for the "house" portion of the coop. I used a large piece of formica covered plywood for the floor. (I found most of my materials in our barn, left behind by the previous owners.)
Then I re-used some pine paneling we had removed from our house for siding, leaving a hole for the pop door.
In the meantime, we bought our five chicks and housed them in an old terrarium in our basement, which worked perfectly.
Upon further inspection, we realized the wood beams the shed was sitting on were completely rotted out, so I dug underneath and carefully inserted a cinderblock foundation. Attached the new pressure treated 2x4s with some concrete adhesive.
I dug a trench around the coop and started attaching the 1/2 inch hardware cloth, including an apron 12 inches deep and 18 inches out from all sides to keep predators out. Then I removed the dirt from inside so I could fill it with 6 inches of sand.
Found some more paneling and covered the gable. Also made the door and ramp.
My husband made the pop door with a pulley system...works great!
I made the roost from branches I found and created a droppings shelf covered with some old linoleum...best thing ever for keeping the inside clean! Also vented the top front and back with hardware cloth.
Put in a plexiglass window above where the nesting boxes will be to let in a little bit of natural light.
My father-in-law made two sets of double doors for the back of the coop. The roosts are on the right side, and the nesting boxes will eventually go on the left when the hens are old enough to start laying.
I attached some more branches inside the coop for roosting during the day and shoveled in two yards of sand.
Hanging food and waterer (not pictured) mounted on the front of the "house."
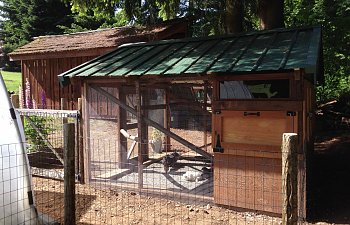
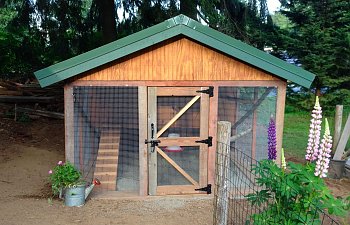
Installed a green metal roof and the egg collection door (also made by my father-in-law) and installed all of the security hardware. (latches and carabiner clips) Made mostly from recycled materials...only things we needed to purchase were the roofing materials, hardware cloth, and door hardware.
And it's finished!
Fixed our garden fence so the chickens can't "free range" in my garden.
The girls love the sand and it's been really easy to keep clean.
It only took a couple of nights for them to figure it out. They usually roost together on the top branch.
As you can see, the "droppings" shelf catches all of it and I just scoop it off each morning. The pine shavings on the floor of the house stay clean and it's very low maintenence, not to mention economical!
I try to let the girls out to free range a little each day.
Left to right: Stella the Light Brahma, Marian the Cuckoo Maran, Georgia the Blue Wyandotte, Dixie the Welsummer, and Poppy the Barred Rock.
UPDATES: Built a chicken run to give the girls more space to roam and take dust baths. It started off as a strip of grass behind my garden. I just extended the current fence and draped some bird netting over the top until I could build something more permanent.
Next, I recycled the old railing we had on our deck to make the sides more substantial. This made the run 6 ft. wide by 16 ft. long. Then we cut an access door from the coop to the run. (I lock this at night to keep predators out.) Of course, the grass quickly became dirt.")
On Sept. 4th, we got our first egg! (Poppy)
Next upgrade was building a 5 gallon bucket outside the coop which runs into a PVC pipe nipple waterer. Best thing ever for a low maintenance coop! (Until the cold spell came and the pipe froze. Now I've switched to a winter waterer, which is still a 5 gallon bucket, but the poultry nipples are directly in the bottom of the bucket and I added a birdbath/bucket de-icer directly in the bucket to keep it from freezing...so far, so good!)
Next, we dug a trench and ran electricity and water from our house to the coop, which is approx. 120 ft. My husband was a huge help!
Next, I ran rope lights inside the coop and hen house to extend the daylight. All five hens are laying now!
Being from rainy Western Washington, it was only a matter of time before I had to build a roof for the run. The chickens were muddy and wet, especially Stella's feathered feet! I used clear corrugated roofing and more recycled deck boards for support. Now they still get a little light while staying somewhat dry and they LOVE it, especially after I added leaves!
It started as an old garden shed that was on our property.
First, I removed the old brittle corrugated fiberglass siding.
Next, I built a platform for the "house" portion of the coop. I used a large piece of formica covered plywood for the floor. (I found most of my materials in our barn, left behind by the previous owners.)
Then I re-used some pine paneling we had removed from our house for siding, leaving a hole for the pop door.
In the meantime, we bought our five chicks and housed them in an old terrarium in our basement, which worked perfectly.
Upon further inspection, we realized the wood beams the shed was sitting on were completely rotted out, so I dug underneath and carefully inserted a cinderblock foundation. Attached the new pressure treated 2x4s with some concrete adhesive.
I dug a trench around the coop and started attaching the 1/2 inch hardware cloth, including an apron 12 inches deep and 18 inches out from all sides to keep predators out. Then I removed the dirt from inside so I could fill it with 6 inches of sand.
Found some more paneling and covered the gable. Also made the door and ramp.
My husband made the pop door with a pulley system...works great!
I made the roost from branches I found and created a droppings shelf covered with some old linoleum...best thing ever for keeping the inside clean! Also vented the top front and back with hardware cloth.
Put in a plexiglass window above where the nesting boxes will be to let in a little bit of natural light.
My father-in-law made two sets of double doors for the back of the coop. The roosts are on the right side, and the nesting boxes will eventually go on the left when the hens are old enough to start laying.
I attached some more branches inside the coop for roosting during the day and shoveled in two yards of sand.
Hanging food and waterer (not pictured) mounted on the front of the "house."
Installed a green metal roof and the egg collection door (also made by my father-in-law) and installed all of the security hardware. (latches and carabiner clips) Made mostly from recycled materials...only things we needed to purchase were the roofing materials, hardware cloth, and door hardware.
And it's finished!
Fixed our garden fence so the chickens can't "free range" in my garden.
The girls love the sand and it's been really easy to keep clean.
It only took a couple of nights for them to figure it out. They usually roost together on the top branch.
As you can see, the "droppings" shelf catches all of it and I just scoop it off each morning. The pine shavings on the floor of the house stay clean and it's very low maintenence, not to mention economical!
I try to let the girls out to free range a little each day.
Left to right: Stella the Light Brahma, Marian the Cuckoo Maran, Georgia the Blue Wyandotte, Dixie the Welsummer, and Poppy the Barred Rock.
UPDATES: Built a chicken run to give the girls more space to roam and take dust baths. It started off as a strip of grass behind my garden. I just extended the current fence and draped some bird netting over the top until I could build something more permanent.
Next, I recycled the old railing we had on our deck to make the sides more substantial. This made the run 6 ft. wide by 16 ft. long. Then we cut an access door from the coop to the run. (I lock this at night to keep predators out.) Of course, the grass quickly became dirt.
On Sept. 4th, we got our first egg! (Poppy)
Next upgrade was building a 5 gallon bucket outside the coop which runs into a PVC pipe nipple waterer. Best thing ever for a low maintenance coop! (Until the cold spell came and the pipe froze. Now I've switched to a winter waterer, which is still a 5 gallon bucket, but the poultry nipples are directly in the bottom of the bucket and I added a birdbath/bucket de-icer directly in the bucket to keep it from freezing...so far, so good!)
Next, we dug a trench and ran electricity and water from our house to the coop, which is approx. 120 ft. My husband was a huge help!
Next, I ran rope lights inside the coop and hen house to extend the daylight. All five hens are laying now!
Being from rainy Western Washington, it was only a matter of time before I had to build a roof for the run. The chickens were muddy and wet, especially Stella's feathered feet! I used clear corrugated roofing and more recycled deck boards for support. Now they still get a little light while staying somewhat dry and they LOVE it, especially after I added leaves!