First we want to thank everyone who has posted their stories of building their own coops and how they upgraded existing ones, we couldn't have completed ours without your help.
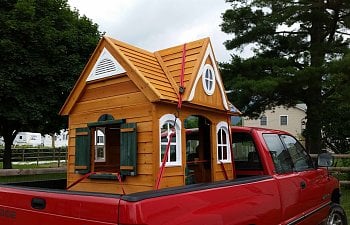
To save money and the desire to have an attractive new chicken coop to replace our ratty old and smaller one lead us to purchasing a Playhouse from Habitat for Humanity's ReStore store. Even though the Playhouse was missing parts and sections were damaged, we paid 1/4th the cost of a new one.
Here is a picture of it once we got it home.

First we had to build a platform to support the playhouse. The wood is pressure treated and are fastened together with metal decking hardware. Once the platform was completed, we mounted the playhouse to it via a framework of 2"x4". We live in a windy area and we wanted to make sure that the playhouse wouldn't be blown away.
Here's our dog checking out our bracing work, he gave us his approval.")
Interior shot of the bracing.
Once we made sure the playhouse was stable, we painted the platform, interior and roof with Black Jack Roof Guard 700. You will notice that the gable has been removed, it was mounted on the roof with a single screw to the cleat you see near the peak. We decided to paint the whole roof and then reinstall the gable once it dried.
Here is the gable reinstalled, the nesting box installed and the opening cut for the pop door. We were actually happy to have removed the gable because we found that the cleat the store had mounted was mounted upside down. Once it was installed correctly the gable slid in place without any gaps.
Here is the interior of the nesting box and the door opening. We couldn't place the nesting box lower because it would have compromised the structural integrity of the wall.
We then stained the cedar siding with Thompson's Water-Seal Clear in Woodland Cedar and the nesting box and platform with Behr Base 5013 stain tinted with Ponderosa Green pigment. Hardware Cloth was installed covering the inside of the windows and ventilation openings. Plate Glass was added to the windows that are facing North.
To save money, instead of purchasing a solid aluminum plate for the pop door, we decided to create one out of laminated aluminum flashing.
1. A jig was created with scraps from the building of the nesting box.
2. 5 plates were cut from a 10' roll of flashing using an X-acto knife.
3. The plates were individually placed in the jig and roughened up with sandpaper and then cleaned up with a tack clothe.
3. The first plate was placed in the jig, and then construction adhesive was added.
4. The next plate was placed on top of the first and then the glue was added to it. This continued for the rest of the plates.
5. A plywood plate was placed on the stack of Aluminum ones.
6. Dual 2"x4"s were placed on top of the plywood plate and then a 20 lb. stone was placed on top of them for 24 hours to compress the Aluminum plates together.
The upper and lower tracks for the door was constructed by placing electrical conduits in a notch into the two supports made out of a 2"X4" cut in half lengthwise. Construction adhesive was used to mount the conduits.
Due to the nesting box being located above the door, we devised a pulley system and a water bottle to provide ballast to automatically close the door when the Chicken Guard door system closes the door.
Once the door was able to slide open and closed without binding, the screws were driven in to make the supports secure.
The Dutch doors were stained, hardware was added and then mounted in the frame.
Here is the coop finished.
Here is the inside of the nesting box and you can see the yellow cable that the Chicken Guard uses to open the door.
Here are the roosts.
Here is the back side of the interior.
Here's the interior taken from the nesting box.
Here is our garden, you can see the old coop in the background.
Hooks and loops were added to the roosts so that the Poop Hammocks can be installed.
Here are the Hammocks installed.
To same even more money, we decided to recycle the old coop's run. We had to build a connecting section between the old run and the new coop.
Here is our dog inspecting the run.
Then we added a ladder and pine shavings to the floor.
Here's our first girl checking out her new digs.
Here you can see the coop and run with the girls enjoying a cool summer day. Note: The West and North side of the platform was enclosed by Lowes' SmartSide Structural 1 Aspen Treated Wood Siding. The South side is covered with Hardware Cloth so when they need to run underneath the coop they can still get fresh are.
The old run was designed to be covered in the winter with a tarp held down with bungee cords and dog chain ground screw anchors.
We have also added a interior feeder and waterer to the coop made out of 4" PVC pipe and horizontal water nipples.
The total cost of the playhouse, supplies and purchasing power tools came to a little over $1100.00, more than I expected but half the price of similar less fancy prebuilt coops that are for sale in this area.
Thanks again to everyone who shares their projects and tips, we wouldn't have been able to get this coop done without your help.
To save money and the desire to have an attractive new chicken coop to replace our ratty old and smaller one lead us to purchasing a Playhouse from Habitat for Humanity's ReStore store. Even though the Playhouse was missing parts and sections were damaged, we paid 1/4th the cost of a new one.
Here is a picture of it once we got it home.
First we had to build a platform to support the playhouse. The wood is pressure treated and are fastened together with metal decking hardware. Once the platform was completed, we mounted the playhouse to it via a framework of 2"x4". We live in a windy area and we wanted to make sure that the playhouse wouldn't be blown away.
Here's our dog checking out our bracing work, he gave us his approval.
Interior shot of the bracing.
Once we made sure the playhouse was stable, we painted the platform, interior and roof with Black Jack Roof Guard 700. You will notice that the gable has been removed, it was mounted on the roof with a single screw to the cleat you see near the peak. We decided to paint the whole roof and then reinstall the gable once it dried.
Here is the gable reinstalled, the nesting box installed and the opening cut for the pop door. We were actually happy to have removed the gable because we found that the cleat the store had mounted was mounted upside down. Once it was installed correctly the gable slid in place without any gaps.
Here is the interior of the nesting box and the door opening. We couldn't place the nesting box lower because it would have compromised the structural integrity of the wall.
We then stained the cedar siding with Thompson's Water-Seal Clear in Woodland Cedar and the nesting box and platform with Behr Base 5013 stain tinted with Ponderosa Green pigment. Hardware Cloth was installed covering the inside of the windows and ventilation openings. Plate Glass was added to the windows that are facing North.
To save money, instead of purchasing a solid aluminum plate for the pop door, we decided to create one out of laminated aluminum flashing.
1. A jig was created with scraps from the building of the nesting box.
2. 5 plates were cut from a 10' roll of flashing using an X-acto knife.
3. The plates were individually placed in the jig and roughened up with sandpaper and then cleaned up with a tack clothe.
3. The first plate was placed in the jig, and then construction adhesive was added.
4. The next plate was placed on top of the first and then the glue was added to it. This continued for the rest of the plates.
5. A plywood plate was placed on the stack of Aluminum ones.
6. Dual 2"x4"s were placed on top of the plywood plate and then a 20 lb. stone was placed on top of them for 24 hours to compress the Aluminum plates together.
The upper and lower tracks for the door was constructed by placing electrical conduits in a notch into the two supports made out of a 2"X4" cut in half lengthwise. Construction adhesive was used to mount the conduits.
Due to the nesting box being located above the door, we devised a pulley system and a water bottle to provide ballast to automatically close the door when the Chicken Guard door system closes the door.
Once the door was able to slide open and closed without binding, the screws were driven in to make the supports secure.
The Dutch doors were stained, hardware was added and then mounted in the frame.
Here is the coop finished.
Here is the inside of the nesting box and you can see the yellow cable that the Chicken Guard uses to open the door.
Here are the roosts.
Here is the back side of the interior.
Here's the interior taken from the nesting box.
Here is our garden, you can see the old coop in the background.
Hooks and loops were added to the roosts so that the Poop Hammocks can be installed.
Here are the Hammocks installed.
To same even more money, we decided to recycle the old coop's run. We had to build a connecting section between the old run and the new coop.
Here is our dog inspecting the run.
Then we added a ladder and pine shavings to the floor.
Here's our first girl checking out her new digs.
Here you can see the coop and run with the girls enjoying a cool summer day. Note: The West and North side of the platform was enclosed by Lowes' SmartSide Structural 1 Aspen Treated Wood Siding. The South side is covered with Hardware Cloth so when they need to run underneath the coop they can still get fresh are.
The old run was designed to be covered in the winter with a tarp held down with bungee cords and dog chain ground screw anchors.
We have also added a interior feeder and waterer to the coop made out of 4" PVC pipe and horizontal water nipples.
The total cost of the playhouse, supplies and purchasing power tools came to a little over $1100.00, more than I expected but half the price of similar less fancy prebuilt coops that are for sale in this area.
Thanks again to everyone who shares their projects and tips, we wouldn't have been able to get this coop done without your help.