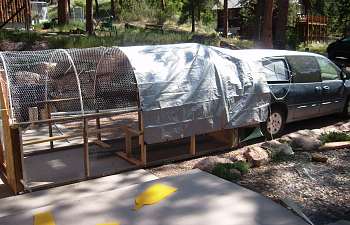
Finished Product:

For over a year, since I purchased my first 8 chicks from MPC, I've been eyeing our 17 year old mini-van that has been sitting in the meadow, only used to haul stuff to the dump for several years. I had this notion to turn the back end (2 rows of seats removed) into a mobile chicken coop and attach a large chicken tractor to the trailer hitch and be able to move it every day to fresh pasture.
So, here's what I'm working with, note the dent and missing rear window, thanks mostly to eldest son's first year driving.
The inside is a mess, full of broken glass, charcoal from dragging an old grill to the scrap yard plus being used as a mobile trash can by my son for almost a year. The back end is a little over 4'X8' (I know because I've lugged 4'X8' pieces of plywood home in it. My first step was to clean it out as best as I could. I then turned my attention to the tractor.
My plan was to create something that would attach to the van where I could open the back hatch of the van and let the chickens out every morning, locking them into the van at night for extra predator protection (lots of those in the mountains of Colorado)
I started building the walls for a 6'X12' tractor.
Here are the first two walls. The bottom pieces are pressure treated lumber, the rest is regular 2"X4"s. The short wall being the end that would tuck up against the rear bumper of the van. Because my main concern with the tractor construction is that it would pull apart over time when dragged behind the mini-van, I decided to reinforce the end to make it stronger. I used a scrap piece of....um....don't remember what it is called...that I picked up at the Restore for $0.80.
I thought it would be easier to build each wall and attach the hardware cloth before I assembled it. Not sure now whether that was wise or not. In hindsight, while wrapping a continuous roll of hardware cloth around three sides of the tractor would have been more difficult, it may have added extra strength and support to keep it together when it is being dragged.
To compensate, I've reinforced every corner of the walls, and then added "L" brackets to the top and bottom corners.
Here are the first three sides connected:
I completed the third side...with the opening for the door (which you can see in the background), also reinforced with scrap picked up at the Restore for $1.50, and attached it to the other three.
I'm feeling particularly clever about the next step. I cut 5/8th inch holes in the top 2"X4"s right on the inside of each vertical stud and bent a 10' length of 1/2" PVC pipe and slid them into the holes. Since I planned on using 3' wide chicken wire on the top part of the tractor, I had spaced the vertical studs 3 feet apart, so the sections of PVC pipe were also 3 feet apart.
It wasn't a big deal (although 2 people would have been a great help) to fasten the chicken wire to the PVC pipe with zip-ties. At each end, I unscrewed the screws & washers that were holding the hardware cloth to the top of the bottom section tucked the end of the chicken wire under it and re-screw it down.
I then turned my focus to the mini-van, coop part. First I cleaned out the back of the mini-van and vacuumed up all the broken glass and other stuff. I then lined the carpet & fabric areas with these sticky-sided plastic sheets I got at the Restore. They were a hassle because they wanted to stick to themselves much more than they wanted to stick to the floor of the van, but reinforced with duct tape, I think they will work to keep the van clean-able.
I then started building the frame that was to go behind the front seats to keep the chickens from joy-riding. I used 2"X4's and PVC pipe.
I then pulled the whole thing out and put down a big 12'X8' tarp over the plastic stuff. I figure that if I allow the carpeting to become saturated with chicken poo there will be no way to really clean it. Plus, I used the last 2 feet of tarp for the backing of the bottom half of the end wall. Poultry netting forms the top half of the barrier. I figure it doesn't need to be predator proof since the van will be closed up when the chickens are inside for the night.
It's been kind of like building a ship in a bottle in that some of the construction has to take place outside of the van and then moved in, and some has to be done in place. So far I've tried to connect any large pieces (like the frame of the far wall) with screws, with the idea that once a year I could actually slide everything out, including the tarp and just hose it down.
I built the frame for the hatch-door wall. While once again, I don't intend this wall to be predator proof, I'm worried that if I'm trying to chuck 35 reluctant 4-week-old Freedom Rangers into the van for the night I could badly injure or kill one slamming that hatch door down. So, the idea is that the middle opening will be rigged like a pop door and the sides will be covered with something solid. The top will be poultry netting, like in the front of the coop space. I'll be able to close the chickens inside before actually closing the hatch.
I purchased a piece of the perforated aluminum that folks use for radiator covers and such (probably the most expensive purchase for this project so far). I traced the opening of the broken window and cut the aluminum about 1/2 inch larger on each side and tried to slide it up into the groove that the window glass would fit into and then down into the lower groove. I had to push and shove and take it out several times to trim it, and scraped my hands against the rough edge, but in the end I'm pretty pleased with the results. I reinforced inside and out with strips of aluminum, hoping to make it more difficult to force inward.
For the record, several weeks after the Freedom Rangers were moved into the coop, I had a predator break in through this window and kill 4 young birds. I replaced the aluminum with hardware cloth. I used metal strips that I purchased at the hardware store (the kind you use at the edge of the carpet when laying carpet) to reinforce the top and the bottom and fastened around the other two sides with sheet metal screws and washers. The only downside to this arrangement is that I can no longer open the sliding door on this side as the hardware cloth covers the track. This may be something I re-engineer once all of the Freedom Rangers have moved on to the freezer stage of their development.
I took this picture fight before I moved the coop to fresh pasture and you can see that I've had a heck of a time convincing my chickens to fasten their seat-belts. Like most teenagers, they ignore my lectures on safety.
Here's a look inside. I built two platforms to elevate the feed and water.
I made a "poop hammock" and installed it under the of the higher of the two roosts. I made a sling with two pieces of PVC pipe, wrapped with that sticky plastic stuff I used to line the van. As usual I was making stuff up as I went along. By then I was out of PVC pipe and had to freshen up to go teach my Zumba class, so I decided to use a simple poop board for the lower roost. It isn't as wide as the hammock, but that may be better anyway, because I don't want to take up all the space in the mobile-coop.
Ready for take off:
It was then time for the maiden voyage to green pastures. Here's the finished product parked down in the meadow.
Happy residents explore new campsite:
The move wasn't as smooth as I would have liked, causing some damage to the front wall of the tractor when we hit some rough terrain, so I started looking for ideas for adding wheels. A fellow BYC'er had posted these plans on his thread, and I copied them for my tractor.
Three days after I completed the project, we were evacuated from our property by the Waldo Canyon Fire. The Mini-van Coop became the FIre Evacuation Mobile. After two attempts to relocate close by, only to be evacuated again, we ended up driving over 2 hours by the back roads to Evergreen, Colorado where we backed the coop into my sister-in-law's garage (with attached dog run) and my 35 juvenile Freedom Rangers, as well as my 8 mature laying hens rode out the evacuation.
Here's a shot of the Mini-van Evacuation Mobile in it's Evergreen location:
As well as being filmed by Denver & News for a piece about the fire:
If you'd like more photos of this project, as well as the conversation between myself and other BYC forum members as I worked through the details and challenges of the build, as well as the supportive energy sent my way during the fire and evacuation, here's a link to the original thread: https://www.backyardchickens.com/t/675624/mini-van-coop-fire-evacuation-mobile-predator-break-in
I"m happy to say that we are back home and that home and property are mostly undamaged (some injury to the landscaping done by our valiant firefighters as they prepared the property in case the fire jumped the containment lines). What started out as what I thought was a creative idea (my husband thought was rather silly) to come up with a way to raise 35 Freedom Rangers turned into a lifesaver. I can't imagine how I would have coped with the fire and evacuation if I didn't have the ability to transport every living creature in my care to safety.
I was reminded of an old Bill Cosby skit that was supposed to be a conversation between God and Noah where God tells Noah to build an ark. Here's a link to the routine where someone has put a pretty good video to go with it.
Can't claim to have had anything like that kind of direct instructions, but it was a "Godsend" to be sure, and the skit ran through my brain numerous times during evacuation.
THINGS I'D CHANGE OR DO DIFFERENTLY:
The tractor needs some work. We added the wheels, which make it much easier to move, but they also raise the tractor up a few inches, which made the connection between the tractor and the trailer hitch not work. Once the birds are all gone, I can spend some effort reworking that connection, but it doesn't seem worth it with the chickens in residence. Moving from one space to another is more time-consuming than I'd like (10-15 minutes depending on whether I'm moving in a straight line or trying to turn), but I think I can get that fixed
I also need to rebuild/reinforce the back door to the tractor. Since I'm sometimes moving over uneven ground, the door sometimes gets torqued, and it has become rather flimsy over the past month of being moved every two days.
All in all though, the Mini-van Mobile Coop has exceeded expectations, traveling more than 170 miles and keeping all of its charges safe on their journey.
For over a year, since I purchased my first 8 chicks from MPC, I've been eyeing our 17 year old mini-van that has been sitting in the meadow, only used to haul stuff to the dump for several years. I had this notion to turn the back end (2 rows of seats removed) into a mobile chicken coop and attach a large chicken tractor to the trailer hitch and be able to move it every day to fresh pasture.
So, here's what I'm working with, note the dent and missing rear window, thanks mostly to eldest son's first year driving.
The inside is a mess, full of broken glass, charcoal from dragging an old grill to the scrap yard plus being used as a mobile trash can by my son for almost a year. The back end is a little over 4'X8' (I know because I've lugged 4'X8' pieces of plywood home in it. My first step was to clean it out as best as I could. I then turned my attention to the tractor.My plan was to create something that would attach to the van where I could open the back hatch of the van and let the chickens out every morning, locking them into the van at night for extra predator protection (lots of those in the mountains of Colorado)
I started building the walls for a 6'X12' tractor.
Here are the first two walls. The bottom pieces are pressure treated lumber, the rest is regular 2"X4"s. The short wall being the end that would tuck up against the rear bumper of the van. Because my main concern with the tractor construction is that it would pull apart over time when dragged behind the mini-van, I decided to reinforce the end to make it stronger. I used a scrap piece of....um....don't remember what it is called...that I picked up at the Restore for $0.80.
I thought it would be easier to build each wall and attach the hardware cloth before I assembled it. Not sure now whether that was wise or not. In hindsight, while wrapping a continuous roll of hardware cloth around three sides of the tractor would have been more difficult, it may have added extra strength and support to keep it together when it is being dragged.
To compensate, I've reinforced every corner of the walls, and then added "L" brackets to the top and bottom corners.
Here are the first three sides connected:
I completed the third side...with the opening for the door (which you can see in the background), also reinforced with scrap picked up at the Restore for $1.50, and attached it to the other three.I'm feeling particularly clever about the next step. I cut 5/8th inch holes in the top 2"X4"s right on the inside of each vertical stud and bent a 10' length of 1/2" PVC pipe and slid them into the holes. Since I planned on using 3' wide chicken wire on the top part of the tractor, I had spaced the vertical studs 3 feet apart, so the sections of PVC pipe were also 3 feet apart.
It wasn't a big deal (although 2 people would have been a great help) to fasten the chicken wire to the PVC pipe with zip-ties. At each end, I unscrewed the screws & washers that were holding the hardware cloth to the top of the bottom section tucked the end of the chicken wire under it and re-screw it down.
I then turned my focus to the mini-van, coop part. First I cleaned out the back of the mini-van and vacuumed up all the broken glass and other stuff. I then lined the carpet & fabric areas with these sticky-sided plastic sheets I got at the Restore. They were a hassle because they wanted to stick to themselves much more than they wanted to stick to the floor of the van, but reinforced with duct tape, I think they will work to keep the van clean-able.
I then started building the frame that was to go behind the front seats to keep the chickens from joy-riding. I used 2"X4's and PVC pipe.
I then pulled the whole thing out and put down a big 12'X8' tarp over the plastic stuff. I figure that if I allow the carpeting to become saturated with chicken poo there will be no way to really clean it. Plus, I used the last 2 feet of tarp for the backing of the bottom half of the end wall. Poultry netting forms the top half of the barrier. I figure it doesn't need to be predator proof since the van will be closed up when the chickens are inside for the night.
It's been kind of like building a ship in a bottle in that some of the construction has to take place outside of the van and then moved in, and some has to be done in place. So far I've tried to connect any large pieces (like the frame of the far wall) with screws, with the idea that once a year I could actually slide everything out, including the tarp and just hose it down.I built the frame for the hatch-door wall. While once again, I don't intend this wall to be predator proof, I'm worried that if I'm trying to chuck 35 reluctant 4-week-old Freedom Rangers into the van for the night I could badly injure or kill one slamming that hatch door down. So, the idea is that the middle opening will be rigged like a pop door and the sides will be covered with something solid. The top will be poultry netting, like in the front of the coop space. I'll be able to close the chickens inside before actually closing the hatch.
I purchased a piece of the perforated aluminum that folks use for radiator covers and such (probably the most expensive purchase for this project so far). I traced the opening of the broken window and cut the aluminum about 1/2 inch larger on each side and tried to slide it up into the groove that the window glass would fit into and then down into the lower groove. I had to push and shove and take it out several times to trim it, and scraped my hands against the rough edge, but in the end I'm pretty pleased with the results. I reinforced inside and out with strips of aluminum, hoping to make it more difficult to force inward.
For the record, several weeks after the Freedom Rangers were moved into the coop, I had a predator break in through this window and kill 4 young birds. I replaced the aluminum with hardware cloth. I used metal strips that I purchased at the hardware store (the kind you use at the edge of the carpet when laying carpet) to reinforce the top and the bottom and fastened around the other two sides with sheet metal screws and washers. The only downside to this arrangement is that I can no longer open the sliding door on this side as the hardware cloth covers the track. This may be something I re-engineer once all of the Freedom Rangers have moved on to the freezer stage of their development.
I took this picture fight before I moved the coop to fresh pasture and you can see that I've had a heck of a time convincing my chickens to fasten their seat-belts. Like most teenagers, they ignore my lectures on safety.Here's a look inside. I built two platforms to elevate the feed and water.
I made a "poop hammock" and installed it under the of the higher of the two roosts. I made a sling with two pieces of PVC pipe, wrapped with that sticky plastic stuff I used to line the van. As usual I was making stuff up as I went along. By then I was out of PVC pipe and had to freshen up to go teach my Zumba class, so I decided to use a simple poop board for the lower roost. It isn't as wide as the hammock, but that may be better anyway, because I don't want to take up all the space in the mobile-coop.
Ready for take off:
It was then time for the maiden voyage to green pastures. Here's the finished product parked down in the meadow.
Happy residents explore new campsite:
The move wasn't as smooth as I would have liked, causing some damage to the front wall of the tractor when we hit some rough terrain, so I started looking for ideas for adding wheels. A fellow BYC'er had posted these plans on his thread, and I copied them for my tractor.
Three days after I completed the project, we were evacuated from our property by the Waldo Canyon Fire. The Mini-van Coop became the FIre Evacuation Mobile. After two attempts to relocate close by, only to be evacuated again, we ended up driving over 2 hours by the back roads to Evergreen, Colorado where we backed the coop into my sister-in-law's garage (with attached dog run) and my 35 juvenile Freedom Rangers, as well as my 8 mature laying hens rode out the evacuation.
Here's a shot of the Mini-van Evacuation Mobile in it's Evergreen location:
As well as being filmed by Denver & News for a piece about the fire:
If you'd like more photos of this project, as well as the conversation between myself and other BYC forum members as I worked through the details and challenges of the build, as well as the supportive energy sent my way during the fire and evacuation, here's a link to the original thread: https://www.backyardchickens.com/t/675624/mini-van-coop-fire-evacuation-mobile-predator-break-in
I"m happy to say that we are back home and that home and property are mostly undamaged (some injury to the landscaping done by our valiant firefighters as they prepared the property in case the fire jumped the containment lines). What started out as what I thought was a creative idea (my husband thought was rather silly) to come up with a way to raise 35 Freedom Rangers turned into a lifesaver. I can't imagine how I would have coped with the fire and evacuation if I didn't have the ability to transport every living creature in my care to safety.
I was reminded of an old Bill Cosby skit that was supposed to be a conversation between God and Noah where God tells Noah to build an ark. Here's a link to the routine where someone has put a pretty good video to go with it.
Can't claim to have had anything like that kind of direct instructions, but it was a "Godsend" to be sure, and the skit ran through my brain numerous times during evacuation.
THINGS I'D CHANGE OR DO DIFFERENTLY:
The tractor needs some work. We added the wheels, which make it much easier to move, but they also raise the tractor up a few inches, which made the connection between the tractor and the trailer hitch not work. Once the birds are all gone, I can spend some effort reworking that connection, but it doesn't seem worth it with the chickens in residence. Moving from one space to another is more time-consuming than I'd like (10-15 minutes depending on whether I'm moving in a straight line or trying to turn), but I think I can get that fixed
I also need to rebuild/reinforce the back door to the tractor. Since I'm sometimes moving over uneven ground, the door sometimes gets torqued, and it has become rather flimsy over the past month of being moved every two days.
All in all though, the Mini-van Mobile Coop has exceeded expectations, traveling more than 170 miles and keeping all of its charges safe on their journey.