Our Tree House

The story goes: my partner and I went to the feed store to get a bag of pellets for our 3 girls. We walked out of the store with our bag of pellets, in addition to a bag of crush and 4 new chicks. A week later, we adopted an unwanted chick from a neighbor. Having brought our total bird count up to 8 ladies, it was time for a new coop...
When I do projects like this around the homestead, I like to use mostly recycled materials and like to think of this kind of project as an amoeba; constantly changing shape and form. If any of you have used recycled materials while building a project, you too might understand what I mean by this. Your preconceived plan has to constantly adapt to what material you have, that is of course unless you buy something or find something else to use. There are people on here who amaze me. They draw, use CAD, and plan their coop or project right down to where each nail is and where each screw goes. Then these same awesome people, build their coops following their plan, right down to every last minute detail. I am jealous of these people and have always aspired to be one....But, unfortunately I am not one of these people, and no matter how detailed the plans are, I always find a way to deviate. I had a very general idea of what I wanted to build and wanted to hit a few key points; 1) wanted to make it large enough to expand to 12 birds, 2) attractive in the landscape, 3) lean-too, 4) it was going in a tree. Like I said earlier, I am not one to draw things out, or erroneously plan every last detail. I get an idea, and roll with it. So I apologize for not having drawn plans, or even pictures of stages of the build as this blog is an after thought.
The materials for our project came from an old barn on a friends property. I took a weekend to tare the old unused barn down in exchange for the lumber, leaving his property nice and clean. I bought roofing material, 4- 12inch lag bolts and 2- 2x12x8's for the main supports of the coop. All other material we had sitting around the house.
I did some research as to how to build an actual treehouse for kids, and found the most of them are supported very simply by a few main joists attached to the tree using lag bolts. I used 2- 2x12x96 and 4-1" diameter lag bolts as the main supports for the house.
With the help of my partner, we leveled and tacked one joist in and then drilled and screwed in the lag bolts, only 2 in each support. The idea behind using minimum hardware is to reduce damage to the tree. At this point nothing, and I mean nothing else is attached to the tree...Kinda scary!
On top of the main supporting joists, I made a 6x8 frame of floor joists out of 2x6's. The floor frame was toe-nailed to the main supports.
Once the floor joist were in I laid the floor using various widths and lengths of 3/4 inch thick lumber. After I had the floor boards nailed down I used the circular saw to cut to size. I made sure to leave a few inches of clearance around the tree for shifting and growing room for the tree. I covered the holes with some hardware cloth to keep the chicks from hurting their legs.
With the floor done, the walls, siding and roof went up. I framed the walls and lifted them into place, the front is 4' tall and the back is 3' tall to create a good slope. Basic rafters were used from front to back.
I put doors on the front side and the back side to make it easier to clean by pushing old straw from one side to the other.
The siding went on pretty quickly using a finishing nailer, nothing fancy. Wood is just overlapped. The corners are edged with some old garden timber ripped down to 2x2.
This is the back side.
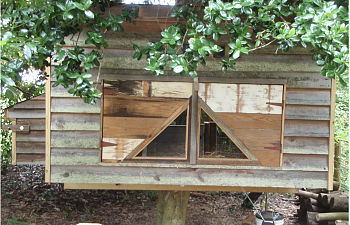
I used an old window from a remodel project that my partner cut diagonally to make the doors on the front.
This is the chicken porch, the birds entrance to the house. I used some old branches for steps. They were having a hard time with this ramp when they first moved into the new house, preferring to get on the wood pile to the left, and then jump onto the ramp? I have since doubled the width of the ramp and decreased the pitch.
On the inside, old branches for perches.
Another shot of the inside. You can also see some venting that I built in at the top of the picture.
The hen box is level with the floor of the coop, which is about chest high. Our older girls like to sleep in them, so they get cleaned daily. Can't seem to brake them of this habit.
I made all of the latches for both sets of doors and for the box.
After we got the coop done, we fenced in a large area in the shade for the girls to have some room to range. The top of the fence is bamboo from the church down the road. I made the gate out of an old door from a remodel project in the house. We really like how shaded the coop is and how it fits into the landscape.
Far corner of their run, you can barley see the coop hidden in the trees! We made sure to include both wooden and grassy areas in their run. We have started to make 'chicken beds' in this corner as well, growing greens in a raised bed that is covered with chicken wire - they can eat the plants all they want without disturbing the roots!
Another shot from further back to get an idea of the size of their run. Its about 50x25. The love scratching in the leaves.
Updates, not included:
1) chicken bed is complete. Planted kale, chick weed, wheat grass and dandelion. Looking forward to seeing how this works out once everything grows.
2) Added a composting bin in their area that the girls can easily get to for tasty grubs!
3) Made a feeder out of an old bucket. Used a heat gun and some wooden wedges. This is hanging under the coop on the main supports.
A few things I would do different:
1) you may have noticed I didn't talk about the roof at all...or show any pictures of it. I am not happy with the way it came out. I saw a lot of tree houses roofed with an inner tube as a liner around the tree. This didn't work out for me. The tree I used was split at the base with two main limbs growing, one of those limbs split into three additional limbs inside the coop. Meaning, 2 entered through the floor 5 exited out of the roof. Those limbs were too close together to use a tire inner tube, so, I made a square frame around them, put some plastic down and used lots of spray foam to fill the gaps. As everyone knows, its been unusually rainy this year... Good year to find leaks I guess. Over top of the foam I have been painting in thin layers of tar to seal leaks as they pop up.
1 cont.) I would have picked a different tree that only had one main limb enter and exit.
2) I would have not made the hen box level to the floor, some of our girls are sleeping in it.
3) The ramp seems to be a bit steep. I added width and changed the pitch, but I still think we are going to have to add hardware cloth or something for them to aid in not sliding.
4) We are having a problem with some of our girls perching in the tree rather than the coop! Need to clip some wings.
A few positive key notes:
1) Love this in a tree. Totally fun to build and is definitely a conversation piece.
2) With using old barn wood and not painting it, the coop seamlessly fits into the landscape. The back of the run is the fence to our neighbors yard, and they can't even see it!
3) In all I think I spent less than $100 dollars between shingles, the two main supports, lag bolts, and some spray foam and tar. As a side note, we did have access to recycled metal roofing, but decided to go with shingles because the metal roof was grey and would not have blended with the landscape as well.
4) All the door latches were made with a piece of wood, a scree and a washer.
5) Did I mention it was fun to build? I love getting creative!
Thanks for stopping by!
The story goes: my partner and I went to the feed store to get a bag of pellets for our 3 girls. We walked out of the store with our bag of pellets, in addition to a bag of crush and 4 new chicks. A week later, we adopted an unwanted chick from a neighbor. Having brought our total bird count up to 8 ladies, it was time for a new coop...

When I do projects like this around the homestead, I like to use mostly recycled materials and like to think of this kind of project as an amoeba; constantly changing shape and form. If any of you have used recycled materials while building a project, you too might understand what I mean by this. Your preconceived plan has to constantly adapt to what material you have, that is of course unless you buy something or find something else to use. There are people on here who amaze me. They draw, use CAD, and plan their coop or project right down to where each nail is and where each screw goes. Then these same awesome people, build their coops following their plan, right down to every last minute detail. I am jealous of these people and have always aspired to be one....But, unfortunately I am not one of these people, and no matter how detailed the plans are, I always find a way to deviate. I had a very general idea of what I wanted to build and wanted to hit a few key points; 1) wanted to make it large enough to expand to 12 birds, 2) attractive in the landscape, 3) lean-too, 4) it was going in a tree. Like I said earlier, I am not one to draw things out, or erroneously plan every last detail. I get an idea, and roll with it. So I apologize for not having drawn plans, or even pictures of stages of the build as this blog is an after thought.
The materials for our project came from an old barn on a friends property. I took a weekend to tare the old unused barn down in exchange for the lumber, leaving his property nice and clean. I bought roofing material, 4- 12inch lag bolts and 2- 2x12x8's for the main supports of the coop. All other material we had sitting around the house.

I did some research as to how to build an actual treehouse for kids, and found the most of them are supported very simply by a few main joists attached to the tree using lag bolts. I used 2- 2x12x96 and 4-1" diameter lag bolts as the main supports for the house.
With the help of my partner, we leveled and tacked one joist in and then drilled and screwed in the lag bolts, only 2 in each support. The idea behind using minimum hardware is to reduce damage to the tree. At this point nothing, and I mean nothing else is attached to the tree...Kinda scary!
On top of the main supporting joists, I made a 6x8 frame of floor joists out of 2x6's. The floor frame was toe-nailed to the main supports.
Once the floor joist were in I laid the floor using various widths and lengths of 3/4 inch thick lumber. After I had the floor boards nailed down I used the circular saw to cut to size. I made sure to leave a few inches of clearance around the tree for shifting and growing room for the tree. I covered the holes with some hardware cloth to keep the chicks from hurting their legs.
With the floor done, the walls, siding and roof went up. I framed the walls and lifted them into place, the front is 4' tall and the back is 3' tall to create a good slope. Basic rafters were used from front to back.
I put doors on the front side and the back side to make it easier to clean by pushing old straw from one side to the other.
The siding went on pretty quickly using a finishing nailer, nothing fancy. Wood is just overlapped. The corners are edged with some old garden timber ripped down to 2x2.
This is the back side.
I used an old window from a remodel project that my partner cut diagonally to make the doors on the front.
This is the chicken porch, the birds entrance to the house. I used some old branches for steps. They were having a hard time with this ramp when they first moved into the new house, preferring to get on the wood pile to the left, and then jump onto the ramp? I have since doubled the width of the ramp and decreased the pitch.
On the inside, old branches for perches.
Another shot of the inside. You can also see some venting that I built in at the top of the picture.
The hen box is level with the floor of the coop, which is about chest high. Our older girls like to sleep in them, so they get cleaned daily. Can't seem to brake them of this habit.
I made all of the latches for both sets of doors and for the box.
After we got the coop done, we fenced in a large area in the shade for the girls to have some room to range. The top of the fence is bamboo from the church down the road. I made the gate out of an old door from a remodel project in the house. We really like how shaded the coop is and how it fits into the landscape.
Far corner of their run, you can barley see the coop hidden in the trees! We made sure to include both wooden and grassy areas in their run. We have started to make 'chicken beds' in this corner as well, growing greens in a raised bed that is covered with chicken wire - they can eat the plants all they want without disturbing the roots!

Another shot from further back to get an idea of the size of their run. Its about 50x25. The love scratching in the leaves.
Updates, not included:
1) chicken bed is complete. Planted kale, chick weed, wheat grass and dandelion. Looking forward to seeing how this works out once everything grows.
2) Added a composting bin in their area that the girls can easily get to for tasty grubs!
3) Made a feeder out of an old bucket. Used a heat gun and some wooden wedges. This is hanging under the coop on the main supports.
A few things I would do different:

1) you may have noticed I didn't talk about the roof at all...or show any pictures of it. I am not happy with the way it came out. I saw a lot of tree houses roofed with an inner tube as a liner around the tree. This didn't work out for me. The tree I used was split at the base with two main limbs growing, one of those limbs split into three additional limbs inside the coop. Meaning, 2 entered through the floor 5 exited out of the roof. Those limbs were too close together to use a tire inner tube, so, I made a square frame around them, put some plastic down and used lots of spray foam to fill the gaps. As everyone knows, its been unusually rainy this year... Good year to find leaks I guess. Over top of the foam I have been painting in thin layers of tar to seal leaks as they pop up.
1 cont.) I would have picked a different tree that only had one main limb enter and exit.
2) I would have not made the hen box level to the floor, some of our girls are sleeping in it.
3) The ramp seems to be a bit steep. I added width and changed the pitch, but I still think we are going to have to add hardware cloth or something for them to aid in not sliding.
4) We are having a problem with some of our girls perching in the tree rather than the coop! Need to clip some wings.
A few positive key notes:

1) Love this in a tree. Totally fun to build and is definitely a conversation piece.
2) With using old barn wood and not painting it, the coop seamlessly fits into the landscape. The back of the run is the fence to our neighbors yard, and they can't even see it!
3) In all I think I spent less than $100 dollars between shingles, the two main supports, lag bolts, and some spray foam and tar. As a side note, we did have access to recycled metal roofing, but decided to go with shingles because the metal roof was grey and would not have blended with the landscape as well.
4) All the door latches were made with a piece of wood, a scree and a washer.
5) Did I mention it was fun to build? I love getting creative!
Thanks for stopping by!