This has been quite a journey! About 10 years ago, my wife and I decided we wanted to have some chickens (that was two moves and two states ago). Before I go any further, let me say thanks to navychick (the Egg Plant), stcroixusvi (the Coop de Grass), and todtrak (the Mid-life Crisis Coop). I borrowed heavily from their designs and ideas. Having virtually no knowledge of chickens or coops before I started, their insights and ideas have been invaluable! My wife only had one guideline for the coop - "I don't want an ugly coop and I want it painted like the house" (well, I guess that's two guidelines). "No problem," I said, not knowing what I was getting myself into. The hen house is 8 feet by 12 feet (8 feet by 8 feet inside) and is raised 20 inches off the ground. The run is fully enclosed and will have a roof on it eventually.
Now for our story:
Every year we tell our children (and grandchildren) that I'm going to build a coop and we're going to have chickens. Early this summer I finally started the project. Actually, I started by fencing in the garden (35' by 70') and left room at the end for the coop and run (15' by 35'). I trenched down about 2 feet and inserted 1/2 inch hardware cloth around the entire perimeter (to keep gophers, moles, voles, mice, rate, coyotes, and raccoons out of the garden and coop area) and laid irrigation pipe the length of the garden & coop area.
Here's the trench with fence posts sitting in place. The posts around the garden are about 6 feet tall to keep the deer, rabbits, and raccoons out of the garden. Yes, I know that you really need a 10 foot fence to keep deer out, but so far they have stayed out.
Here is a picture of the 3 foot wide hardware cloth extending a foot above the ground (the other two feet are underground). You can also see a riser for the irrigation line that I installed for watering the garden and for the coop.
The irrigation is now hooked up. You can also see the fence posts for the chicken run on the right. They are about 8 feet high.
The garden fence is done and the fence between the garden and the chicken run is up. All fencing is 1/2" welded hardware cloth.
Here's a panorama showing the garden and the run. It's already mid summer and you can see that we've already harvested most of the onions and the potato plants are already under shade cloth. In the run you will notice that I'm digging out about 8 inches of dirt which will be replaced with sand.
The chicken run slopes from the front left corner to the back right corner. So, once the dirt (can you say hard-packed clay) was removed, I installed drain pipe along the right side and back. Incidentally, in order to facilitate digging up the clay, I first tilled the entire area and then shoveled out the tilled-up clay.
Next, I started hauling in the sand. Notice the four taller post in the right front. These are the main supports for the hen house. They are sunk in concrete. All other posts are sunk in clay that is soaked and packed, then allowed to dry. They dried completely within about a week because we have had an unusually hot summer here in Oregon. Most of the work was done while the temperature was between 85 and 100 degrees. Yes, I did sweat a lot during this project and lost about 12 pounds from start to finish.
Here the floor joists are in place. The extensions on the two ends are for the nesting boxes (near side) and storage area (far side). These are two of the many ideas that I got from others here on backyardchickens.com. From this point on, I spent about 1/2 hour of research and design time in the evenings for every hour of construction during the day. You can see my designs at the end of this article.
On top of the floor joists I laid 3/4" plywood that I bought 6 months ago at Lowe's when it was on sale for less than half price. Originally, I was going to use it to build bookshelves, but that project will have to wait until next summer (maybe). It wasn't until I started laying the subfloor that I realized that the two left posts were about 1 1/2" off from square (honestly, boss, I measured three times and even measured the diagonals). Oh well, the chickens haven't complained about their house being out of square. I purchased eight "basement" slider windows on-line and framed in two on each wall. I put doors on both the left and right side. The one on the left will be inside the run for easy access into the coop and the one on the right side will be outside the run so I can clean out the coop and dump everything right into a wheelbarrow.
Roof joists are installed and the nesting boxes and storage area are framed in. There will eventually be a 14" square hole in the center of the roof that will support the cupola. After many hours of design time, I decided it would be easier to build the roof joists and cut out the center to put the cupola support frame in rather than trying to build the joists around the cupola support frame.
Next, I used 9/16" OSB (Oriented Strand Board for those of us who had no idea what OSB stands for) for the sub roof and wall sheathing. Notice the square hole in the roof. This will allow hot air to flow up through the opening and vent out the cupola.
Next, we took a trip to San Diego for my 50th high school reunion. I needed a week off after 4 months of fencing and coop building! And no, Alice, I didn't do any surfing (but I wanted to!)
Here is the hen house wrapped in Tyvek with the windows installed and composition roofing going on. You may think that the Tyvek is overkill for a hen house, but there are absolutely no drafts even on windy days in the dead of winter.
These photos show the T1-11 siding and trim being installed. Notice on the windows that have the trim installed, I cut and formed 1/2" hardware cloth over the outside of the windows. The hardware cloth is held in place by the trim pieces. Notice our house in the background, the hen house was later painted to match the house.
Even though there are 8 nesting boxes, I decided to put only four doors on them (opening two nesting boxes at a time). I was going to put eight doors in, but I got lazy.

The back side shows the storage area. Initially, I thought this would be overkill. Now that I have chickens residing, I realize that it's just about right.
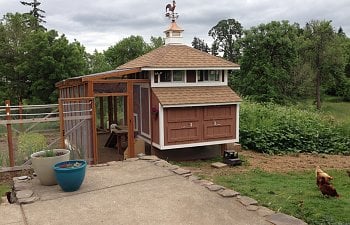
One coat of primer and one coat of color later, it looks like this. We had the paint left over from when we had our house painted, so it now matches the house (and my wife is verrrrrrrry happy). Notice the porch by the chicken door (thanks, navychick. That was a great idea!).
The cupola finally arrived. It was four weeks late, but better late then never. I just had to have a rooster on the weather vane, now didn't I?
Another idea I got from folks at BYC, was to put vinyl flooring in the coop. I was going to do the install myself, but because of the surprise arrival of 5 chickens (see below), I decided to have a professional do it. I had him put it down in the hen house, in the nesting boxes, and in the storage area.
"If you build it, they will come!"
The people who have the property next to us run a horse rescue operation. Unfortunately, they bought a new place and had to move. We were sad to see the horses go. Fortunately, for us, they couldn't take their chickens with them, so they gave us 5 Red Rock hens. Unfortunately, the chicken run still needs fencing on three sides and I haven't finished the interior. Fortunately, the chickens were used to free ranging and haven't yet complained about an unfinished home.
Do you remember how excited you got when you found your first egg? You would have thought we had just won the lottery (oh, yeah, you have to buy a ticket first, don't you)! Four of them lay their eggs in the nesting boxes, but one of them prefers to walk around to the far side of the garden where she nested down in some tall weeds. She has left us an egg there almost every day since we got her. (Update) After clearing out the weeds, all of the hens are now laying eggs in the nesting boxes.
After a few days with our 5 girls, we found someone on craig's list who was thinning their flock of 80 birds and we purchased 10 additional hens (1 Barnevelder, 2 Blue Wyandottes, 2 Blue Laced Red Wyandottes, 2 Speckeled Sussex, 2 Buff Orpingtons, and 1 Australorp). The Buff Orpingtons are definitely our favorites. They will come and sit on our laps.
I just finished fencing in the run and installed the run door. I bought the ADOR1 automatic door for the chicken door and installed it in minutes. I stopped for a break to wait-out a passing shower and looked back at the coop and saw the pot (or coop) at the end of the rainbow. I call this "my pot of eggs at the end of the rainbow."
There's more to come, but that's the story for now. I'll add updates as I complete more. I still have the interior to finish and I'm going to put a roof over the run (I hear it rains occasionally here in Oregon)!
NEXT INSTALLMENT
Here's a picture from the garden showing the roof installed over the run. I finished the roofing over the run in the late fall. I was putting in the last dozen screws just as a big rain storm was starting. Boy, talk about timing! As you can tell, this picture was taken later, in the spring.
I read on BYC that hens lay more eggs in the winter if they have a light in the hen house. So we ran a circuit to the coop and connected it to a GFCI plug (for circuit protection and to give us a way to disable the circuit while working on wiring). We had a small chandelier that has been sitting in a box from two moves ago and decided that since this is a palace, a chandelier would be appropriate. As you can see, I haven't finished the interior walls yet. I'm sure I'll get to that eventually.
I found a programmable light switch online (leftmost of three switches) and wired it to the chandelier. It comes on at 6:00 AM, goes off at 9:00 AM, then comes on again at 4:00 PM and off at 8:00 PM. That gives the girls 14 hours of light. My daughter thought I was a little crazy going to all that trouble, but as they say, the proof is in the pudding. Before installing the light, we were getting 6 or 7 eggs a day from our 15 hens. Within a week after installing the lighting we were getting 12 to 14 eggs a day. My daughter has since confessed that I'm not as crazy as she thought. She didn't say that I'm not crazy, just not as crazy as she thought.
The other two switches are for the outside lights and for some LED lights that I plan on installing on the outside of the cupola.
Now that we have power to the coop, we added a couple more features. We installed motion-sensing, photocell-controlled flood lights on two sides of the coop for added safety and protection. It's funny to see the neighbor's cat come prowling around in the evening. As soon as the light comes on, he heads for the bushes. We also added a switch and a plug inside the run. I found a temperature controlled plug online and ran a cord under the sand to a light bulb underneath the waterer. When the temperature drops below 34 degrees (fahrenheit), the plug turns on, lighting the bulb under the water and when the temperature gets back above 40 degrees, the plug turns off. No more frozen water!
I installed the perches with poo boards underneath. The perches are attached to the wall with a couple of bolts so that we can swing the perches up out of the way when we need to get to the boards to take them outside for cleaning.
This spring, we got 10 baby chicks to add to our flock. Our grandchildren really wanted to get baby chickens, so we built a brooder and the day before Easter we got 2 Gold Laced Wyandottes, 2 Silver Laced Wyandottes (one turned out to be an Ameraucana), 2 Australorps, and 4 Ameraucanas (which turned out to be 5). So, with the help of pictures of brooders from BYC, we decided on a design and built a 3 foot x 4 foot brooder with a swing-up top. Next, I had to build a quarantine section of the run.
Here's the quarantine area in the run with the brooder. I cut a door in the side of the brooder so we can let the little girls out during the daytime and lock them up in the brooder at night. In the picture on the left you can see the polycarbonate roofing that I installed over the run. It is light, strong, and lets in lots of light.
Here's a shot looking into the brooder. I put two perches in the brooder to get them used to sleeping on a perch at night. However, as many of you have no doubt noticed, chickens do what they want to do, not necessarily what we want them to do. The chicks like to play on the perches during the daytime, but they all sleep together on the floor at night. I covered the top and sides of the brooder with plastic sheeting to keep them dry when it rains. (Did you know that it rains in Oregon -- occasionally?)
WHAT WE WOULD DO DIFFERENTLY NEXT TIME
Not that we ever expect to do this again, but if we did:
- We would plan on the project taking about 4 times as long as we originally thought and costing about 4 times more that we originally thought.
- We would only put in 4 nesting boxes, instead of 8, saving more room for perches (see next point). As it turns out, even with 24 chickens, about 90% of the eggs are being laid in three of the nesting boxes. Most of the eggs end up in the floor level boxes and only a few get laid in the upper boxes.
- We would spend more time planning the perches. By the time we put 8 nesting boxes along one wall and doors in two of the other walls, we kinda ran out of room for the perches. We originally planned on 15 to 20 chickens (we now have 24) and we had to squeeze in the perches to accommodate them.
- We would put rain gutters on the roof directly above the nesting boxes. It's quite annoying to get constantly dripped on when collecting eggs in the rain (did I mention that it rains occasionally in Oregon?)
WHAT WE DID RIGHT (thanks to ideas from BYC)
- There is plenty of ventilation in the hen house. With two windows along the top of each of the four walls and a square hole in the ceiling topped off with a cupola, there is plenty of air movement. Even when we get lazy and don't clean off the poo boards under the perches often enough, there is very little ammonia smell in the hen house. During the winter we can close all but two or three of the windows and there is still enough ventilation without having any drafts.
- We installed the ADOR1 automatic chicken door in the hen house. When it gets dark (after the girls have gone in) it automatically closes, and in the morning when it starts to get light, the door opens automatically. It runs off a single lantern battery that is supposed to last an entire year (we've only had it in for about 7 months).
- We put a large door on the hen house outside the run. This makes cleaning out the hen house and cleaning the poo boards much easier.
- We built a fully enclosed run with a roof. Although we mostly allow the girls to free-range during the day, on days when we are going to be gone all day long, we leave them in the run. One Sunday we went to our grandson's wedding and without thinking about it, we let the chickens out in the morning and let them free-range while we were gone. That evening when we got home and counted our chickens we were missing one. After talking to our neighbor, we learned that a pack of coyotes were in the area that day. We were fortunate that we only lost one of our girls. Our neighbor lost four of his.
- We filled the floor of the run with sand and put a french drain along the two lower sides. It is easy to rake up the poo and takes virtually no other maintenance. On those (rare?) days when it does rain, the sand may get damp from rain blowing through the fencing, but never wet.
- We use pine shavings (deep litter method) on the floor of the hen house.
- We put the nesting boxes on the end, with outside access. It makes collecting eggs verrrrry easy. It has become one of our grandchildren's favorite chores.
- We ran electricity out to the coop. With lighting and plugs in the hen house and run, it is a safer, more comfortable area for the chickens and using power tools doesn't require a long extension cord.
- We put a light with a programmable timer in the hen house to give the girls longer days. Longer days = more eggs.
- We built the hen house raised off the ground. This keeps the hen house warmer in the winter and gives the chickens extra room in the run.
- We put hardware cloth 24 inches into the ground around the entire perimeter. We have had no issues with animals digging into the run (even the gophers and moles stay outside the run.)
- We included storage area inside the run. It keeps all the supplies and tools convenient and out of the weather.
- We installed vinyl flooring on the floor of the hen house and the floor of the nesting boxes. Cleaning is muuuuuch easier this way.
PLANS
The following images are the plans I drew up in Adobe Illustrator. I didn't stick exactly to the plans because, well ... plans change when you get into the heat of the build. Use what you want and ignore the rest.
Here are the four walls. I'm not sure why the East Wall uploaded as a larger image.
Here are the plans for the floor joists and the nesting box. I originally had a different plan for the nesting boxes, but changed it to this alternate plan.
And ... Here are the plans for the roof rafters. When I built the roof, I built the whole thing without the square hole in the middle (for the cupola). Then I supported the whole thing from the inside, marked out the square hole and cut it out. Then, I carefully slid the square box in place and nailed it.
We hope you enjoyed reading about our journey as much as we enjoyed doing it. I don't know what we would have done without BYC. We certainly wouldn't have ended up with as functional a chicken coop as we did.
Thanks to everyone for your ideas.