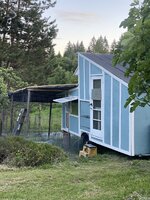
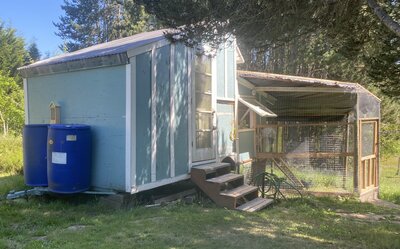
Not perfect yet, but getting closer


Update 4/29/2021
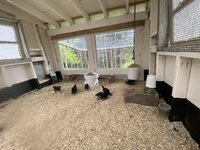
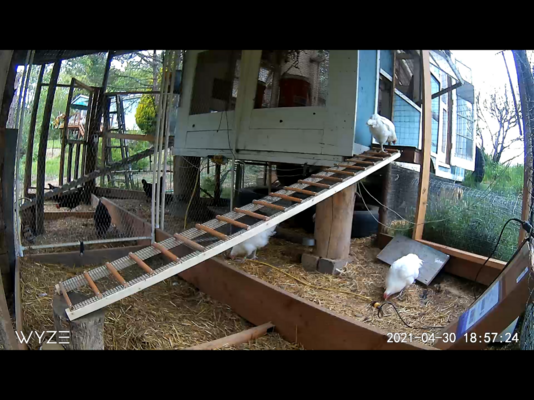
Recently I framed in PT lumber (bought months ago before prices went crazy) to terrace the steeply sloped henyard floor. I already broke one finger last fall from slipping in there, I really didn’t like that floor when it got wet!

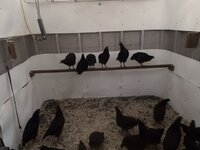
Then I used up some of my stored stacks of pvc pipe to make frames and hog ringed poultry wire onto it to divide the henyand in half for the new flock. I had to pull the giant tractor tire nest box / dust bath out and substituted two of our worn semi tires in it’s place in order to run the partition wire down the middle under the coop.
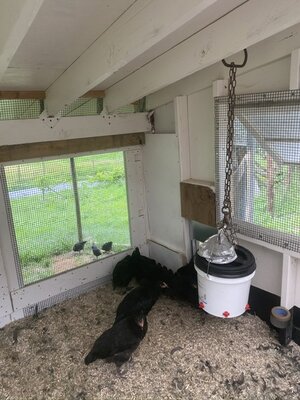
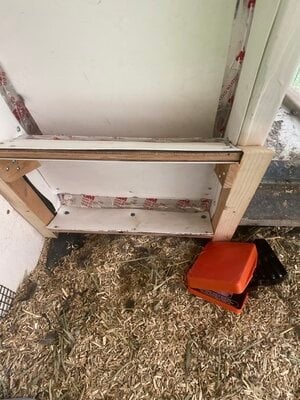
I built the pop door platform (still need to add the plexiglass chunnel and plastic curtains to keep out the songbirds etc.) and attached the new ramp. I have quite a bit of this short pile green carpet so threw a piece on the platform to see if I like it. I’ve got so much of it (free) I can pull one off and hose it down while a spare is put up in its place.
For the ground level partition on the lowest of the 3 new tiers I buried the poultry wire in kind of an inverted ‘Y’ with about a foot of wire spread out each way and buried to help prevent digging under by any overly enthusiastic velociraptors.
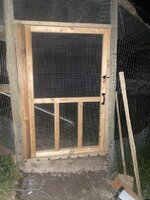
 My ‘door latch’ for the partition door is kinda hokey at the moment, but it works for now.
  I will implement a better method one of these days......

the second Ador is in and seems to be functioning properly. We were using a flashlight tonight driving the last screws in so didn’t get a good photo of it done.
Update 4/4/2021 Happy Easter everyone!
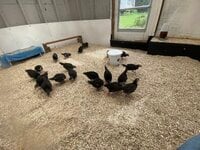
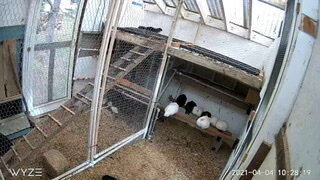
Added two ramps to upper roosts, coop partition, brooder partition, and adjustable chick doors. I redid the wall feeder ports too. Oh, and hatched five more American Bresse chicks.

There are two more adjustable chick doors, one to connect the two halves of the brooder and one facing into the coop on each half. I originally imagined an f-stop type aperture as the adjustable chick door but decided to stay with the egg theme instead. I pre drilled holes in the Plas-Tex panels desired overlap points top and bottom and secure them with small cotter pins.
Also, the juveniles don’t have access to the upper roosts yet, so the hens access both roosts from the same ramp.
Update 3/17/2021
Roost boards and dividable chick brooder
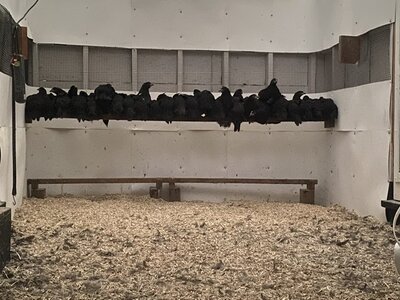
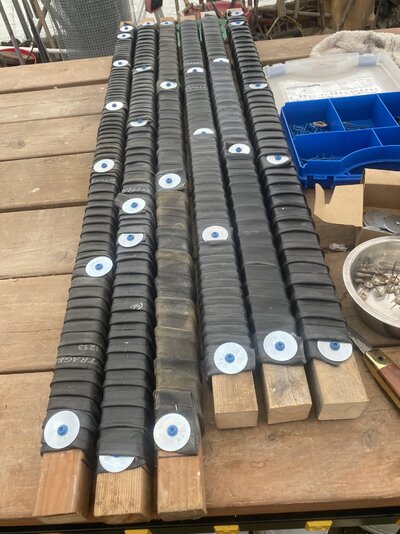
The 2 x 2 removable roosts are tightly wrapped with bicycle tubes as discussed in this article and accompanying study. It took several inquiries ( done over a few years, I didn't start in earnest until this year) before I was able to get enough used tubes from the local Bike Gallery, but they ended up giving me a whole box full the last time I asked. Very grateful to them for that, I would not want to have to buy and use new ones!
https://www.yourchickens.co.uk/care-and-advice/the-perfect-perch-1-
https://pubmed.ncbi.nlm.nih.gov/21406354/
Stall Freshener PDZ under the roosts, I’ve put down 5 bags (25# each) so far, I might add one more to the right set. In my haste to get the chicks into the brooder last week I didn’t get a good seal to the edges of the PlasTex so I had to redo that part a couple days ago. I had some quarter round stock laying around so decided to use that and torq screw it in.

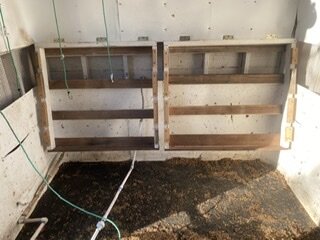
Chick Brooder
I used 3/4” PVC pipe and mostly zip tied the panels together to make it removable. I used small hog rings to fasten the hardware cloth to the pvc frame (which isn’t glued). To secure it to the floor I set the bottom legs of the two front panels into 3/4” pvc pipe end caps screwed into the floor.
I have a few more modifications to do on it including dividing it in two, which will feature a sliding chick door panel (I have more Bresse eggs in the incubators now
), and also making two adjustable chick doors in the front.
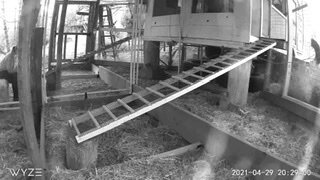
Next up to build are the two ramps to the roosts. They have a ladder and a plank temporarily (not shown).
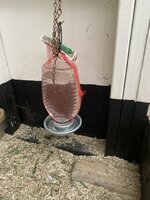
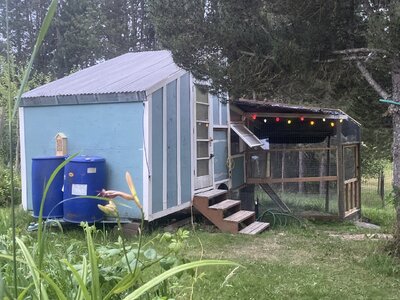
The top picture shows some of the most recent improvements which are still being fine tuned, including the water system, which I’ll work on again in the summer. When it’s warmer, and not raining every day.

Update 8/27/2020
One of the reasons I built this coop to be as automatic and maintenance free as possible was in case we had to leave for any length of time as part of our jobs, the chickens would not be neglected.
Recently it was put to the test, and although not perfect, upon short notice and for a weeks+- time it did the trick. The chickens had plenty of food left, they were safely locked in the coop each night and let out each morning. The new water system worked and even the backup supply in buckets hadn’t run dry. I had two cameras on them I could access for almost the entire trip so I knew they were fine. And I knew a few people I could call if something went wrong. Thankfully nothing serious happened and they were all happy to see us when we returned. Well, maybe they were a little upset that they weren’t getting their snackies everyday, but they were all healthy regardless.
We were gone for little over a week.
We pulled the trigger on getting the birds this spring (2020) because our specialized trucking services suddenly were no longer needed. It has been quite the roller-coaster since then. This project has kept me occupied and sane, and even if we can’t go back to the same routine I wanted to get this system running as reliably as possible just in case. Just about three weeks ago we finally got the call back to work for one specialized run. With just a couple days notice I suddenly had to finish the water system so they wouldn’t run out. I had already managed to put most of it together but was returning from grocery shopping but when I got the call. I u-turned back to town and picked up a float valve for the rain barrel. Also ordered by overnight the Deco mesh wifi extender and two Wyze pan cams (A big thanks to everyone here who put in their 2 cents worth on extenders and cameras) and worked late into the night getting everything put together and running. I need to make a few small changes here and there, but everything worked pretty much as I had envisioned it would.
The biggest issue was the water, but because I had left multiple backups they were never in danger of running out. The water barrel is actually a 30 gallon barrel inside a 55 gallon barrel, connected with a double bulkhead. When I build the second one I will do an article about it separately. The reason for this is to be able to insulate between the two barrels to help keep it thawed in winter with a thermocube controlled de-icer. And also cooler in the summer with the help of the recirculation pump. The issue here was somehow the water hose to the barrel got turned off a few days before we got back, and the recirculating pump burned out. (Maybe I needed a bigger/better one, but it had worked beautifully! Taking less than 10 seconds to complete the circuit through the coop and return to the barrel!) Fortunately the gravity flow from the barrel continued to supply water through the drain fitting that I had (wisely) hooked to an outside set of nipple waterers in addition to the inside set that may or may not have worked without the pump, I wasn’t sure and had little time to test. As it turned out, because the inside barrel sits higher on top of 3 layers of 1” thick rigid foam board insulation inside the 55 gal. barrel, the inside water nipples do still work, but also the outside waterers were still getting water by gravity feed. The inner barrel was still 3/4’s full when we returned as well. As soon as I can work out all the kinks, ie leaks, I will add vertical strips of rigid foam for winter insulation.
8/26/2020
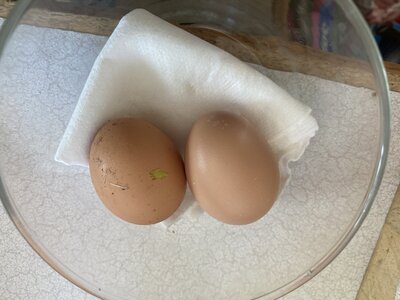
3rd egg today, but perfectly clean and safe in the outside rollout nest box while I was grocery shopping. Same hen, just one laying so far, all 3 days.

Here’s a picture of their dust bath where they she laid the first two....


The clean eggs on the right and left are from the nest box. (Day 4)
8/25/2020
Added the modified prototype reversible roll out nest box today. Yesterday we got our first egg and the same hen laid again today, so I had to get it in. I’ll protect the outside of the nest box from rain if it isn’t replaced right away.


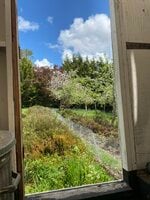
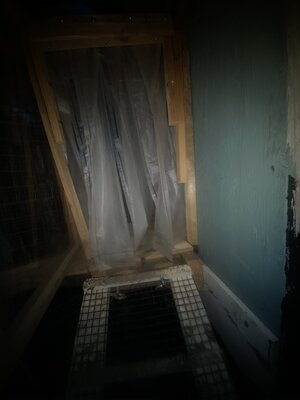
I wanted to post another picture of the “shower curtains“ that I think are successfully keeping the wild birds out of the coop. The chickens have no issues with these curtains. No damage to them at all. Left picture was taken at night right after they returned to the coop.


I am very pleased with the ramp also. Again, they have no issues with it. It’s so light I can remove it or reattach it with one hand. The poop falls through so I really haven’t had to clean it since I put it up. Thats one of the Wyze cameras behind the exclusion zone on top of the plexiglass Chunnel. Temporary location but it works for now.
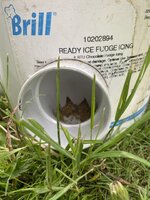
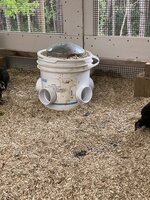
One Auto-feeder installed 6/30/2020 explanation near bottom of article and more photos.

June 29, 2020
Since I am now mostly done with the coop I’m going to go back to chronologically listing pictures and updates, except I will still post one or two photos of what I think is a notable improvement under my lead picture before rotating them to the bottom. There are three main things left to do; the auto feeder which I’m working on now, the auto watering system which is next, and the electric hot wires which I hope to get up before I have any predator issues. And the nest boxes! But since I’ve got an auto-feeder done that still leaves me three major things left to do.

July 16, 2014
Hello everyone. I had chickens when I was a teenager and for many years now have wanted to have chickens again. Knowing this my DH promised me a coop for my birthday ( which was back in May so you see it's already become a long term project), and he helps me every chance we get to work on it. I guess I need to clarify this a little...my REAL birthday present was the free time so I could do the build, not that he would build it for me.

I have been researching all these incredible ideas that BYC brings together and trying to develop a suitable design for our needs. BYC is a goldmine of information! Thank you to ALL coop builder/contributors, administrators and especially Rob Ludlow @Nifty-Chicken who thought this whole BYC thing up and made it such a great resource! Thank you Nifty!
I am only able to get a little bit done at a time because of our work, so this will probably be a rather long drawn out post rather than lots of pictures all at once. I tend to take way too many pictures anyway but I know how much I was able to learn what features I wanted from looking at everyone else's designs, so I will just add them as I go along.
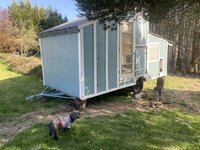
I chose the Prince T Woods (a special thanks to all those who made Woods Style postings too!!) open air style as healthy air circulation is a must here especially in our (sometimes 8-9 months!!!) long rainy "season" ( we are on what is known as the WE(s)T side of Oregon). The open air coop that Woods promoted was used throughout the nation and Canada in the early 1900's. (Maybe not as much in the Deep South, although Dr. Woods gives examples of suitable coops for that region in his book as well) It worked well even in the rainy NW as I discovered references to the style in old poultry books from Oregon and California from that time period. The main point is that the proper ventilation, (not heating the coop, which virtually nobody did back then anyway) was the key to having a healthy chicken flock. His book really explains how it works a lot better than I can, but I did a rough sketch just to illustrate the air displacement that occurs in this design.

I also wanted a moveable coop to use as a chicken tractor (and no building permits required) and/or sturdy enough I could trailer it down the highway if I needed to. And it had to be easy to use and clean, as I'm not getting any younger either! I guess I'd better add another caveat here, I did not stick 100 % with the book on some parts of the build as I was doing the build on a two wheeled home built slightly variable dimensions chassis. I had to build to fit the frame and I wanted exceptional strength and durability. Also, since building is something I'm learning on the fly, mistakes and oversights have/will be made. That being said, there is no other style of coop out there, no matter how cute, that I'd rather have to raise chickens in.
Here are some links to the Prince T Woods Open Air style Coop book:
(
 For the links to other Woods style and Open Air Style Coops, please scroll to bottom of page)
free Ebook first
online book. http://books.google.com/books?id=o08PAAAAYAAJ&pg=PA7&lpg=PA7&dq=Woods+style+open-air+chicken+house&source=bl&ots=yzyOqjO8sd&sig=i1Ex_3FBXHzQA5umDVYqBeQKvAU&hl=en&ei=gwhDTajvJoe6sQOSl_H9Cg&sa=X&oi=book_result&ct=result&resnum=2&ved=0CCYQ6AEwAQ#v=onepage&q&f=false
Another version of the free book
http://archive.org/stream/openairpoultryho00wood#page/18/mode/2up
.....and a site with various poultry housing and misc. plans
On this link you hit the green plan number to bring up a set of plans. The last one on the list is a woods style aka a half-monitor, but it's hard to read clearly.
https://www.ag.ndsu.edu/extension-aben/buildingplans/poultry
Amazon
http://www.amazon.com/Fresh-Air-Poultry-Houses-Open-Front-Healthier/dp/097217706X/ref=sr_1_1?s=books&ie=UTF8&qid=1440201305&sr=1-1&keywords=Prince+t+woods
Norton Creek Press is a family business run by Karen L. Black and Robert Plamondon, who've masterminded the reprinting of the book. I give this as a reference. When I talked to him last at the Poultry Swap(and bought his reprinted "the Dollar Hen" he indicated it was simpler to just buy it through Amazon, he gets pretty much the same royalty. He sells most of his books at the swaps if you can get to one, and he is happy to talk chicken
") Nice guy. (Didn't get to meet Karen)
Nice guy. (Didn't get to meet Karen)http://www.nortoncreekpress.com/fresh_air_poultry_houses.html
NOTE: I decided to use nautical terms on here for a couple reasons. When working with someone else it always helps if you are in agreement over what exactly you mean when you say "front" or "back". In coop terms, for this coop at least, the "front" of the coop is where the open front is. The back is where the roosts are. A no brainer, right? But since this is built on a trailer chassis, the hitch and tongue are more correctly the "front". The exact opposite of the coops layout. So if its not clear on front or back....well left and right don't work either. By using Bow, Stern, Port and Starboard, it was simple. The hitch was the Bow. And since DH was in the Navy, it just made it all that much more easier.

Here's a rough sketch of what I had in mind after sifting through months of research and a notebook of doodle sketches. It might change a bit here and there from the drawing
I started by finding a homemade trailer frame locally on Craigslist for $200. It was a bit too small (but heavy duty nonetheless!) at 6' 4" wide and a hair over 13' long (not counting the tongue
 I always wondered where I could use that ).
DH has been a welder for many years and went right to work making it wider (8') (legal highway width is 8'6") THIS IS THE "WINGED" PART and longer (16').
Next up was 5 cans each of primer for rusty metal and flat black enamel paint. At this point was another small design change, I wanted an extra brace on each side of the tongue to hold up to two water barrels. ( thank goodness we had a little extra scrap metal laying around)
(Total of 10 windows and 2 doors in background also from Craigslist $22! ;~)
The wheels are now slightly inside the frame ( like a travel trailers) and we (okay, HE, but I measured and bought it so it counts, right? ;~) made a custom wheel well cover out of 1/16" aluminum diamond decking from Metal Mart in Portland. We had used this material previously on a repair to a 1961 travel trailer and I liked working with it ( there were a couple other reasons for choosing it ; it doesn't rust, is easy to cut and weld, (for him, not me) and it's tough enough to deter critters I hope. ;~)}.
I knew I would need a bunch of plywood and trim etc., which we again found locally through Craigslist. ( $$ Great deal and more than enough for other projects as well.) I pre-painted 4 of the thickest plywood (3/4") (white) to use as the floorboards and drilled lots of 1/4" holes to carriage bolt it to the frame.
After I bolted the first sheet down I was thinking through the next step of securing the base 2x4's to the frame and didn't like the 1/4" bolts for that. DH and I brainstormed and decided to weld gussets at each corner (8 now instead of 4 because of the wheel wells) to put good sized bolts through. (Ran out of material, so we went with 6 corner support braces instead of 8)
So that's how far we've gotten so far. I will try to explain each step as I go so the pictures tie to the current work stage. I will also have to post the pictures separately as they are on my cell phone.
Front sheet of plywood bolted down, will be putting Blackjack 57 over this (eventually) I think thanks to JackE's suggestion for his floor in his Woods style coop (link to JackE's coop at bottom of page).
Then I was able to notch and lay all four sheets of plywood into place. Bolted the forward one back down, drilled holes until dark for the rest. I will fill in the cracks and spaces in the wood with a caulk of some sort, but I'm not too worried about that as the Blackjack 57 should goop up all the holes I miss when I get to that point. ( turns out it’s too runny to fill in gaps, so I do need to use a big gap filler)
August 14, 2014
First two sets of wall studs nearly ready to go up. It's been a frustrating week, but I got most of the "oh no, I don't have the right tool to do that!" Issues resolved. The good news is, I got some new tools!

So these are the sidewalls from the highest point, the monitor window area, to the back of the coop where the roosts will be. I cut the studs all on a 71 degree angle at the top. I used a Kreg HD pocket screw jig tool to pre-drill screw holes from the upright studs to the foundation sill. I had tried some cheapo wood screws on this earlier, what a waste of time. This HD version of the Kreg makes a solid solid joint, I won't have to worry about these babies vibrating out! And it already made it a piece of cake to reverse the screws out for one stud that needed to be shaved down a tad. Made me want to dance a "jig" hahaha. I HATE nails!
This picture shows about where the door will be, I had it framed in, but the cheapo screws failed to hold it together through one positioning trial. (Did I mention I love the Kreg!? )
These are better shots of what the pocket hole system of fastening looks like ( and hats off to Woodcrafters in NE portland for having ALL the Kreg products I needed in one place with incredibly helpful [also chicken owners] sales help to answer all my questions and get me back to working on my COOP!!
This blue thing is the Kreg HD jig, zoom in on that drill bit if you can. It's HUGE! The box of screws to the left are the HD coarse thread 2 1/2" long, the small jig for the nest boxes etc on the left.. The hurkey jig for 2xs on the right. See the difference in screw size? Normal panhead screw on left, HD on right.
Next I needed to notch all the studs in the corners for the added on braces...
(Those old C clamps were my late dads, he'd be happy to know they're still getting used. BTW C clamps are a bit slower to use, but they don't break if you drop them!)
Now I'm just waiting for DH to come back up from cutting firewood so we can start lifting the two walls I have done up.
August 16, 2014
Walls starting to go up!

Took pictures before we re squared, so even tho they don't look square here, we fixed already, just forgot to take new pics.....
Ok, here's how far we got before we ran out of 2x 4's.
August 17, 2014
Rafters.
August 21, 2014
We were able to put in a few extra days so we got a bit more done...
I cut all the boards to seal the open rafter end spaces top and bottom and at least one set to go near the middle of the rafters to fasten the roofing to. I'm not sure what the correct term for those are, bridges? We'll wait to put them in until the lower roof is on to firm the whole thing up. At our age holding a heavy drill over our heads 11' in the air is enough excitement without the walls being wobbly too!
Monitor window frame up with an extra 2x4" horizontal brace under the 2 x 6" to keep it square for now. The free standing 2 x 4"s are for the door studs.
And all cleaned up, swept out through the "front clean out doors" and tools all put away. It will be a couple weeks or more before we can do any more. Now we have to get back to work and earn some more $$ to keep the ball rolling

Not new work since I can't work on it right now, but thought I'd add the picture since I was editing anyway,
it's just something I was intrigued by and wanted to see if I could do, so I'm thinking I'll add later....
October 6, 2014
Lower roof rafters up
Notice I put blocks under the trailer. I leveled it too. A lot easier to work on now.
Friday October 10, 2014
Put both doors up to test fit. Windows on the sides framed, tested and set aside for now.
Both doors will be about 8" higher off the floor to accommodate the deep litter I plan on using. The boards leaning against the coop to the right of the door will be used to raise them up.
I also cut the pieces for the base of the nest boxes over both wheels but haven't fastened them together yet. I'll use plywood against the aluminum Diamond decking, which will have Blackjack 57 over that.
Saturday October 11, 2014
Was able to get a tiny bit more done today.......
Bottom sills and top cross pieces for both doors. Working by myself today hense the triple bracing on the starboard door.
October 12, 2014
Lower roof plywood going on
October 21, 2014
Working in the rain.....
Front plywood on and the "Super" is back on the job, and this time we put the chalk on the wall instead of on her!

October 26, 2014
It got a little windy this weekend, refastened the tarp more securely over the open top rafters.
Framed in both pop doors, but will wait to purchase second Ador door until it's needed.
I made a bit more progress and I'm pleased with how it's taking shape. I think one of the hardest parts, framing, for me at least, is about done. I'm really glad I stuck with using screws and not nails, it's so much easier to fix mistakes. The Kreig system let’s even a novice builder like myself end up with a solid result.
10/28/14
Great progress today....this pic doesn't show it, but the other side is done up to this point as well. I've found it easier to do the mirror image work while it was still fresh in my mind rather than do one whole side then the other.
10/30/2014
Working on my reversible roll out nest box prototype. (see link below for the prototype, I’ll be building one full set
of six nest boxes with traps hopefully by this fall 2020)
Cut the fixed base for the entire unit to sit / slide on. It won't stick out this far when I'm done, and I'll round the corners to minimize shin bruises.
(at least I found a work light!  )
)RE the nest box, I had to delete nonessential pictures in order to add the new ones from 2020....I thought they would still be in my album, but many things have changed in the last few years and it now appears they are no longer viewable. If and when I have time I’ll make up another album with all the build pictures in one place.
For more information on this reversible rollout prototype nestbox , please visit
https://www.backyardchickens.com/a/...t-box-with-room-for-trap-later-prototype-only
11/30/2014
The day before Thanksgiving we put up the rafter "bridges".
Did manage to work on the nest box today tho.....
4/22/2015
Painting and sheathing the hardware cloth on the cleanout doors, which will latch on the INSIDE. (That’s so no one can get locked inside accidentally)
Time to crow...or should I say sing a hen song???? ..these cleanout doors were something that had me stymied for quite a while, but I'm pretty happy with how they turned out
 e
e
Cleanout doors set in place for marking hinge attachments
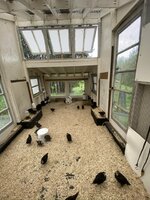
Hardware cloth on roof NOTE: I was rethinking this step.......I considered removIng the hardware cloth from the roof if it dripped water and condensated too much...BUT....As of May of 2020 we have had numerous downpours and thunderstorms, no dripping whatsoever! Totally dry but the extra light these panels let in is fantastic. The hardware cloth stays!
June 1, 2015
I had a bit of a setback so the project is a bit behind schedule. Unfortunately this means no chickens yet as I will not compromise on their security and an unfinished coop is far from secure! The good news is I'm able to get quite a bit accomplished on the days I get work on it, so hopefully it'll start shaping up soon. As there is still a lot to do and I have even less time, I've put an outline of what's left to do towards the bottom of the rather long, (sorry!) page, and as I can I will just drop pictures into place. (IF my Android phone will ever start working properly and share the pictures!)
JULY 12, 2015
Polycarbonate smoke grey panels onto roof
(Tuftex Polycarb 2.17-ft x 12-ft Corrugated Polycarbonate Roof Panel From Lowes
July 26, 2015
work progressed on swing down roost boards for easy cleaning. I will have to add a strong support leg later for when it has more weight on it, but the idea worked so I'm happy!
I will also use screws to fasten the waterproof shower board to the plywood insert later. I put the showerboard on the walls behind the roost also.
Aug. 1, 2015
Strip, glaze and paint windows. Old glass was removed, double sash channels puttied and sanded, twice, two coats Behrs Bleached Linen VOC free semi gloss paint applied. On a side note, as these windows were pretty old I was very careful to have a tarp under my work station so I could collect and safely dispose of the old paint as it came off. I made sure to wear one of those paint fume masks as well
guess I missed adding the picture with the Harbor Freight heat gun, but that's what accelerated the paint removal.
Aug. 16, 2015
Hung refurbished windows with new Polycarbonate panes installed (protective film left on for now. 2020: That was a mistake! It’s a pitb to get off after a few years of baking on). I decided glass, especially old non safety glass, the type that shatters into a thousand shards, wasn't what I wanted in a mobile coop. Not in the windows at least.
Sept. 20, 2015,
Time to paint the floor and 12" up the walls with the Blackjack #57!
I am horrible at painting a straight line so I marked 12" up all around first and put painters tape up. It took a lot longer to mix the Blackjack than I expected, even with a good drill powered paint mixing paddle. It looked like it had about 2" of water at the top and big chunks of tar balls below that when I started. By the time I got it all mixed good, at least 30 minutes later, it was about the consistency of cake batter. Thick cake batter. As per suggestions on another thread, I had a bucket of water handy, 2 sets of masks, 2 sets of gloves, my junk shoes and pants, throw away rollers and brushes (not that I will, but I definitely didn't use good ones), and I was ready. This is just one coat so far. Will let it dry a day at least.
Oct. 6, 2015
Finished Blackjack, mostly.....
Will touch up seams later. I bought plugs for the pocket holes......but they were the wrong size.

So I might add those later as well
Felt/tarpaper and starter row of shingles
5 rows was all I had enough left over from our last project ...so off to big box to get more....
Oct. 8.......well now, the orange box decided to quit carrying this style, so off to Lowes (which I like better anyway!) we went and we got extra for other projects too. Still need to add flashing and trim........
Both doors in with DH's help, will leave glass in for now as these are in pretty good shape. I may switch to Lexan type (Tap Plastics) later if they prove to be too fragile. One pane did eventually break, but haven’t had time to replace, so it’s boarded securely for now.
Dec. 4, 2015
Trim is rough pine trim which I planed on one side (Harbor Freight 12" planer used was hubbies Christmas present a few years ago), then cut to size and tacked up. Plan is to finish port side, then do starboard side as well and remove all and paint over Christmas break. I hope. I did put vulkem in the crevices where I didn't get a nice tight seam, ( I am getting better at that measuring and fitting part tho....) the trim is over that. Using a different sealant anywhere it won't be covered by trim.
.jpg")
NOTE: I was unable to physically work on the coop for a couple years due to business and other demands, but I did keep dreaming up lots more improvements for it ;~)
April 25, 2020
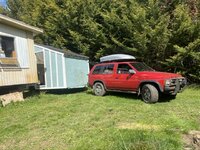
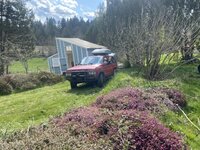
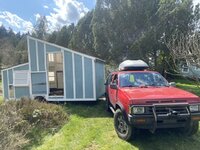
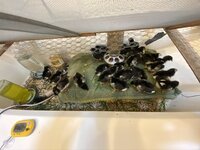
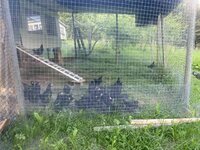
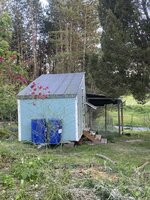
We were able to move the coop to her semi-permanent position this month AND we got chickens. Baby chicks actually...


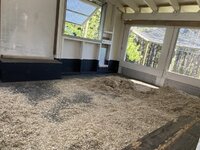
I finished putting up the PlasTex poly wall board as a ‘chick security shield’ in the bottom brooder area (to prevent chicks getting scrunched into sharp corners) In hindsight, I would have liked to have covered the entire roost/brood area with plasTex wallboard, but I needed to have smaller pieces that would be easier to pull off to install the water lines through. Also when I originally purchased them I couldn’t find them locally for a reasonable price so we bought and hauled them back from a Wyoming Menards store. Lowe’s carries them now but they’re $20 each(6/2020). I think I paid 10 or 13 something at Menards 5 years ago. (Parkland Plastics white matte wall panel. I call them PlasTex because that was the name on them when I bought them) I use screws instead of glue to fasten because 1) I make mistakes and/or I like to redo things, and 2) this is a chicken coop, not a food cart. But since these are waterproof and don’t support mold, mildew or bacteria growth, and they’re food preparation approved, I thought they were a logical choice for what I’m using them for. They clean right up with soap and water.

It also works as a ‘poop shield‘ for the roost area to keep things cleaner and washable. Added hardware cloth over any gaps.
Even when it’s dark clouds and rainIng here it’s very light in the coop. I’m really loving the smoke polycarbonate roof with all the windows. I also took the roost platforms off until after the water system is installed.
Hemp bedding from Oregon Hemp Solutions. I used 3 bales at first, and have added 2 more since May under the roosts. Cost was $30 for ~30# bale. I was able to buy direct from the distributor Gary Lyman, super nice guy, (no price difference) and saw his coop (modeled after Carolina Coops I think) where he’s had the same Hemp bedding for over two years without changing. No smell, no dust, looked great. It was somewhat shuffled to one end just like in my coop. I’ll have to rake it back every once in a while.
https://hempsolutionsoregon.org/
5/25/2020 Memorial Day
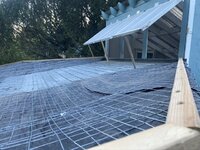
We have the Hen Yard nearly finished. We were going to put shade cloth and co-poly, aka opaque white greenhouse film over it, but since it’s a temporary roof until we can afford and install the same polycarbonate roof as is over the roost area, we went with what we had available, a layer of poultry netting, a layer of ground cover fabric, and a layer of chicken/stucco wire over that. It sheds a little water through the overlapped points, but at least it won’t puddle like the plastic would have, and it will be dryer than not. And shady.


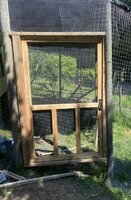
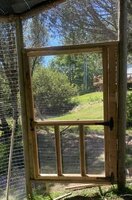
I made and installed the screen doors, using trim boards planed down and joined with pocket hole screws, aluminum bug screen, the same 1/2” black hardware cloth used inside the coop, and old moulding from our stash of used lumber. Hinged opposite of outer door to help thwart escape attempts. Works great. I added screen door springs to all the doors as well. Also hook and eye brackets to keep doors closed when I’m inside. And handles, neat vintage screen door handles.


5/28/2020
I used landscape fabric pins to secure the hardware cloth apron to the ground around the hen yard. The hen yard is completely inside the outer perimeter Moat fence, which although not complete, does have 24-30” of 48” wide 1/2” mesh hardware cloth buried vertically around the entire garden. This is in heavy clay soil, which will hopefully help deter diggers. Most of the inner perimeter fence is up as well, although we still need to add the stucco chicken wire to that too. Priority was shifted to keeping the deer out of our garden as all the fences had been removed to start the Moat Project. (I will do a separate article on the Moat Project when finished). We weren’t too worried about tunneling and burrowing creatures at this point, mostly dogs, coyotes, and raccoons Etc., jumping the HWC outer layer. We will be adding electric hot wires to coop and run as soon as possible

6/3/2020
Hen Yard door up. We had to shim it a bit after adjusting another post which tweaked these two out of square, but it works great. Will paint when time permits. 6/28/2020 Now that the chicks are using the HenYard I added another latch to the bottom of the door. And an inside release cable for the latch made an old phone charging cable

6/25/2020
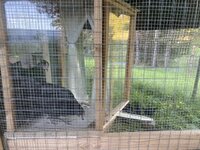
Installed the Plexiglass Chunnel for pop door with modified shower curtains to help keep out rain and hopefully any wild birds wanting a free meal. I will gradually release the “curtains“ until they are comfortable walking through it when it’s closed.
Ramp is up and Ador pop door is working perfectly. After the operator read the instructions! A couple stragglers for a night or two, but they are all in on the two mid-height temporary roosts before the door closes at sunset now.


I used hook and eye bolts to make the ramp, which is very light btw, easy to move on and off. They are having absolutely no problems using it with the vinyl coated hardware cloth.


6/30/2020
Today I installed one of the two ~40# auto-feeders. These are made with the same waterproof hygienic PlasTex material I used in the roost area. I taped the seams inside with dryer vent shiny aluminum(?)tape and made extra braces to handle the weight of that much feed. The only time I would fill them to the top would be if we have to leave for 2-3 weeks for our job. The lower front is screwed to the wall for easy removal for cleaning and/or removing excess feed. It will have a plywood front above the feed ports for extra strength if we need to fill it up. The 2x4 vertical is to screw the plywood in 3 solid studs to prevent bulging out when fully filled. I put 10#s in as a test and it worked beautifully!


Still to do:
Definitely get aluminum bug screen to go with hardware cloth.
Build removable roosts, wrap with bicycle tubes.
Set coop divider partition PVC caps into floor. Assemble coop partition
Finish brooding area under roost board, I did put plas-Tex up to round corners in brooder area so chickies can't get trapped. ( 2020- skipped building the actual this year as chicks were already 3 weeks old and fine in the coop by themselves and we needed to get them out of the stock tank, so that part has been put off a bit)
Set up water barrel(s) with rain gutter connection and connect to water system.
Auto- Feed system
Solar panel(s) onto lower roof (winter lights, summer mist system)
Build Battery box on trailer tongue or?
Build/install porthole windows by roosts
Build nest boxes and traps
Install First aid kit above nests
Set up ACV (Apple cider vinegar), Oyster shell, grit, charcoal, DE (diatomaceous earth) and FF (fermented feed) stations
Hang BSF(black soldier fly larvae) auto treat dispenser (I had BSF adults laying eggs in April of 2017 I think).
Build awnings ( no room for shutters
but I've got some neat ideas for the awnings )Add brass escutcheons and other ornaments
Build summer/winter CHICKEN MOAT!! (5/2020 We are actually working on this as well as the Coop....making great progress but not a priority to finish for a few months)
Add swings and fun stuff
Dust bathing area
Try to get baked on plexiglass protective film off....
Replace broken window in East door. I bought plexiglass to do just that and ended up using all of it for the Chunnel so it’ll have to wait.
Build incubator.
(Not necessarily in that order)( also add links to any related items)
Thanks for looking.
If you are intrigued by these open air Woods Style coops, please check out these other great interpretations ......(I'll keep posting links to as many as I can) ALL of these have GREAT ventilation!
There are several GREAT new Woods style coop additionson BYC in 2019-2020 so this list is far from complete.
https://www.backyardchickens.com/t/445004/woods-style-house-in-the-winter by @JackE (a thread not a coop build page so much more discussion about the build and performance through the winter. also sprinkled in there are pictures (or references to) of other Woods style coops that don't have a build page)(also movable if he ever needs to...as its built on skids)
https://www.backyardchickens.com/a/3-bs-chicken-palace-woods-style By @blwells45 (nicely detailed coop build with a tribute to his grandfather)
https://www.backyardchickens.com/t/499098/woods-on-wheels-update-added-more-photos By @offgridhen (first one I ever saw on wheels)
https://www.backyardchickens.com/t/1009681/woods-fresh-air-poultry-house By @jeff8486 (very nice use of board and batten!)
https://www.backyardchickens.com/a/ooodalolly-at-dunrovin-station by @WthrLady (this is gorgeous! .....But of course......she's an artist! )
https://www.backyardchickens.com/a/mustang-valley-farm-chicken-wagon by @Diann88 (Scaled down to 4'x 12' on an old farm wagon base, nicely done!)
https://www.backyardchickens.com/a/loopy-coop by @ash10383 (this is actually a full monitor style, instead of half-monitor)
https://www.backyardchickens.com/a/chickie-land-love-center by @loon138 (also on skids, moved into place with a jeep!)
https://www.backyardchickens.com/a/coop-remodel-go-big-or-go-home By @mexieontheloose (another scaled down version)
https://www.backyardchickens.com/t/672804/our-woods-style-coop by @pharmchickrnmom AND @Arty (nice build [thread] using home milled lumber)
https://www.backyardchickens.com/a/half-monitor-chicken-coop by @bugsaroo (an excellent example of a larger version. Partitioned for breeding)
What I'd have done differently......
Put blocks under and leveled the trailer at the beginning instead of several months into the build. No doubt it would have helped.