Here is my heated waterer. I looked at many designs and decided upon this one because the bucket is closed to prevent water evaporation and won't add to the humidity in the coop. And I have 5 nipples they seem to be enough for the (24) girls right now. I may add a couple more if I see there is an issue. I also have it setting on a cookie tin heater which is on top of an upside down large galvanized dish which helps to distribute any heat loss upward to prevent the nipples from freezing.

A five gallon bucket , Horizontal nipple waterers, Food safe silicon sealant, Aluminum foil, insulation/foil bubble wrap, electrical tape, 9 ft wrappable pipe heater, extra piece of acrylic/PVC sheet plastic optional.
The bucket with the nipples installed per instructions from the nipple manufacturer. (Drill proper size per instructions, screw together through bucket and seal with food grade silicon sealant.) Wrapped in aluminum foil on sides and bottom.The foil is to help distribute the heat from the heater tape more evenly. It is taped with the electrical tape around the nipples and the overlapped edge. Also taped to the bucket at the start to keep from moving while working with it.
A circle of insulation foil/bubble wrap on the bottom and below an circle of acrylic sheeting I had left over from a bathtub enclosure to help protect the bottom.
Wrapped 9 ft. pipe heater cable. I used one that can be wrapped around a pipe. There is a type that can only be run the length of the pipe and not wrapped but I wasn't sure how that would hold up with wrapping it. This one lays nice and flat around the bucket and has a thermostat built in to shut off at 38F.
Next I measured and cut the length of insulation. I had to add a couple of inches to make sure it would still go around since the slight taper on the bucket makes it shift slightly.
I started by taping one end of the insulation and going around and cutting the slots for the nipples and the heater sensor.
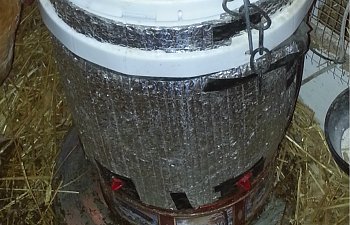
The Insulation all wrapped and taped up.
I put a circle of insulation on the lid. It also needs to be glued with some kind of adhesive on the inside or place it on the top outside the bucket. Also a strip of the insulation around the very top of the bucket just for a little extra insulation.
1-4-2015 Edited to add:
I have the bucket hanging from the ceiling joists at the same height as the water tin and bottom metal feed pan are, to prevent any tip over by over rambuncious hens. Just in case. And I took the circle of insulation from the inside top of the bucket and set it on top outside the bucket. After about 2 weeks the tape didn't hold in the humidity of the inside of the bucket. But this works well too.
You can see if you look close you can see some peck marks/holes but no actual eating of the wrap. The cookie tin heater is mostly for the frigid temps but it also helps to raise the bucket a little higher. A thermo cube outlet adapter will help keep the electricity cost down on the cookie tin heater.
All the wires are secured to the nearby hardware cloth in the divider wall. If that wasn't so close I would have put up a 2x4 and done something similar to secure the wires and outlets.
The only other thing I want to add at this time is to get a lid with a screw on cap built in to make adding water a little easier. Right now I slide the chains and handle back a little and lift and slide the lid out. no biggie, but I'd like to try the other kind of lid too.
All in all I'm very pleased with it.
UPDATE - February 16, 2015: During the middle of severe winter temps down to -11F so far and still no ice in the bucket and the nipples have not frozen at all. Very pleased. So far this has surpassed my expectations.
Thank you for reading my page!
A five gallon bucket , Horizontal nipple waterers, Food safe silicon sealant, Aluminum foil, insulation/foil bubble wrap, electrical tape, 9 ft wrappable pipe heater, extra piece of acrylic/PVC sheet plastic optional.
The bucket with the nipples installed per instructions from the nipple manufacturer. (Drill proper size per instructions, screw together through bucket and seal with food grade silicon sealant.) Wrapped in aluminum foil on sides and bottom.The foil is to help distribute the heat from the heater tape more evenly. It is taped with the electrical tape around the nipples and the overlapped edge. Also taped to the bucket at the start to keep from moving while working with it.
A circle of insulation foil/bubble wrap on the bottom and below an circle of acrylic sheeting I had left over from a bathtub enclosure to help protect the bottom.
Wrapped 9 ft. pipe heater cable. I used one that can be wrapped around a pipe. There is a type that can only be run the length of the pipe and not wrapped but I wasn't sure how that would hold up with wrapping it. This one lays nice and flat around the bucket and has a thermostat built in to shut off at 38F.
Next I measured and cut the length of insulation. I had to add a couple of inches to make sure it would still go around since the slight taper on the bucket makes it shift slightly.
I started by taping one end of the insulation and going around and cutting the slots for the nipples and the heater sensor.
The Insulation all wrapped and taped up.
I put a circle of insulation on the lid. It also needs to be glued with some kind of adhesive on the inside or place it on the top outside the bucket. Also a strip of the insulation around the very top of the bucket just for a little extra insulation.
1-4-2015 Edited to add:
I have the bucket hanging from the ceiling joists at the same height as the water tin and bottom metal feed pan are, to prevent any tip over by over rambuncious hens. Just in case. And I took the circle of insulation from the inside top of the bucket and set it on top outside the bucket. After about 2 weeks the tape didn't hold in the humidity of the inside of the bucket. But this works well too.
You can see if you look close you can see some peck marks/holes but no actual eating of the wrap. The cookie tin heater is mostly for the frigid temps but it also helps to raise the bucket a little higher. A thermo cube outlet adapter will help keep the electricity cost down on the cookie tin heater.
All the wires are secured to the nearby hardware cloth in the divider wall. If that wasn't so close I would have put up a 2x4 and done something similar to secure the wires and outlets.
The only other thing I want to add at this time is to get a lid with a screw on cap built in to make adding water a little easier. Right now I slide the chains and handle back a little and lift and slide the lid out. no biggie, but I'd like to try the other kind of lid too.
All in all I'm very pleased with it.
UPDATE - February 16, 2015: During the middle of severe winter temps down to -11F so far and still no ice in the bucket and the nipples have not frozen at all. Very pleased. So far this has surpassed my expectations.
Thank you for reading my page!