Our chicken coop adventure began when I spotted an expensive pre-fab chicken coop for sale at an antique/thrift/junk shop. I looked up online, stumbled upon Backyard Chickens.com and researched local code. Backyard chickens are okay in the town to which we had recently moved as long as 100 feet from any neighbor’s house. My coop is actually within 100 ft. of a vacant house and we will deal with that situation when the house becomes occupied, but the code is only enforced if the neighbor complains (free eggs for the new neighbor!).
We ordered our 4 chicks from a local feed store and set out deciding on a coop. We went pre-fab from Amazon because of costs involved and after much renovation, adding another pre-fab coop, and serious re-construction of the set-up, we put our little ladies out at about 5 weeks old. It quickly became obvious that the pre-fab creation was not going to work. After a few months, we began our new project on a big, beautiful, easy to maintain coop, run, and yard.
The girls have been living in it since October 2014 and it has served us well. The size and design were based on our needs and our climate. We live in a dry southwest climate. That means 100+ degree summers and occasional snow/ice in the winter. Strong winds can be a factor and our ground is hard, red, clay. We wanted enough room in the coop for nest boxes and roost with a poop board, lots of ventilation for those hot summer days and nights, and a good sized protected run since we were not going to free-range very often. We also added a fenced yard to open the run door into. This doubles or triples their space and they spend their days with all the area and are locked into the coop/run for the evenings - no door on the pop opening in the coop. The entire run/coop is built to be predator-proof.
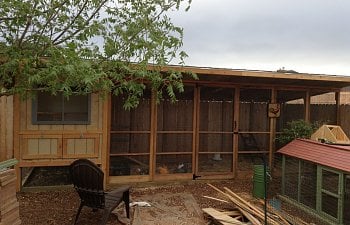
The coop is 6’ deep x 5’ wide and the run is 18’ long by 6’ deep plus the additional area under the coop. We bought some old screen doors and window frames and used those with our store-bought materials to create their new digs. The roof is shingled and slanted with a gutter to catch rainwater and directed into a ditch on the side of our home. I have Sweet PDZ in the poop tray which I scoop about 2x per week. The nest boxes (4) have outside access, but I do have to go inside the run to access the coop for scooping and general clean-out. After trying all kinds of do-it-yourself feeders and waterers, we have settled on a store-bought hanging plastic feeder and waterer, although we have kept our bucket with nipples available in the run as a back-up waterer. We used our privacy fence for two sides which saved on materials and the entire run and windows of the coop are covered in hardware cloth. One of my favorite parts of the whole set-up is the fenced run with gate, which allows them so much more room and sun. They don’t fly over as long as I don’t put anything too close to the fence. We covered the windows and large door of the coop with a plastic laminate material for the winter to block cold wind and the top of the coop has open eaves for continual ventilation. We have wimped out and added a heat lamp and turn it on when it goes below 30 degrees, but it's probably not necessary.
I have been in 7th heaven since we built this coop. The hens are happy and it is so much easier to take care of them. No bending! My recommendations for anyone considering chickens is to build the best coop you can afford as it will make the experience so much more positive. We spent a little under $1,000 on this venture which absolutely makes me cringe, but the trade-off of a great set-up and happy hens and a happy caretaker are worth it! We were able to sell the original coop for $300 and let the new owner know that this would only be good for chicks and he'd need to upgrade.
Our latest update is a broody pen divider since our Buff Orpington went broody and we gave her some fertile eggs from a co-worker of mine. We are down to one embryo/egg, so hopefully we will have a chick in a few weeks!
ORIGINAL COOP - Way too small and inconvenient and the heat reflected off the low roof into the run and coop!
CROWDED LADIES IN THE OLD COOP!
HUBBY WORKING ON COOP BASE - 4x4s over a gravel trench for the entire structure base. I think it's pressure-treated and then we used cedar for most of the other wood. We kept the dirt floor and put pine bark mulch (untreated, natural) over the dirt. For the winter we opened a straw bale over all of that. I'll clean out the straw and rake everything when winter ends.
COOP COMPLETE without REFINEMENTS - I got lazy picture taking, but you can see we used the screen door frames for the front and my husband built this thing like Fort Knox. We have stained all the wood and painted the coop neutral. We also replaced the temporary fence with a real fence and gate, so the girls are secure when in the yard area.
COOP INTERIOR - We have made some adjustments, such as adding the hanging feeder and waterer, placement of straw bale and bench. I added a nice sand box for dust-bathing and we removed the ladder in the coop. They just hop up on their own.
OUR BROODER BEFORE WE MOVED THE GIRLS OUTSIDE!
OUR FIRST BROODER BEFORE WE REALIZED THEY WOULD OUTGROW IT!
MY FOUR LITTLE BABIES WHO ARE NOW ALMOST 1 YEAR OLD!
OUR NEW BROODY SUBDIVIDE. We let Daisy our BO (above as a pullet) out into the open areas 1x per day, but otherwise we have to protect her egg as we had an egg attack and lost all except 3. We are down to one viable egg and hope it gives everyone a present in two weeks!
UPDATE 2/11 - Our broody hen's last egg broke, so we wound up pulling the old switcheroo and gave her 9 chicks (half are going to a friend). She is having fun being a new Mama and all are doing well after 4 days of becoming a family. We built a grow-out pen to move Mama and chicks later this week, so the run design is still working well for us. Thanks for sharing your comments! We have enjoyed every minute of our chicken adventures!