This is the luxury coop I built for our 5 chickens about 6 months ago. Now that the weather has finally thawed, I thought I'd post some pictures.
(Bonnie checking out her new pad)
The coop itself is 4x4 and it sits over a 4x8 run. My dad helped me build it, and the whole process took the two of us the better part of two weekends, plus some late week nights after work. The design was roughly inspired by a coop I saw in Reinventing the Chicken Coop while browsing at Barnes & Noble one day (in particular, the barn door), but for the most part it came from my head. I'm guessing it cost around $650 to build it, but truth be told, after about the 10th trip to the hardware store, I stopped adding up the receipts. Overall, I'm really happy with how it turned out, especially given that we had no written plans and ended up making a lot of modifications on the fly.
Day one, we bought all the supplies (or so we thought, how little we knew then), built the frame for the run, and built the base frame for the coop. The run is made from treated lumber, which I know you're not supposed to use, but I really wasn't about to spend the money on cedar and I didn't want it to rot. I've never seen a single bird try to peck at it, so I think they're fine. We were making really good time at this point, and I think we both thought we'd basically have this thing done by the end of day two. Hahaha.
Here's our progress by the end of day two. Not bad, but still a long way to go. By this point, the coop is pretty much framed, and we'd put down most of lumber for the floor. One thing I will say, I'm really glad about the decision to go with the 4x4 and 4x8 sizing. It saved us from a lot of wasted wood. You might be wondering, why on earth use those little 1x2s for the the flooring? Well, I had originally planned to use metal trays on top of slats so I could easily clean and spray out the coop muck. However, due to approximately 100 coop design changes during the building process, it didn't end up working out as planned. Do yourself a favor and just use plywood for the floor. It will save you a lot of time and trouble. I ended up putting down cheap laminate tile on top of these, so it was a waste. Also, you'll notice we made a little roosting ladder with three steps. I would recommend sticking to two, they almost never use the top roost. Although I made the first step really low down form my silkies, I still can't get them to roost to save my life. So yeah.
So that was the weekend. At this point, we started working in the evenings after I got home from work. My dad was really into getting this done as quickly as possibly, so I'd usually end up kicking him out of my yard at around 12-1 am, when I insisted the neighbors probably didn't appreciate the late-night hammering. You can see here that we've started putting on cedar siding. Definitely not the cheapest choice, but it's rot resistant and ended up looking really nice.
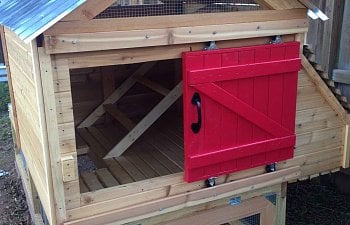
Ok, the door. I'd seen something like this in a book, but that design called for using a special saw to create this barn door cut, and we're not that fancy. Speaking of tools, the only tools we used to build this coop were: a miter saw, a circular saw, your standard plug-in drill, hammers, screw drivers, a jigsaw (borrowed to cut out a hole for the PVC feeder), and some quick-grip clamps (those things are amazing and I highly recommend getting them if you don't own them already). The door itself is just cut 2x4 that is held together by 1x2s cut into a z-shape. We also drilled some slats across the top and bottom and attached 4 fixed casters. To make the tracks for the door, we took some heavy-duty cedar 2x4s (I think?) and bolted it to the coop. Then we bolted cedar slats to the 2x4s, leaving about a 1/2 inch track for the door to slide on. The door is really heavy, so you need it to be secure. If you end up doing this, you'll probably want the track to only be about 1/4-3/8 inches deep. There are some little bolts on the casters that hit right where the board is and tend to stick. It's not a big deal, but it's annoying.
I've definitely skipped some days, but suffice to say things kept coming up that we hadn't thought about, which meant we just kept working. Finally, we got to the point where we were ready to put the coop together. We dug out a 4x8 box in the yard a buried some hardware cloth. I highly recommend doing this to keep the rats from digging under. I don't have any pictures, but for the part of the run that isn't covered by the coop, but we just hinged an approximately 3.4x4 foot lid ont the frame (just a frame around some hardware cloth), which swings open completely and rests against the fence. This is nice because I can get in an easily clean out the run. Then we attached the coop some flat bars, attached a ladder so they could get in, painted the outside of the door, added some hardware, and wallah!
Hopefully you don't have a rooster who is stupid like mine. It took Clyde at least a month to figure out how to get in via the ladder in the run. The others all figured it out within a day...