As the name would suggest, this structure is actually used for keeping a rabbit (and later her offspring), but with some minor modifications, I think this would work great for chickens too, so I thought I'd write up an article on the build. If it were to be used for chickens, I think 4-6 birds would gladly call it home.

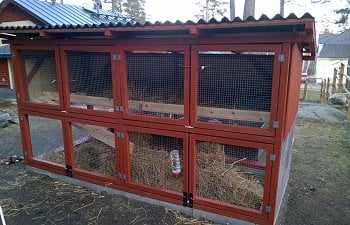
The pen has a 10½ foot (3.15m) by 4½ foot (1.35m) footprint, and offers about 80 square feet of floor space on two levels. At the moment, only one bunny lives in it.
Be sure to check out my coop page too, the Scandin-Avian Coop.
April 7th 2015 Introduction to rabbits
So, as we spiral down further on the path of madness, we decided it was time to try our luck with raising meat rabbits. The warnings of chickens being a gateway livestock are greatly played down. After we had confirmation that we could pick up our doe, we started work on a bunny tractor. I'll write up another article on that, but here's what Hilma, our one year old French Lop-New Zealand Red doe spent her first weeks in when she moved in with us a little over a month ago.
Since our philosophy of animal husbandry is to provide the animals with as much natural stimulation as possible, keeping her in this indefinitely wasn't an option. We plan on using it later on when we separate the males from the females in her litter though. The tractor is mobile, and modular. It can be folded into a very small space for storage, and adding 7 square feet of run space to it costs about 8 dollars, or 7.50 euros. But more on that in a separate article later.
The same weekend we picked up Hilma, we also broke ground on the permanent bunny pen. After we had decided where to place it, we had to move one of our raised beds.
We were slightly slowed down by the fact that at this point, the raised beds were pretty much solid blocks of ice. Here you can see me trying to break them down into manageable pieces.
After we had moved the raised bed, we measured out the area the rabbit pen was going to occupy. Then began the digging.
At this point, we were blessed with a heat wave, so the ground quickly thawed. Our only obstacle was the unbelievable amount of rocks in the ground. All of the rocks in these two pictures were in the ground.
Once we had reached a depth of a little over a foot, we put down some plastic coated hardware cloth on the bottom, and laid the foundation with cinder blocks.
After a lot of cursing, digging and sweat, we finally had a somewhat level foundation that measured 10½ by 4½ feet, or 3.15 by 1.35 meters.
Then we started shoveling, since we wanted the bottom to provide something to dig in.
Then I put together some frames for the structure. Learning from my experiences building the chicken coop, this time I decided to build something that can be disassembled when it's time to move away from here. The back wall (on the left) is about 5 feet tall (1.50 meters), and about 10½ feet long (3.15 meters). The front is 8 inches taller, placing it at 5'8" (1.70 meters). The side frames are about 2" high (0.6 meters) and 3'10" long (1.15 meters).
Again, learning from our mistakes with the chicken coop build, we decided this time to paint as much as possible in advance. I hate painting, so I tried to think of creative reasons why my better half, pictured above, needed to do as much of the painting as possible. Painting the eight doors that we're going to sit on the front was especially horrible.
Since I didn't want to go through moving the raised beds again, we also attached the hardware cloth to the back before assembling the frame. I just rolled up the parts that were going to cover the sides.
Then I assembled the frame. each corner is held together by only 3 90mm (3½ inch) deck screws. That way, when it's time to disassemble this thing, I can only take those apart. It might sound a bit flimsy, but after the roof came on, it became a lot sturdier. But I'm getting ahead of myself.
Then came the roof rafters. I used 2x2's, five of them. I have about 8 inches (20cm) of overlap. I also put in a floor support in the middle.
Then came the horizontal roof supports. At this point the structure started feeling a lot sturdier. I used the same paneling for this as I was going to use as siding and for the floor.
I've been wanting to try out Onduline roofing panels for some time now, and this was finally my chance. They're made of a combination of wood chips and bitumen, pressed into pieces that resemble tin roofing. I needed 4 of them to cover this.
The wire walls have also been attached with screws and washers.
Then came the siding.
And a floor. The floor isn't attached, it can be removed for cleaning.
More painting. This time I was forced to do it on my own, since Karin wasn't at home.
And then the doors. The idea is that the whole front can be opened for easy access. The ramp you see in the picture is meant to be a temporary structure, I will later build two ramps that can be folded up to separate the bottom from the top. I might also put in some sort of separator in the middle if needed, but for now, Hilma gets to use. the whole thing.
Here our rooster Eemeli is getting acquainted with Hilma.
And this is how the pen ties in with the rest of the yard. It's placed sort of backwards, since the winds always blow from this direction.
And here we have the occupant herself. She seems to like her pen, and should be giving birth to a litter later this week.
We won't see the kits for quite some time though, since she has taken full advantage of her apartment and has dug a tunnel deep below the ramp. We have enjoyed watching her excavate, then fill it with straw, and just today, a lot of fur.
April 29th 2015 A first glimpse at the next generation
So, about 19 days ago, Hilma gave birth. All we've know so far, was that she was going into her tunnel to feed them on a daily basis, but we haven't known anything about how many, if any, kits she had. That changed yesterday, when we set up a trail camera to monitor the entrance. And today, I managed to catch a shot of what I believe is all of her kits. Looks like we have 8 new inhabitants in the bunny pen.
January 27th 2016 Wintr update
It's been a while since my last update to this. The bunnies are going through their first winter at the moment, and at the moment we have Hilma, the original inhabitant, two of her daughters from the first litter (Lisbeth and Inkeri), and a non related Sobel named Coco. Hilma has had a total of two litters with us so far, and both of her daughters currently have litters in the coop. Due to Coco and Hilma not getting along, I've divided the pen in two by putting in a ramp that can be raised to separate the upstairs from the downstairs. We've also put in concrete slabs in front of the pen, skirted with pine discs. And to protect the downstairs from snow, we've hung clear plastic on two sides. I don't have any decent pictures of the modifications, but I thought I'd post some pictures of the nests I've made for the bunnies. We've got two of them upstairs, and one downstairs.
These nests are built using an Ikea 130 liter container, a 5 liter bucket, and some zip ties, and they're lined with hemp and straw.
They seem to be working great, the kits have survived -25C (-15F) weather without problems.
Also, here's a bonus pic of Inkeri, and my ugly sweater, along with some winter funtime pictures.