February 2014 we lost our entire flock of hens to neighborhood dogs. We were devastated. We weren't sure we would ever get hens again, but as time went by we decided we did want a new brood, but we wanted to make a safer place! My sweet husband agreed to build me a fabulous new coop. We sat down and began designing together. We decided on a 3' wide, 8' long, and 6.5' tall coop. We are only allowed 6 hens on our lot so we knew it would be ample. Not only did we design it to be sturdy and safe, we also put in some dream features. I wanted a broody box for a sick, broody or injured hen, a storage area, a built in feeder, removable roosts, and a few other extras.

We began construction in late Spring 2014. The base was built and even cemented into the ground to make it extra sturdy. Hopefully we will never move! Before beginning framing we got a roll of linoleum and covered the entire base, which meant all of the corners would be covered by the framing which would prevent peeling. Then we began the framing. The weather was too hot when summer hit, it was unseasonably warm, then oddly we ran into a strange rainy season, which was unheard off. Construction was slow in these conditions and before we knew it 2015 was upon us. With six cheeping hens in the basement we quickly tried to finish our massive project.
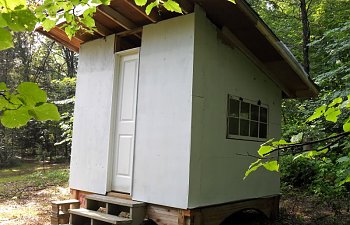
Thankfully it has come together and the coop is mostly done! We still need to build the chicken ladder and we need to finish the run. The chicks are so young they are happy hanging in the coop full time for now. We have super heavy duty hardware on the doors. I chose a morning glory blue and white for the exterior, and yellow for the interior. The roof is shingled and the entire coop is insulated. All of the windows are screened with 1/2" hardware cloth and then have a hinged plexiglass window on top.
The front (people) door is very large and swings out wide to allow for easy access.
My husband also designed and installed a built in feeder. It is very easy to fill and stores a lot of feed.
This one piece roosting bar is actually removable for cleaning or repainting as needed. I know it won't be long before the brilliant white paint will be poop splattered.
There are three nesting boxes. I plan on installing nesting box curtains before the girls start laying to allow for more privacy.
I have placed a boot mat below the roosts to collect poop. It is easy to clean and to remove as needed.
The west side of the coop. As you can see it is wired for power and there is an electrical outlet on the interior of the coop. It is easy to plug in an extension cord for any electrical needs. The nesting boxes all have their own hinged top so I can easily collect eggs without disturbing another hen in a neighboring box.
The East side of the coop. Here you will find the storage space and the broody box.
This space is already filled with my chicken first aid kit, extra bedding, food, and cleaning supplies.
Here is the front of the broody box. The door/window has two parts. On a hot day you can easily open just the plexi-glass.
The whole door swings wide to allow access to the broody box.
I wanted a space where a sick, broody, or injured hen could go. The wall to the rest of the coop is separated by hardware wire so the hens will still be able to view the out of commission hen. I'm hoping this will make it easier for the flock to stay whole and not have to worry about a reintroduction period. I wish this spot was a little easier to reach. I need a step stool to be able to reach all the way back to the rear of the space.
The chicks who are almost 5 weeks old really love their new space. They were quickly outgrowing the brooder.
I know it won't be long until they will be all grown up and I'm grateful I have an amazing coop!
We began construction in late Spring 2014. The base was built and even cemented into the ground to make it extra sturdy. Hopefully we will never move! Before beginning framing we got a roll of linoleum and covered the entire base, which meant all of the corners would be covered by the framing which would prevent peeling. Then we began the framing. The weather was too hot when summer hit, it was unseasonably warm, then oddly we ran into a strange rainy season, which was unheard off. Construction was slow in these conditions and before we knew it 2015 was upon us. With six cheeping hens in the basement we quickly tried to finish our massive project.
Thankfully it has come together and the coop is mostly done! We still need to build the chicken ladder and we need to finish the run. The chicks are so young they are happy hanging in the coop full time for now. We have super heavy duty hardware on the doors. I chose a morning glory blue and white for the exterior, and yellow for the interior. The roof is shingled and the entire coop is insulated. All of the windows are screened with 1/2" hardware cloth and then have a hinged plexiglass window on top.
The front (people) door is very large and swings out wide to allow for easy access.
My husband also designed and installed a built in feeder. It is very easy to fill and stores a lot of feed.
This one piece roosting bar is actually removable for cleaning or repainting as needed. I know it won't be long before the brilliant white paint will be poop splattered.
There are three nesting boxes. I plan on installing nesting box curtains before the girls start laying to allow for more privacy.
I have placed a boot mat below the roosts to collect poop. It is easy to clean and to remove as needed.
The west side of the coop. As you can see it is wired for power and there is an electrical outlet on the interior of the coop. It is easy to plug in an extension cord for any electrical needs. The nesting boxes all have their own hinged top so I can easily collect eggs without disturbing another hen in a neighboring box.
The East side of the coop. Here you will find the storage space and the broody box.
This space is already filled with my chicken first aid kit, extra bedding, food, and cleaning supplies.
Here is the front of the broody box. The door/window has two parts. On a hot day you can easily open just the plexi-glass.
The whole door swings wide to allow access to the broody box.
I wanted a space where a sick, broody, or injured hen could go. The wall to the rest of the coop is separated by hardware wire so the hens will still be able to view the out of commission hen. I'm hoping this will make it easier for the flock to stay whole and not have to worry about a reintroduction period. I wish this spot was a little easier to reach. I need a step stool to be able to reach all the way back to the rear of the space.
The chicks who are almost 5 weeks old really love their new space. They were quickly outgrowing the brooder.
I know it won't be long until they will be all grown up and I'm grateful I have an amazing coop!