"Chichen Paradise" Coop
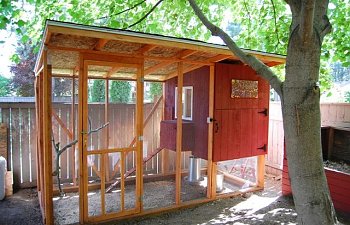
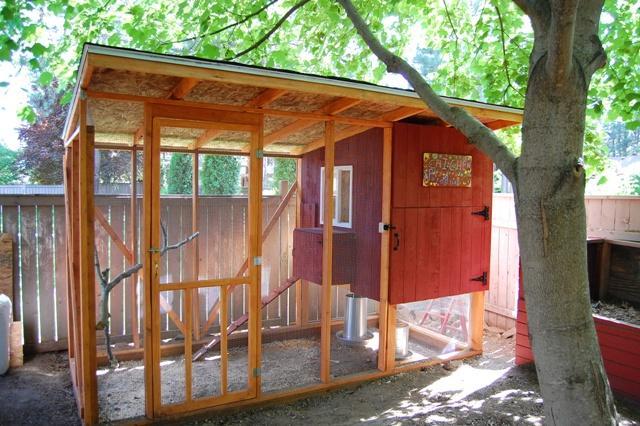
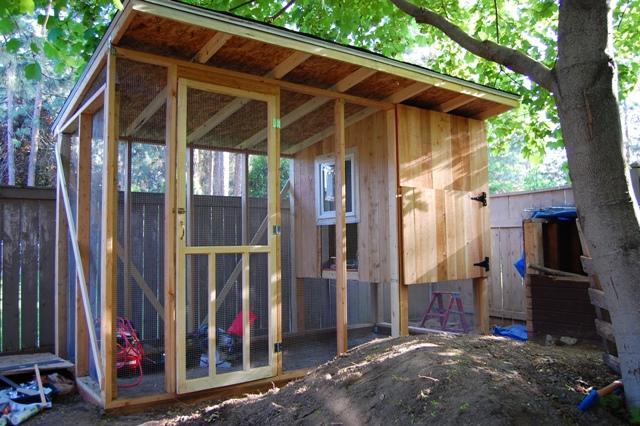
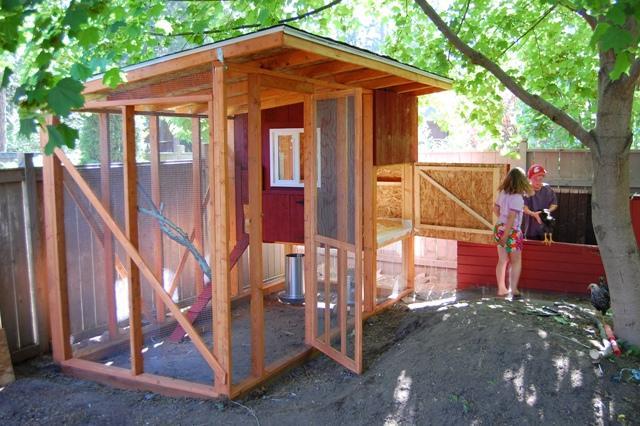
 Above is the finished coop. Below is the description of how I got there.
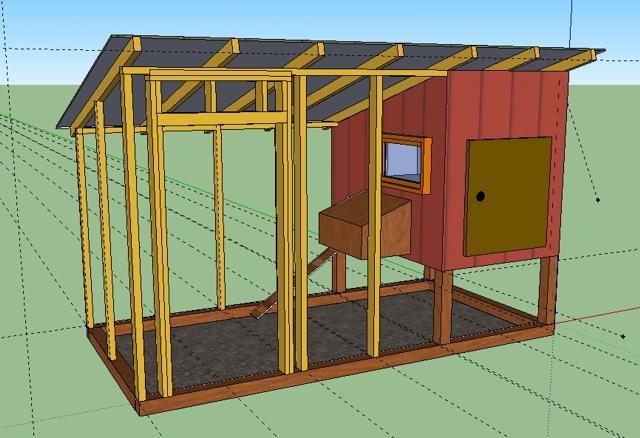
1. Google Sketchup
I started by researching the different coops on this site and came up with a rough idea of what I wanted. My goal was to make a coop for five chickens with a minimum of 4 feet per bird inside the coop and 10 sq ft per bird in the run. Google Sketchup is a free download and with a little bit of a learning curve I came up with the concept below. When it came time to put it together I realized some of the obvious design errors, but it at least got me started. Go here for the full three dimensional sketchup I made pictured below. Just make sure you recognize that it is not a ready to build design. It is a detailed conceptual design that is quite a bit different from what we ended up with. The measurements are available if you upload the coop and use the measurement tool. When we set out to frame the walls I printed up four different perspectives on the coop and wrote in the measurements as a guide. Worked out great.
2. The Foundation is made of treated 4x4's. The dimensions of the foundation are 12ftx5ft. 12 feet is a standard lumber size and helps the rest of the framing come out nicely in 2 foot increments. We connected with foundation lumber with metal corner brackets on the inside of each corner and flat metal L brackets on the bottom. We leveled the existing ground which is already pretty sandy and compacted it. We decided not to use hardware cloth as a barrier on the bottom of the of the run floor. I like the idea of the chickens being able to scratch around and dig into the dirt floor without running into metal. For predator protection we placed large rocks around most of the outside of the foundation beams. I didn't realize how much the chickens would dig around the foundation and so I retrofitted the inside with smaller rocks around the inside of the foundation beams to keep them from messing up the level foundation. We're in a suburb without intense predator issues. It's hard to imagine a weasel hanging out anywhere nearby. Hopefully I won't have to update this with a tragic tale of chicken coop carnage.
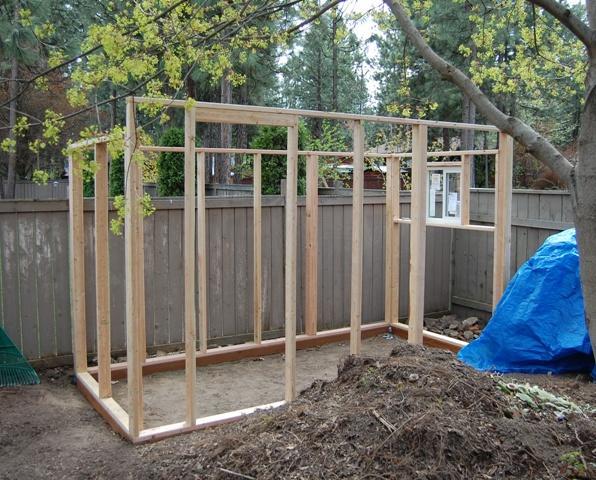
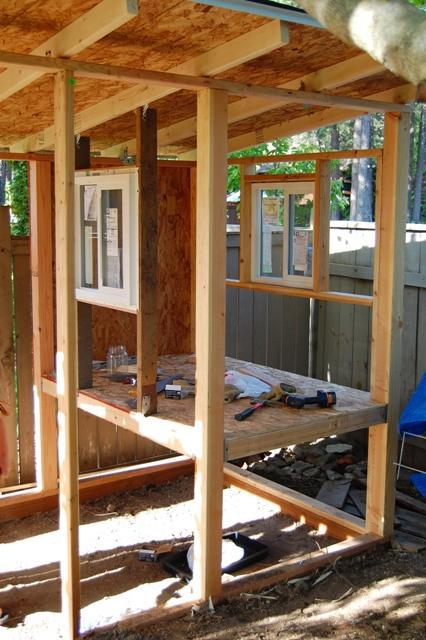
3. Framing
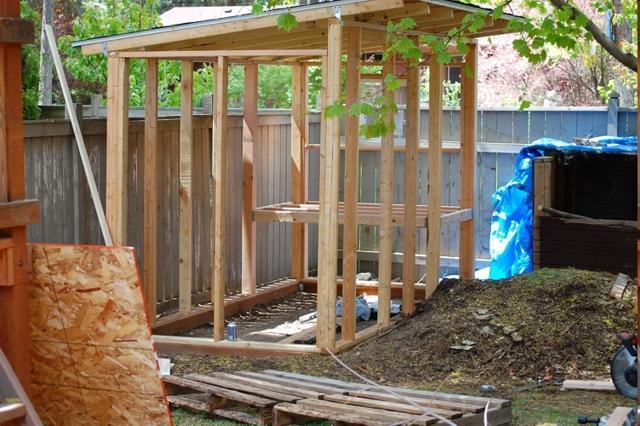
The frame is made of 2x4's with 12 foot headers and footers on the long edge. The short sides were framed to fit between the long walls. I used 4x4's for the corners of the indoor coop. I initially thought this was unnecessary but now that it is put together I'm glad for the extra two inches to hang the floor joists and beef it up. The long walls have a 2x4 every two feet on center except for the door, which is framed to size moving the 2x4 that is closest to the edge toward the end wall. I had the door ahead of time and simply placed it in the space to size the opening. Same thing with the window on the end - simply placed it in the middle of the cross beam and framed around it. I had an 8 inch elevation from front to back over 5 feet of distance. If I did it over I would probably add and inch or two to give the roof a little more slope. We used a framing nail gun and were able to put the pieces together in a little over an hour.
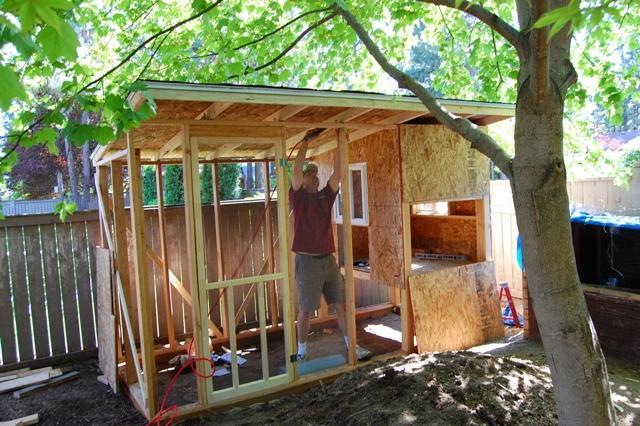
4. Roof
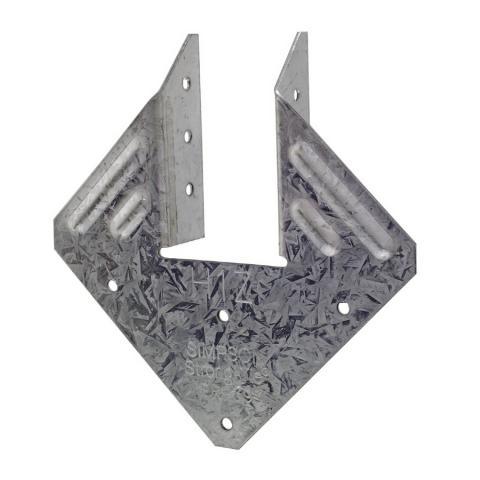
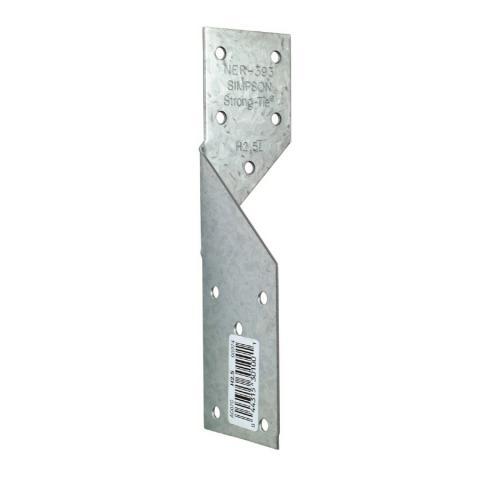
The roof is made of three OSB boards set on standard length 8ft 2x4's attached every 2ft on center. Again, it was nice not having the cut the 2x4's or boards. I also chose not to notch the rafters where they meet the headers. It seems unnecessary with with metal brackets and they set on their just fine. I used two different kinds of metal brackets to attach the roof joists.(See below)
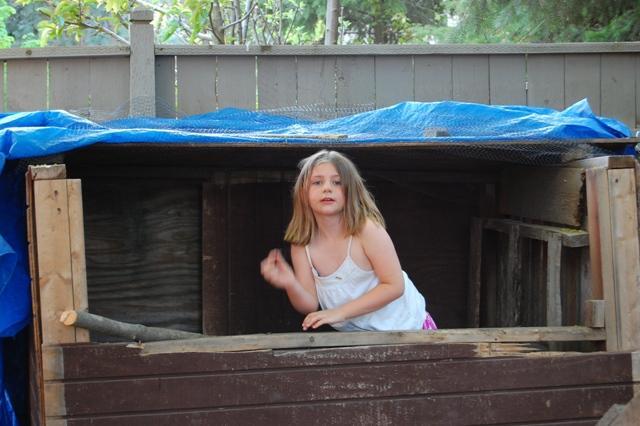
It took a little work to get everything square up there. It wasn't perfect but I kept reminding myself that it was a chicken coop. We topped the wood with paper, asphalt shingles and flashing. It was a lot of weight but was cheaper than some of the panel roofing material. If I could have afforded it I would have gone with 8 foot sheets of metal roofing material that would have fit nicely on the two foot spaced joists. The paper and shingles were free so that won out. We used the compost box as a temporary coop to the right while the main coop was under construction. Lily liked it in the temporary coop too as seen in the picture below.
5. Coop Floor
I used simple joist hangers to create the floor. I wasn't sure how high to make it and decided on 2 ft up from the bottom footer. I'm happy with the height.
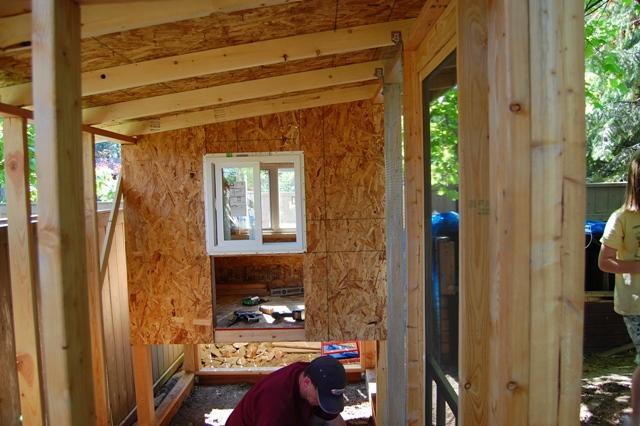
6. Coop Walls
I used the make it up as you go method of construction which worked for me. I remember reading someone saying they wished they had started with a set design as opposed to coming up with their own. I had the opposite experience, enjoying feeling my way through it. The two windows are set directly across from each other with the clamps on the outside.
Notice above I originally tried to hang the door with hinges that were long triangles on both sides of the hinge. The screws went into the 4x4 timbers with this so I have to remove them and use hinges with a short rectangle on one side and the triangle on the door.
Notice above that the door is just a piece of OSB with 1x4's and 1x2's as braces. We'll see how it holds up over time. I don't think door design and manufacturing is in my future.
7. Other Details
We used OSB boards for the walls and floor and then used cheap cedar planks as the siding. We used a random piece of OSB board to determine the size of the door. In retrospect I would have made it a little taller for easier entry. The roost is just inside the door so that will be the major poop clean out. We used .5 inch hardware cloth attaching it with staples. THe hardware cloth was a lot of work to get it to the right size to fit the spaces. I wasn't sure what I was going to do for the end wall because the spaces were more than 24 inches. I found a roll that was 36 inches wide and used that for the end. I was glad for the two foot dimensions of most of the framing for fitting the sheets of hardware cloth. Hanging the coop door was a little tricky but finally figured out the long hinges with a rectangular end worked. At first I thought it would be rickety because of the lack of lateral braces so I added the three angled 1x3's which beefed it up and then when walled in the coop, it really firmed it up. It doesn't move at all now.
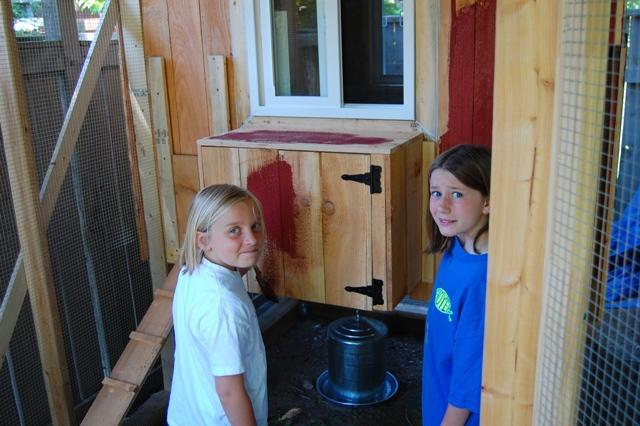
8. The Nest
I boxed in the nest off the main coop to make more room and set it off. I was originally going to slope the roof of the nest but it works better for the kids to open the door out instead of up at an angle. I haven't seen the chickens roosting on top of it yet but I'm guessing that's why a sloped roof is desirable. I read up on coop size and with five chickens decided to go with on spacious nest instead of multiple small nests. I've read so many people say the chickens lay their eggs in one nest anyway. This one is big enough for two to nest at the same time. I didn't raise it off the coop floor as many recommend but I like the way it fits nicely into the frame under the window.
9. The Floor Cover
When I told the girls we were going to paint the floor they kept on wondering why we were going to paint the dirt. It took them awhile to figure out I was talking about the coop floor. I painted the floor and bottom 4 inches of the walls with a good sealer/primer. I didn't paint the whole inside partially because I didn't want the extra thing to do but also because I like warm feel of the wood as opposed to the stark white. I have to believe those small chicken brains find it more soothing than the white. We'll see how messy it gets. I bought three large ceramic tiles from the used builder supply and placed those directly under the roost which seems to work real well. I love how the floor sweeps right the door with no lip or anything to get over. This will make clean up extra easy. For the run so far I'm just going with the sandy soil with some shavings over it to keep the dust down. I'm glad for the nice roof to keep the water out. We've had several very large rain storms and the coop and run stayed dry and odor free.
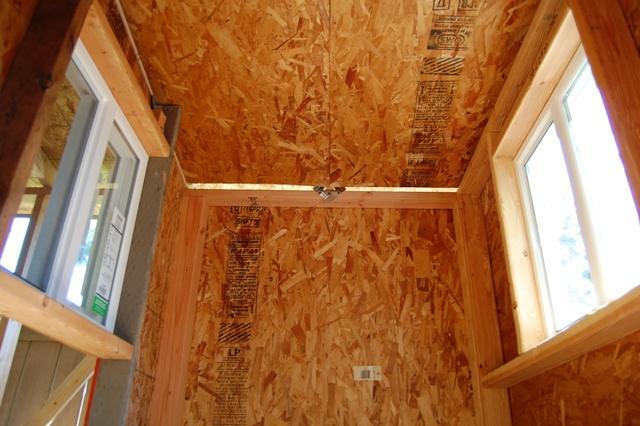
10. Ventilation
The roof brace pictured below at the back top of the coop naturally left a one to two inch gap that I mentally tranformed from shoddy construction into ventilation. The coop is right next to a large maple tree so it gets plenty of shade and never really heats up during the day. I'm sure our greater challenge is going to be to button it up for the winter and keep it warm enough for the chickens. I'll seal this up as much as I need to for the winter while at the same time making sure there is enough ventilation.
\
11. Paint and Coating
We painted the coop with Barn Red cheap paint from the local farm supply outfit. I coated the exposed lumber with Thompson's water seal "natural cedar" coating. I wish I would have done this before attaching the hardware cloth but it worked out. The painting was a great thing for the kids to participate in and get some ownership of the coop. I put an extra roost on the inside of the run.
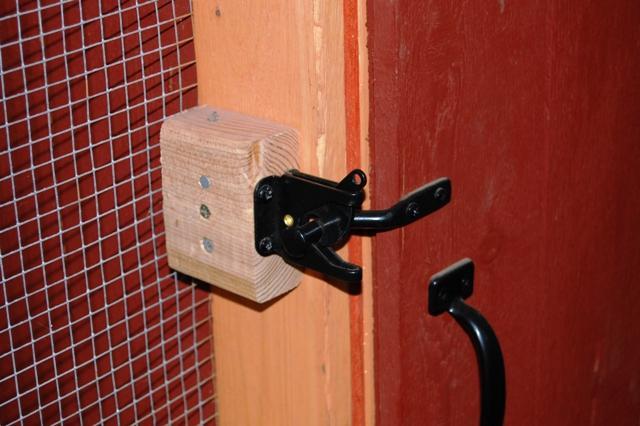
12. Finishing Touches
The last challenge was figuring out how to secure the coop door on the outside. I finally figured out how to use a gate closer latch by putting it on reverse so instead of the rod sticking out away from the door it was set back, which enabled it to reach back to where the clamp was set. See pic below.
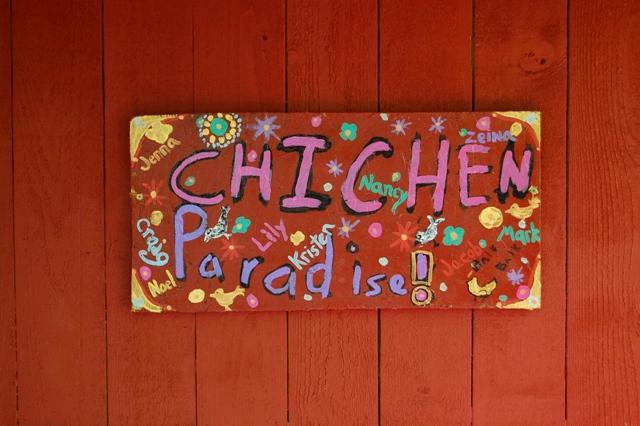
And my favorite part of the coop is the sign the kids made featuring pictures of all the chickens and the names of the neighborhood folks connected to the coop. Spelling is courtesy of my daughter who consulted us on the spelling of "Paradise" but was sure she new how to spell "Chicken".
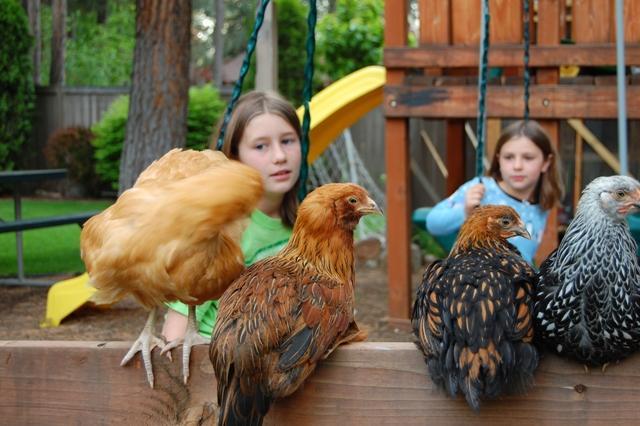
Now we're off and running. The chickens are still getting used to going on the swing though.
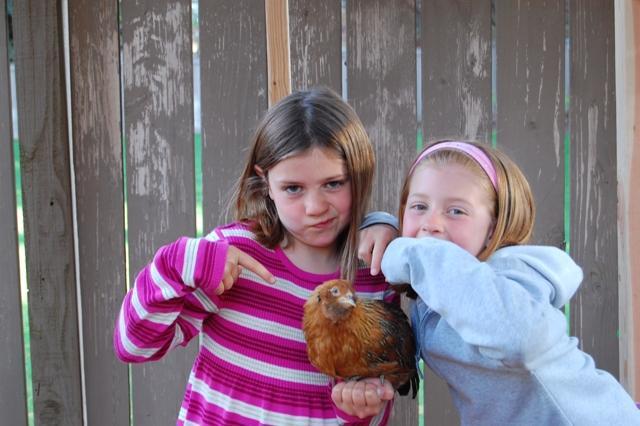
And we've got to work on keeping our "chicken pride" in check. The kids can be heard in the picture below saying, "That's right, our chickens are the bomb!"
Things to Change or Add:
It's a little hard to say at this point. Overall I'm very pleased with the design. It seems to really confirm what people say about the number of chickens and the space recommended. Four feet per bird in the coop is absolutely about right. We could probably add one more. Given that we are already out of compliance with local zoning laws I think we'll stay at five or under. I bought the large metal containers for food and water and I can tell they will be well worth the cost over time. Low maintenance is going to be key for us. I've talked to a lot of people who had a coop for a year and got rid of them because of the upkeep. I feel like the integrated design we used it going to keep us going for the long haul.
If I had the time I probably would have prepped the foundation a little bit more with crushed gravel as the underlay but it seems to be fine. One thing I may have to retrofit is the size of the door for the chickens to get int he coop. It's plenty tall but only about 9 inches wide. We'll wait and see just how fat the chickens get.
I am glad I took about two months of cogitating on different designs by looking over the site here and getting some books. No one seemed to have the exact right ready-made design for us but with enough time to think it over we ended up with one that fit the bill. This was the coop that was the primary inspiration for ours.
I spent about a month cruising Craigslist hoping that we could find a used coop. I actually found the playground coop from this site for sale for $500 but it was too small for five chickens. I realized along the way that given the transfer of disease among chickens it's probably best to start from scratch. It was a ton of work but the process with the kids participation bodes well for their ownership of taking care of the chickens.
I wasn't great a keeping track of costs but I'm guessing we came out in the $700 range. Hardware cloth, lumber and windows made up about 75% of the cost. We saved a lot on the roof using scraps. I was surprised that buying a new door at Lowes for $20 and two windows for $120 was not much more expensive that buying used. I did my best to source used stuff at local building supply stores but didn't have much luck.
We have two Silver Laced Wyandottes, one Golden Laced Wyandotte, one Ameraucauna, and one Buff Orpington. They all get along well and have great temperaments with the kids. I'm glad for the variety. So far the Buff is the Queen of the coop which is contrary to things I read that said you need to be careful in a mixed coop that Buff's don't get bullied too much.
To find out more background on how we came to have a chicken coop go to www.yearofplenty.org.
UPDATE: 7/31/2009
The chickens were apparently so excited at winning the coop page contest, they decided to lay their first egg and in our unconventional nest arrangement. That was one of my big questions regarding our coop. Our nest is different from any of the others I've seen on the site so I was anxious to see if they could figure it out. Scrambled eggs for breakfast!
1. Google Sketchup
I started by researching the different coops on this site and came up with a rough idea of what I wanted. My goal was to make a coop for five chickens with a minimum of 4 feet per bird inside the coop and 10 sq ft per bird in the run. Google Sketchup is a free download and with a little bit of a learning curve I came up with the concept below. When it came time to put it together I realized some of the obvious design errors, but it at least got me started. Go here for the full three dimensional sketchup I made pictured below. Just make sure you recognize that it is not a ready to build design. It is a detailed conceptual design that is quite a bit different from what we ended up with. The measurements are available if you upload the coop and use the measurement tool. When we set out to frame the walls I printed up four different perspectives on the coop and wrote in the measurements as a guide. Worked out great.
2. The Foundation is made of treated 4x4's. The dimensions of the foundation are 12ftx5ft. 12 feet is a standard lumber size and helps the rest of the framing come out nicely in 2 foot increments. We connected with foundation lumber with metal corner brackets on the inside of each corner and flat metal L brackets on the bottom. We leveled the existing ground which is already pretty sandy and compacted it. We decided not to use hardware cloth as a barrier on the bottom of the of the run floor. I like the idea of the chickens being able to scratch around and dig into the dirt floor without running into metal. For predator protection we placed large rocks around most of the outside of the foundation beams. I didn't realize how much the chickens would dig around the foundation and so I retrofitted the inside with smaller rocks around the inside of the foundation beams to keep them from messing up the level foundation. We're in a suburb without intense predator issues. It's hard to imagine a weasel hanging out anywhere nearby. Hopefully I won't have to update this with a tragic tale of chicken coop carnage.
3. Framing
The frame is made of 2x4's with 12 foot headers and footers on the long edge. The short sides were framed to fit between the long walls. I used 4x4's for the corners of the indoor coop. I initially thought this was unnecessary but now that it is put together I'm glad for the extra two inches to hang the floor joists and beef it up. The long walls have a 2x4 every two feet on center except for the door, which is framed to size moving the 2x4 that is closest to the edge toward the end wall. I had the door ahead of time and simply placed it in the space to size the opening. Same thing with the window on the end - simply placed it in the middle of the cross beam and framed around it. I had an 8 inch elevation from front to back over 5 feet of distance. If I did it over I would probably add and inch or two to give the roof a little more slope. We used a framing nail gun and were able to put the pieces together in a little over an hour.
4. Roof

The roof is made of three OSB boards set on standard length 8ft 2x4's attached every 2ft on center. Again, it was nice not having the cut the 2x4's or boards. I also chose not to notch the rafters where they meet the headers. It seems unnecessary with with metal brackets and they set on their just fine. I used two different kinds of metal brackets to attach the roof joists.(See below)
It took a little work to get everything square up there. It wasn't perfect but I kept reminding myself that it was a chicken coop. We topped the wood with paper, asphalt shingles and flashing. It was a lot of weight but was cheaper than some of the panel roofing material. If I could have afforded it I would have gone with 8 foot sheets of metal roofing material that would have fit nicely on the two foot spaced joists. The paper and shingles were free so that won out. We used the compost box as a temporary coop to the right while the main coop was under construction. Lily liked it in the temporary coop too as seen in the picture below.
5. Coop Floor
I used simple joist hangers to create the floor. I wasn't sure how high to make it and decided on 2 ft up from the bottom footer. I'm happy with the height.
6. Coop Walls
I used the make it up as you go method of construction which worked for me. I remember reading someone saying they wished they had started with a set design as opposed to coming up with their own. I had the opposite experience, enjoying feeling my way through it. The two windows are set directly across from each other with the clamps on the outside.

Notice above I originally tried to hang the door with hinges that were long triangles on both sides of the hinge. The screws went into the 4x4 timbers with this so I have to remove them and use hinges with a short rectangle on one side and the triangle on the door.
Notice above that the door is just a piece of OSB with 1x4's and 1x2's as braces. We'll see how it holds up over time. I don't think door design and manufacturing is in my future.
7. Other Details
We used OSB boards for the walls and floor and then used cheap cedar planks as the siding. We used a random piece of OSB board to determine the size of the door. In retrospect I would have made it a little taller for easier entry. The roost is just inside the door so that will be the major poop clean out. We used .5 inch hardware cloth attaching it with staples. THe hardware cloth was a lot of work to get it to the right size to fit the spaces. I wasn't sure what I was going to do for the end wall because the spaces were more than 24 inches. I found a roll that was 36 inches wide and used that for the end. I was glad for the two foot dimensions of most of the framing for fitting the sheets of hardware cloth. Hanging the coop door was a little tricky but finally figured out the long hinges with a rectangular end worked. At first I thought it would be rickety because of the lack of lateral braces so I added the three angled 1x3's which beefed it up and then when walled in the coop, it really firmed it up. It doesn't move at all now.
8. The Nest
I boxed in the nest off the main coop to make more room and set it off. I was originally going to slope the roof of the nest but it works better for the kids to open the door out instead of up at an angle. I haven't seen the chickens roosting on top of it yet but I'm guessing that's why a sloped roof is desirable. I read up on coop size and with five chickens decided to go with on spacious nest instead of multiple small nests. I've read so many people say the chickens lay their eggs in one nest anyway. This one is big enough for two to nest at the same time. I didn't raise it off the coop floor as many recommend but I like the way it fits nicely into the frame under the window.
9. The Floor Cover
When I told the girls we were going to paint the floor they kept on wondering why we were going to paint the dirt. It took them awhile to figure out I was talking about the coop floor. I painted the floor and bottom 4 inches of the walls with a good sealer/primer. I didn't paint the whole inside partially because I didn't want the extra thing to do but also because I like warm feel of the wood as opposed to the stark white. I have to believe those small chicken brains find it more soothing than the white. We'll see how messy it gets. I bought three large ceramic tiles from the used builder supply and placed those directly under the roost which seems to work real well. I love how the floor sweeps right the door with no lip or anything to get over. This will make clean up extra easy. For the run so far I'm just going with the sandy soil with some shavings over it to keep the dust down. I'm glad for the nice roof to keep the water out. We've had several very large rain storms and the coop and run stayed dry and odor free.

10. Ventilation
The roof brace pictured below at the back top of the coop naturally left a one to two inch gap that I mentally tranformed from shoddy construction into ventilation. The coop is right next to a large maple tree so it gets plenty of shade and never really heats up during the day. I'm sure our greater challenge is going to be to button it up for the winter and keep it warm enough for the chickens. I'll seal this up as much as I need to for the winter while at the same time making sure there is enough ventilation.
\
11. Paint and Coating
We painted the coop with Barn Red cheap paint from the local farm supply outfit. I coated the exposed lumber with Thompson's water seal "natural cedar" coating. I wish I would have done this before attaching the hardware cloth but it worked out. The painting was a great thing for the kids to participate in and get some ownership of the coop. I put an extra roost on the inside of the run.
12. Finishing Touches
The last challenge was figuring out how to secure the coop door on the outside. I finally figured out how to use a gate closer latch by putting it on reverse so instead of the rod sticking out away from the door it was set back, which enabled it to reach back to where the clamp was set. See pic below.
And my favorite part of the coop is the sign the kids made featuring pictures of all the chickens and the names of the neighborhood folks connected to the coop. Spelling is courtesy of my daughter who consulted us on the spelling of "Paradise" but was sure she new how to spell "Chicken".
Now we're off and running. The chickens are still getting used to going on the swing though.
And we've got to work on keeping our "chicken pride" in check. The kids can be heard in the picture below saying, "That's right, our chickens are the bomb!"
Things to Change or Add:
It's a little hard to say at this point. Overall I'm very pleased with the design. It seems to really confirm what people say about the number of chickens and the space recommended. Four feet per bird in the coop is absolutely about right. We could probably add one more. Given that we are already out of compliance with local zoning laws I think we'll stay at five or under. I bought the large metal containers for food and water and I can tell they will be well worth the cost over time. Low maintenance is going to be key for us. I've talked to a lot of people who had a coop for a year and got rid of them because of the upkeep. I feel like the integrated design we used it going to keep us going for the long haul.
If I had the time I probably would have prepped the foundation a little bit more with crushed gravel as the underlay but it seems to be fine. One thing I may have to retrofit is the size of the door for the chickens to get int he coop. It's plenty tall but only about 9 inches wide. We'll wait and see just how fat the chickens get.
I am glad I took about two months of cogitating on different designs by looking over the site here and getting some books. No one seemed to have the exact right ready-made design for us but with enough time to think it over we ended up with one that fit the bill. This was the coop that was the primary inspiration for ours.
I spent about a month cruising Craigslist hoping that we could find a used coop. I actually found the playground coop from this site for sale for $500 but it was too small for five chickens. I realized along the way that given the transfer of disease among chickens it's probably best to start from scratch. It was a ton of work but the process with the kids participation bodes well for their ownership of taking care of the chickens.
I wasn't great a keeping track of costs but I'm guessing we came out in the $700 range. Hardware cloth, lumber and windows made up about 75% of the cost. We saved a lot on the roof using scraps. I was surprised that buying a new door at Lowes for $20 and two windows for $120 was not much more expensive that buying used. I did my best to source used stuff at local building supply stores but didn't have much luck.
We have two Silver Laced Wyandottes, one Golden Laced Wyandotte, one Ameraucauna, and one Buff Orpington. They all get along well and have great temperaments with the kids. I'm glad for the variety. So far the Buff is the Queen of the coop which is contrary to things I read that said you need to be careful in a mixed coop that Buff's don't get bullied too much.
To find out more background on how we came to have a chicken coop go to www.yearofplenty.org.
UPDATE: 7/31/2009
The chickens were apparently so excited at winning the coop page contest, they decided to lay their first egg and in our unconventional nest arrangement. That was one of my big questions regarding our coop. Our nest is different from any of the others I've seen on the site so I was anxious to see if they could figure it out. Scrambled eggs for breakfast!