I decided on a tractor style coop for now because it would be a lot more time before I can put in something permanent here and I wanted chickens now.

I looked at a lot of designs. I wanted one that could hold 4-6 large hens, heavy enough to not blow away, light enough I could move by myself, Inexpensive, simple to assemble, predator proof, and easy to clean. And of course simple enough for me to build. I came up with a rectangle of 6X8X3 that could hold 5 large hens. It is open air to be lighter, easier to clean, and healthier for the birds, but this will required winter proofing in the fall. Probably with tarps and straw bales.
The math: I love spreadsheets, one of the things I did to figure out which coop design was best for me was to put the materials, the cost per item, the formula to multiply that out (so I don't have to do it manually) and then that total divided by the number of hens it could hold. This coop was suppost to be about $150, or about $30 per bird. The PVC one by Fresh Eggs Daily worked out to also $150 localy, they had it as $121 before paint for them. The cost differnce was due to me wanting a skirt and a differnt hasp/lock. I also looked at Ana White's A frame tractor. She says it cost less then $100 for her. It only holds four hens. My calculations came up with $121, probably also due to hardware cloth (she used chicken wire and no skirt). All three are about the same cost per chicken it can hold. The PVC one looks harder for me to build even without the awesome door, I am simply not able to cut PVC or use a jigsaw to cut the rounded door. The Ana White one looks harder to clean and only holds four hens. (though I love her other projects). So I made my own design.
I went to school for graphic design. I took a sketching class. I can sketch if I think about it. But I clearly didn't use that skill in my plans:
Mostly though the plans were to figure out how much wood to buy and how to get the most space for the money. The original plans also didn't call for an egg door, but my daughter couldn't reach through the top door so I added one for her. It was easier then expected.
I built the top and bottom in my basement, where it is dry and warmer. Then I carried those out the sliding door (walk out) and attached the vertical pieces in the driveway. After that it was just a matter of putting on the hardware cloth and sides/roof/doors.
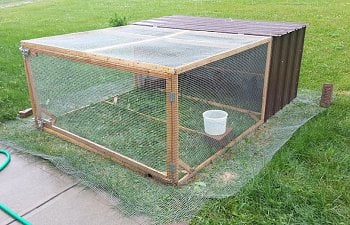
The hardware cloth is Origin Point 133650 19-Gauge Galvanized Hardware Cloth Fence, 50-Foot x 36-Inch With 1/2-Inch Openings. The wood is untreated 1X2 pine. I used whatever screws worked for the most part to attach the wood. But mostly Kreg pocket hole screws since I used a Kreg pocket hole jig to attach everything. I like pocketholes, I think they split less then going straight into the end of the wood. and it makes it nice and tight.
For the hardware cloth and the metal sides and roof I used metal screws with big fat heads so I didn't have to use washers or pennies. They went into the metal wonderfully and seem to be holding to the wood fine (except in a few spots where the metal was a bit far from the wood for it to catch right, but it still seems safe enough)
Upside down to put on the skirt. I put the skirt under the metal sides.
Not done yet (see the lack of hardware cloth on the roof), but good enough for these 5 week olds to spend a bit of time outside when it was warm enough. They came inside at night (mostly due to the coop not being finished.) The metal pan was a dust bath.
The chicks here are about 6 weeks, they had a lamp in case they got cold at night.
Almost 13 weeks. I need to get something to keep them off the food bucket. The blue thing is for grit. Nest box will go on the left, the extra long support is there to keep them from pooping in the nest box. Here they are almost 12 weeks.
Egg door:
Front door locks:
It still has some work to be done, the water buckets will be hung, and I need some garden staples to hold down the skirt instead of the bricks. I also need to finish the locks on the top door.
Update 30 Aug 2015:
I have added wheels under the covered end.
The wheels turn and if needed can be locked in place. I had to add another support board to attach them to. They do make the back of the coop a bit higher as seen below:
But they make moving the coop much easier.
Food/Water/Grit
You can see the 5 gallon bucket feeder I tried to make out of a green Menard's bucket in many of these photos. I say 'tried' because it didn't work out for me as well as it did for many people in the thread: Make your own - No waste - 5 gallon (25# feed) bucket feeder for about $3. My pipe just falls into the bucket when it gets low enough. Maybe I just need to keep it fuller? I am terrible at cutting holes though, but I think if it were smaller the pipe would fall out. I am thinking of switching to a PVC J system which would be easier to attach to the coop anyway.
For grit I got a simple blue hang on style food container. I added a piece of hardware cloth to one side under the roof and hung it on there. The oyster shell will go next to it when they are older.
Water. This is one thing that concerns me the most. I don't want it to freeze, I don't want to fill it up multiple times a day to keep it from freezing, and I don't want it being dirty constantly. A chicken nipple solves at least one of those issues, a horizontal nipple solves most of it. So I ordered a set of 5. One I put into an empty vinegar container for the chicks to use. In retrospect I should have put it lower. I wanted a container with a small top so the chicks couldn't drown. The soft plastic was hard to drill though and very hard to get to work without leaking. I had to use some aquarium safe silicone to secure it. The big girls are using some 5qt containers I got. They are food safe plastic though they were marketed for paint. The problem with them is they don't have lids so they are getting dirty anyway. And my one pullet likes to drink from the top, which is fine since at least she isn't pooping in it. Eventually the plan is to hang them. For winter I need to get something to heat the water to keep it from freezing.
4 week old buff Brahma getting a drink:
Separating different ages
I got three more babies after loosing one of the first set. I put in a chicken wire divider to keep the babies separate from the big girls. First I had to put in two more wood pieces on each end. You can see the back one below, the chicks here are about 3.5 weeks old. They started staying out overnight at 4 weeks. In under a week they were roosting and rarely did I see them actually under the lamp. The night temps were in the mid 60s mostly and daytime was around 80.
Here is a side view where you can see the front brace. Because of the door I attached it to the inside. The door wire creates a ( shape where the babies can slip through if they choose to and visit the big girls.
I used some twine to attach the chicken wire along the top first, then down the front brace, then I cut a slit in the back to allow for the roost, and wrapped the cut wire around the other side to hold the slit together. Then tied the back wire to the back brace. The wire I was using was 4' and the coop is 3' tall so this gave me extra on the bottom to keep the big girls from slipping under. I also put rocks and bricks along this part to hold it down.
Things I would change if I made another or plan to change
Wheels. They were a part of the original idea, but they are expensive and added considerably to the price of the coop. But after adding the metal it was quite heavy for one person. I can move it, but it's hard on me and the coop. I plan to add two wheels to the back corners.
Done as of end of August 2015
The sides/roof: I used metal because it was the cheapest to get and reasonably easy for me to cut as I already had tin snips. Plastic would have been lighter though, but I am not sure how much harder it would have been to attach to the coop or to cut. I think that metal is lighter then wood and will hold up better for a similar price. If I could do plastic though I would.
I need to adjust the area above where the nest box will be since the big girls like to roost there. They did this before the chicks were in there so it's not just the divider/light. They were sliding on it though. And sometimes they sleep on the food bucket. Thinking about doing a pipe one that will attach to the coop and be easier to just move the coop.
Like I mentioned above the food bucket has problems. They sleep on it, and the pipe won't stay put. So a J feeder attached to the back wall should solve those problems. I am really liking this one from Rachel at Harmonious Homestead.
ETA: bought parts end of Aug 2015. Need to figure out how to attach to my coop.
I wouldn't mind the roof being more solid. But that adds to the weight and the cost. I might try row cover plastic which should be cheap. I might do that for the winter and put straw bales around the sides to help keep them warm but still allow for ventilation.