Here it is! The fabulous “Chicken Coop From a Twin Bed!” created from found materials, two drills, a bucket of screws, a hand-held circular saw—and a tape measure (used periodically). I have no experience building anything, but I read a lot of DIY—I needed space upstairs in a bedroom, so I chose to get rid of an old wooden twin bed, rather than a futon.
First: take apart bed frame and drag outside. While it was apart, I stapled in some hail screen donated by a neighbor to form two future windows. The bed size seemed rather large, so I cut 16” off the length, which I later regretted, then the whole thing was screwed back together. I turned the 16" piece upright and screwed it into the back corner.
I saved the bottom mattress support for later and opted to cut down a salvaged, hollow-core door. (I’d gotten 3 of them from the dump, along with their hinge hardware and framing wood. I took that all apart and saved it.) This was cut in half—I figured it would be easier to get two halves out later if I needed—for cleaning or replacement.
Next, two posts that I had salvaged from a dumpster were attached to the front of the bed—one on each side. I regret not cutting the top of them at an angle before I attached them! Then I decided to paint the whole thing white with some Kilz from my shed--and I also took some wheels off a dead mower--these went on the bottom--I had a heck of a time detaching those suckers. Argh. W-D40 helped.
There was an old dresser drawer under the couch, so I added a piece of thin plywood (salvaged) down the center to make a double nest box. I changed my mind about this later. The neighbor had thrown out a broken, small dresser so I snagged that and cut down the side to make a chicken ladder. Here it is above--with the wheels added.
I made new nest boxes out of smaller drawers, cutting the backs down so they were 14x14--again, it would be easier to move out a couple smaller boxes than one big double box. Borrowing clamps from the woods teacher, they were easy to glue/nail together. I put on high sides and painted them white also. After that, I cut another hollow-core door up, creating a back wall and toenailed that in along with a 2x4 scrap on the top edge for strength and a piece of door framing. (The roof would rest on this low back wall.)
Next, another 2x4 scrap (YEAH, dumpsters!) and doorframe scrap went across the top front, and then I cut up some scrap masonite for the triangular sides, some of which I had to piece togethr. I kept painting, thinking this would cut down on areas that might harbor mites--and I had a huge sack of caulk in the basement, so all of my uneven edges were filled in! After that, you can see that I added another 2x4 piece at an angle (yes, I did cut angles this time on the ends, whew) running from the high to the low side. Twice. A friend volunteered some old decking wood which we cut into 2x2's at his house--this would form the roof frame. Later, I added the free door framing vertically. For a quick temporary roof--to keep things dry, I stapled on a piece of shower plastic later--I liked it! Plus, the roof is removable!
Now, I realize you can see a lot of gaps on those sides. These were filled in from the inside with more pieces of triangular cut masonite--AND pieces of insulation in between; I just cut and tacked in pieces of wood to fill it all--then caulked and painted.
The dump also had some type of thin plywood stuff like paneling and that was used to make little side shutters that could raise up and down to let in a breeze, using those free hinges of course. Whenever I go to Menards, I take their scrap wood out of their trash and ask if I can have it for crafts. They always say 'yes'--it framed out the shutters! A center (almost center!) post was added in front--that sucker will not come out!
Oh gosh, maybe I said this backwards--I think I did the insides, the insulation, then the outside….
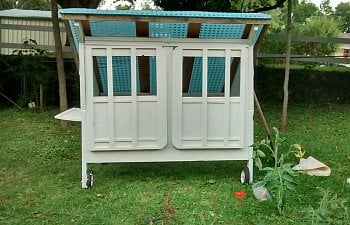
Since I never finished painting my garage, I used the white paint to cover the Kilz. That looked much better. Now, it was time to cut the mattress frame in half and shorten it a bit, then create doors for the front--big doors for easy cleaning. Again, I used lots of scraps and then had to finally buy a piece of plexiglass (I had one already), so that costs about 15$?) The doors were hinged on each side, with a scrap of wood to hold them shut. (Did I mention that a neighbor also ripped up an old camper--and I got to take off a lot of hinges, screws, locks, handles, etc? I don't mind using pre-owned items at all! Why buy something if you don't have to?!) Make sure you predrill everything, especially plexiglass or it will crack.
Its easier (lighter) to push around the yard without the floor and roof on. Later, I added curtains and a 'secret door' on the front--built right within the big door. I cut out a section with a jigsaw and added small interior hinges and a lock. You can't see it from the outside, but it is awesome--I open it from the inside, shut the door; the chicks come out and it stays cozy inside…
Sadly, I am going with the deep litter method--I currently have leaves, pine shavings and a few huge bags of sawdust covering my cheapo blue TILE FLOOR! I couldn't resist--they were on sale so I bought enough to cover the white paint--and they cut easily with a scissors--plus easy cleaning later. My chicken roost was made from scraps...although I did change it out later with a removable bar that goes nearly all the way across the coop. My chicks are too young to need nest boxes, so they have plenty of space at this time…
Of course I know predators could poke right through that shower curtain roof, so it was ripped off and replaced with pieces of thin plywood, then silver bubble wrap that a custodian gave to me...then lastly, with pieces of vinyl siding from Restore. I think it cost $2.40 for 4 pieces...I can still take the roof on and off, even though it weighs more. I also wired it down on each corner so heavy winds couldn't lift it this winter. And because I like the aqua shower curtain so well, I mixed some turquoise craft paint into my white paint and painted the underside a light aqua.
Now, meet my 13 week golden-laced Wyandottes and silver cuckoo Maran chickens: Alpha (Mean Girl) Centauri, Halo, Calypso, Andromeda, Coppernica, and Caliope. They are my science chicks, named after space, space stations, etc. Yes, I love science and they will gladly be fed gmo and conventional feed. None of that high-priced organic food for us... garden scraps, kitchen scraps, chick feed, and sprouting grain/fodder....I am FOR all kinds of farming, but refuse to fall for the baloney. My chicks will be quite well-taken care of inside their cozy home and my fenced-in yard! I hope you like the little house--I really enjoyed creating it--a great learning experience and several weekends of work. Now, I just hope my city will allow chickens--we vote this week!