I convinced my wife to let me start raising chickens on our 11 acre wooded lot. I didn't have any formal plans more of a basic concept that evolved as I learned. What looked to be a simple investment of $300 for a prefab coop from Sam's Club for free range chickens turned into a major, multi-month project. First, it seems that most of the prefab coop manufacturer's lie about capacity and use the cheapest materials possible. I could have clearly built a more practical coop from scratch for the money, though it wouldn't have been as cute as the Chicken Chalet from Urban Chicken. It was serviceable and had some nice features, but the claim of 4-6 chickens might work for cornish game hens, but 6 Australorps weren't going to be happy in that little box, especially if they weren't going to be able to free range. Of course that changed to 3 Australorps and 3 Sicilian Buttercups before my wife and I left the feed store with our chicks.
How Plans Change
After attending a lecture with the Cooperative Extension, free ranging waa off the table. With the looming Avian Flu pandemic, the microbiologist giving the lecture stressed the need for a covered run to keep wild bird poop out of the run. I had the aluminum frames left over from two 10' x 10' gazebos which roofs had collapsed under snow, which I thought I just make into a chicken wire cage up until then. Now I need a roof, no tarp on the box is going to do with snow in the winter. I start thinking of starting with a shed roof, but he 10' span is problematic when you consider possible snow loads. so a steep gable roof it is. I/ve ever built one before, but how hard can it be (much harder and expensive than anticipated). The project has now increased in complexity and cost. I learned a lot and continue to learn what works and what doesn't as I've muddled through the project.
In the Beginning There was a Box
Let's start with the basic idea before everything got complicated by reality. The first photo shows the original store bought coop kit put together and aluminum frames set up by the garden. The frames are the key structural element of the run. They have a triangular cross brace across the foot of the vertical panels that have holes for 12" spikes to anchor the structure. This built in footing and dense clay allowed building this without a footing as the load is distributed over a large footprint. Add some solid dimensional lumber on the perimeter and this makes for a solid base as long as the uprights are plumb.
Let's start with the basic idea before everything got complicated by reality. The first photo shows the original store bought coop kit put together and aluminum frames set up by the garden. The frames are the key structural element of the run. They have a triangular cross brace across the foot of the vertical panels that have holes for 12" spikes to anchor the structure. This built in footing and dense clay allowed building this without a footing as the load is distributed over a large footprint. Add some solid dimensional lumber on the perimeter and this makes for a solid base as long as the uprights are plumb.

The coop looks nice enough, has a outside access nesting box, poop tray for a floor, and attached "run", but much too small for confined hens. More of a rabbit hutch with a nesting box at this point. I did consider using it as a chicken tractor for awhile, but that seemed a pain and the girls would still be stuck in a small box. It will go through a few transformations before the end. The second photo shows the run moved to the back end of the coop. I removed the back wall and adding slide out "poop" trays for the floor of that section. Planned on using solid panels, with Reflectix insulation to winterize the "sun porch" when it gets cold. Of course, since this is an organically grown project more than a planned design, that changed. I found the double paned window in the third permutation put out with someone's trash and found it fit the end well, so the girls get a fancy tilt out window for their south facing window. I'm thinking acrylic "storm windows" for the remaining open screened areas so the girls get plenty of light in the winter.
Raising the Roof
Now back to the run. 10' 2 x 6 pressure treated lumber all around the top to support the roof. All tied together with deck screws.
I went with a 2 x 4 roof rafters using plywood gussets made out of leftover PT plywood. I also used metal brackets to makes sure the whole run makes it to Oz in one piece if a big storm comes through. At $.058 each they seemed like cheap insurance and made hanging the rafters single handed possible. 2 x 3 rafter ties on all the inner rafters for strength and stability. I won't be surprised to see the Buttercups in the rafters at some point.
Next come the 1 x 4 purlins to support the Ondura roof panels. A bit rough, but I'm working without a helper and it's just a chicken run after all.
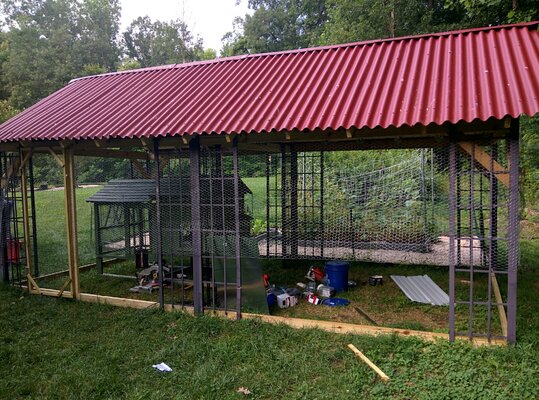
Finally, up go the Ondura panels. I decided on these with purlins on 24" centers as an attractive, low cost option to metal (preferred) or shingles on sheathing. While I was putting up the roof panels, I noticed that things were a bit shaky up there so I added the corner braces and it stiffened up nicely. You can also see the 10' PT 2 x 4's around the lower perimeter to attach the chicken wire and the entry gate in the left corner
Wrapping the box
Now it's time to wrap the box with 150 feet x 48" of 1" chicken wire. Grabbed it on sale at Lowes. Was going to use lattice screws, but realized I had a pneumatic staple gun, so a few hundred staples later, we're ready for the girls. I was happily surprised to find the staples worked well in the aluminum frame. II read that the wire should be buried to keep predators from digging under the wire and large stones on the perimeter help with discourage digging as well. Turns out I had about a cubic yard of river stone that came out of another project, so I was set. looks pretty good and with a bit of landscape fabric, should help keep the weeds down around the run. After covering the gable ends, there is just enough to gaps in the eves if needed. In the second picture, you can see where I stained the roof of the coop to match that of the run. Already had some leftover red stain. Most people seem to like it. Sort of like having a nested chicken coops.
The Girls Move In
Now that we have a safe place for them, the girls make the move from their brooder box in the garage to the run. Two five gallon buckets and a few bits of hardware and they've got a no waste automatic feeder and waterer for under $20 bucks. Helps offset the $500 cost for the roof I wasn't planning on building. Discovered that I can tell the water level with the night vision on camera I set up. Found a bucket de-icer for the winter, so that's settled. Hang a branches for roosts and in they go The old tire is a dust bath that has food grade diatomaceous earth. I got the idea from another BYC member's coop. Funny thing was that I found that they weren't sleeping in the coop and huddled up in a corner every night. Locked them in the coop that night and now they head in at dusk.
That's Entertainment
After reading about Chicken Toys on BYC, I discover that a compost pile is the number one chicken entertainment. Build the girls a 2 foot by 10 foot raised compost pile for them. Amazing how they love it. Doesn't matter what I throw on it, they're in it. Designed it so finished compost falls below it for easy collection. It is now piled high with weeds and kitchen scraps (not that those last long). I've added an easy access door above it so I can dump goodies without having to walk through the run.The ramp up is an old bit of wire shelving. I've since moved the ladder on the right next (from an old bunk bed) to it and they seem to like it. I also have an old log that I roll over occasionally to expose bugs, which the girls are crazy about. They also like to play "Queen of the log".
A New Floor
After a few weeks, the grass that was, is no more. The ground is damp, so I buy a cubic yard of paver base (finely crushed local blue stone) and spread it two inches deep. The floor is much dryer and the girls love digging in it. The stone size varies from dust to 1/4" so it's a good source of grit as well as an easy to clean surface. Half the cost of the pea gravel you see in the garden pathway and well worth the price.
Update: I learned I had made a major rookie error of not putting an permeable membrane under the stone, so within a year of scratching, the stone sank into the earth and the girls dug some pretty large holes in the ground and around the perimeter. Good thing I ran the chicken wire under the rocks around the run.

More mods to the coop.
Found some stair rail spindles at the Habitat for Humanity Restore for $2 each. Put them up in the sun porch and the girls love them. Especially in the morning to catch some morning rays. You can see the poop trays as well. The tray bottoms are galvanized steel. The rails for the trays are made of metal studs screwed in to 2 x 4s.
Next you can see a couple dishpans, artificial turf and ceramic eggs I put in the nesting box area to try and give them the idea this is the place to lay. So far they've just decided they are a great place to roost at night. I found all six squeezed into one of them one night. At least it's all easy to clean.
Update: I removed the tubs and switched a community nest box with pine shavings for bedding has worked well.
Turning Night Into Day
Picked up a couple 10 Watt LED lamps on Amazon. Put one on a timer to extend the girls day and try to keep them laying through the winter. The other has a motion detector to startle nighttime predators. They also provide some work light if I'm in the run at night. You can also see the wireless repeater I set up in the run for the pollo cam to the left of the timed light. I will be cleaning up all those wires eventually. Set up the garden swing for casual bird watching.
Streaming live video from La Casita del Pollo
After making the rounds with three different security cams, I finally settled on an external dome camera from Hikvision. 4 megapixels, up to 1080p streaming, and a very wide angle. I set it at bird's eye view next to the entry door. Covers nearly the entire run with little distortion.
After making the rounds with three different security cams, I finally settled on an external dome camera from Hikvision. 4 megapixels, up to 1080p streaming, and a very wide angle. I set it at bird's eye view next to the entry door. Covers nearly the entire run with little distortion.
Since I started letting the girls in the garden next to the run, I hung a pan and tilt camera I had lying around under the eave of the roof.
Giving outside access to the nest box
I had left the entire coop inside the run, so I had to walk in to check the nesting box, but finally decided that I'd move the coop to the corner and expose the box to the outside world. Since there is roof overhang, and the aluminum panels, I had to make a docking port around the nesting box. More room in the run and little intrusion into the garden path. Lots of staples, but I'll take it.
Converting Coop to a Rollout Nest Box
I decided to replenish the flock this year. We were down to two of the big girls. The Russell Terrier mix we adopted killed two before she learned that the chickens weren't vermin and lost two of the buttercups on a freakishly cold night. With a 10 chick minimum order for more Australorps, I concluded that I'd need a rollout nesting box to handle the eventual volume easily. After looking at a variet of pre-built nesting boxes and DYI designs, I realised that I could modify the existing nesting box into a rollout with less work for around $50 with the bulk of that going to the "astroturf" mat for the floor from Hengear.com.
Inexpensive 6"x 20" ceramic tile make the floor/ramp. It extends 6" past the original nest box wall, so the hens can't touch the eggs once they've rolled under the access panel.
The Hen Gear "astroturf" sits on that.
I put a 3" strip of the astroturf on the wall as a stop. You can see how it's not really astroturf and holds its shape even with the weight of a hen.
I used old pine tongue and groove siding I had lying around for the frame. I'll stain it to match the rest of the box later.
Initially the girls didn't like walking on the astroturf and started laying their eggs in the roost floor of the coop. Luckily I bought a large enough mat that I was able to cover the roost floor with the leftovers. The next day, I had an egg in the box.
Adding a "Treat Door" to the compost pile
I just added a door in the run over the compost pile, so we can drop treats from the garden and kitchen on the pile without having to go through the run. I'm using a 1"x2" on a hinge as a prop stick to hold it open while tossing in the goodies.
Movin on up!
Once the girls got large enough to fly onto the roof of the coop, they insisted on roosting in the rafters of the run despite all my attempts to keep them out with bird netting and running wires over the rafters (you can see the one of the shelf brackets I used to run the wire in the following photo). After they moved up there, I mounted leftover siding from our pole barn under the rafters to catch poop. Because of the quality of ventilation up there, I was able to go 5 years before i had to scrape them clean because the poop dried out and stayed dry, so no smell or flies.
How Plans Change
After attending a lecture with the Cooperative Extension, free ranging waa off the table. With the looming Avian Flu pandemic, the microbiologist giving the lecture stressed the need for a covered run to keep wild bird poop out of the run. I had the aluminum frames left over from two 10' x 10' gazebos which roofs had collapsed under snow, which I thought I just make into a chicken wire cage up until then. Now I need a roof, no tarp on the box is going to do with snow in the winter. I start thinking of starting with a shed roof, but he 10' span is problematic when you consider possible snow loads. so a steep gable roof it is. I/ve ever built one before, but how hard can it be (much harder and expensive than anticipated). The project has now increased in complexity and cost. I learned a lot and continue to learn what works and what doesn't as I've muddled through the project.
In the Beginning There was a Box
Let's start with the basic idea before everything got complicated by reality. The first photo shows the original store bought coop kit put together and aluminum frames set up by the garden. The frames are the key structural element of the run. They have a triangular cross brace across the foot of the vertical panels that have holes for 12" spikes to anchor the structure. This built in footing and dense clay allowed building this without a footing as the load is distributed over a large footprint. Add some solid dimensional lumber on the perimeter and this makes for a solid base as long as the uprights are plumb.
Let's start with the basic idea before everything got complicated by reality. The first photo shows the original store bought coop kit put together and aluminum frames set up by the garden. The frames are the key structural element of the run. They have a triangular cross brace across the foot of the vertical panels that have holes for 12" spikes to anchor the structure. This built in footing and dense clay allowed building this without a footing as the load is distributed over a large footprint. Add some solid dimensional lumber on the perimeter and this makes for a solid base as long as the uprights are plumb.
The coop looks nice enough, has a outside access nesting box, poop tray for a floor, and attached "run", but much too small for confined hens. More of a rabbit hutch with a nesting box at this point. I did consider using it as a chicken tractor for awhile, but that seemed a pain and the girls would still be stuck in a small box. It will go through a few transformations before the end. The second photo shows the run moved to the back end of the coop. I removed the back wall and adding slide out "poop" trays for the floor of that section. Planned on using solid panels, with Reflectix insulation to winterize the "sun porch" when it gets cold. Of course, since this is an organically grown project more than a planned design, that changed. I found the double paned window in the third permutation put out with someone's trash and found it fit the end well, so the girls get a fancy tilt out window for their south facing window. I'm thinking acrylic "storm windows" for the remaining open screened areas so the girls get plenty of light in the winter.
Raising the Roof
Now back to the run. 10' 2 x 6 pressure treated lumber all around the top to support the roof. All tied together with deck screws.
I went with a 2 x 4 roof rafters using plywood gussets made out of leftover PT plywood. I also used metal brackets to makes sure the whole run makes it to Oz in one piece if a big storm comes through. At $.058 each they seemed like cheap insurance and made hanging the rafters single handed possible. 2 x 3 rafter ties on all the inner rafters for strength and stability. I won't be surprised to see the Buttercups in the rafters at some point.
Next come the 1 x 4 purlins to support the Ondura roof panels. A bit rough, but I'm working without a helper and it's just a chicken run after all.
Finally, up go the Ondura panels. I decided on these with purlins on 24" centers as an attractive, low cost option to metal (preferred) or shingles on sheathing. While I was putting up the roof panels, I noticed that things were a bit shaky up there so I added the corner braces and it stiffened up nicely. You can also see the 10' PT 2 x 4's around the lower perimeter to attach the chicken wire and the entry gate in the left corner
Wrapping the box
Now it's time to wrap the box with 150 feet x 48" of 1" chicken wire. Grabbed it on sale at Lowes. Was going to use lattice screws, but realized I had a pneumatic staple gun, so a few hundred staples later, we're ready for the girls. I was happily surprised to find the staples worked well in the aluminum frame. II read that the wire should be buried to keep predators from digging under the wire and large stones on the perimeter help with discourage digging as well. Turns out I had about a cubic yard of river stone that came out of another project, so I was set. looks pretty good and with a bit of landscape fabric, should help keep the weeds down around the run. After covering the gable ends, there is just enough to gaps in the eves if needed. In the second picture, you can see where I stained the roof of the coop to match that of the run. Already had some leftover red stain. Most people seem to like it. Sort of like having a nested chicken coops.
The Girls Move In
Now that we have a safe place for them, the girls make the move from their brooder box in the garage to the run. Two five gallon buckets and a few bits of hardware and they've got a no waste automatic feeder and waterer for under $20 bucks. Helps offset the $500 cost for the roof I wasn't planning on building. Discovered that I can tell the water level with the night vision on camera I set up. Found a bucket de-icer for the winter, so that's settled. Hang a branches for roosts and in they go The old tire is a dust bath that has food grade diatomaceous earth. I got the idea from another BYC member's coop. Funny thing was that I found that they weren't sleeping in the coop and huddled up in a corner every night. Locked them in the coop that night and now they head in at dusk.
That's Entertainment
After reading about Chicken Toys on BYC, I discover that a compost pile is the number one chicken entertainment. Build the girls a 2 foot by 10 foot raised compost pile for them. Amazing how they love it. Doesn't matter what I throw on it, they're in it. Designed it so finished compost falls below it for easy collection. It is now piled high with weeds and kitchen scraps (not that those last long). I've added an easy access door above it so I can dump goodies without having to walk through the run.The ramp up is an old bit of wire shelving. I've since moved the ladder on the right next (from an old bunk bed) to it and they seem to like it. I also have an old log that I roll over occasionally to expose bugs, which the girls are crazy about. They also like to play "Queen of the log".
A New Floor
After a few weeks, the grass that was, is no more. The ground is damp, so I buy a cubic yard of paver base (finely crushed local blue stone) and spread it two inches deep. The floor is much dryer and the girls love digging in it. The stone size varies from dust to 1/4" so it's a good source of grit as well as an easy to clean surface. Half the cost of the pea gravel you see in the garden pathway and well worth the price.
Update: I learned I had made a major rookie error of not putting an permeable membrane under the stone, so within a year of scratching, the stone sank into the earth and the girls dug some pretty large holes in the ground and around the perimeter. Good thing I ran the chicken wire under the rocks around the run.
More mods to the coop.
Found some stair rail spindles at the Habitat for Humanity Restore for $2 each. Put them up in the sun porch and the girls love them. Especially in the morning to catch some morning rays. You can see the poop trays as well. The tray bottoms are galvanized steel. The rails for the trays are made of metal studs screwed in to 2 x 4s.
Next you can see a couple dishpans, artificial turf and ceramic eggs I put in the nesting box area to try and give them the idea this is the place to lay. So far they've just decided they are a great place to roost at night. I found all six squeezed into one of them one night. At least it's all easy to clean.
Update: I removed the tubs and switched a community nest box with pine shavings for bedding has worked well.
Turning Night Into Day
Picked up a couple 10 Watt LED lamps on Amazon. Put one on a timer to extend the girls day and try to keep them laying through the winter. The other has a motion detector to startle nighttime predators. They also provide some work light if I'm in the run at night. You can also see the wireless repeater I set up in the run for the pollo cam to the left of the timed light. I will be cleaning up all those wires eventually. Set up the garden swing for casual bird watching.
Streaming live video from La Casita del Pollo
After making the rounds with three different security cams, I finally settled on an external dome camera from Hikvision. 4 megapixels, up to 1080p streaming, and a very wide angle. I set it at bird's eye view next to the entry door. Covers nearly the entire run with little distortion.
After making the rounds with three different security cams, I finally settled on an external dome camera from Hikvision. 4 megapixels, up to 1080p streaming, and a very wide angle. I set it at bird's eye view next to the entry door. Covers nearly the entire run with little distortion.
Since I started letting the girls in the garden next to the run, I hung a pan and tilt camera I had lying around under the eave of the roof.
Giving outside access to the nest box
I had left the entire coop inside the run, so I had to walk in to check the nesting box, but finally decided that I'd move the coop to the corner and expose the box to the outside world. Since there is roof overhang, and the aluminum panels, I had to make a docking port around the nesting box. More room in the run and little intrusion into the garden path. Lots of staples, but I'll take it.
Converting Coop to a Rollout Nest Box
I decided to replenish the flock this year. We were down to two of the big girls. The Russell Terrier mix we adopted killed two before she learned that the chickens weren't vermin and lost two of the buttercups on a freakishly cold night. With a 10 chick minimum order for more Australorps, I concluded that I'd need a rollout nesting box to handle the eventual volume easily. After looking at a variet of pre-built nesting boxes and DYI designs, I realised that I could modify the existing nesting box into a rollout with less work for around $50 with the bulk of that going to the "astroturf" mat for the floor from Hengear.com.
Inexpensive 6"x 20" ceramic tile make the floor/ramp. It extends 6" past the original nest box wall, so the hens can't touch the eggs once they've rolled under the access panel.
The Hen Gear "astroturf" sits on that.
I put a 3" strip of the astroturf on the wall as a stop. You can see how it's not really astroturf and holds its shape even with the weight of a hen.
I used old pine tongue and groove siding I had lying around for the frame. I'll stain it to match the rest of the box later.
Initially the girls didn't like walking on the astroturf and started laying their eggs in the roost floor of the coop. Luckily I bought a large enough mat that I was able to cover the roost floor with the leftovers. The next day, I had an egg in the box.
Adding a "Treat Door" to the compost pile
I just added a door in the run over the compost pile, so we can drop treats from the garden and kitchen on the pile without having to go through the run. I'm using a 1"x2" on a hinge as a prop stick to hold it open while tossing in the goodies.
Movin on up!
Once the girls got large enough to fly onto the roof of the coop, they insisted on roosting in the rafters of the run despite all my attempts to keep them out with bird netting and running wires over the rafters (you can see the one of the shelf brackets I used to run the wire in the following photo). After they moved up there, I mounted leftover siding from our pole barn under the rafters to catch poop. Because of the quality of ventilation up there, I was able to go 5 years before i had to scrape them clean because the poop dried out and stayed dry, so no smell or flies.
Even though we live in a meadow in the woods, we've had (fingers crossed) no predator problems in past 7 years. I've left them wide open overnight several times and no signs of disturbance. I started letting them forage last month and they love the edge of the woods, which made me nervous, but no losses so far. I have been told there are racoons in the woods, but the only animals that have gotten into our garbage in 15 years have been our dogs. I know that because they get caught on the security cameras. I give the dogs credit for keeping the predators at bay. The Russell Terrier/Pit Bull mix spends a lot of time in the woods chasing critters. The girls did come across a rabbit the other day. They chased it off. I've yet to see how they will react when deer come through the yard.