
MN-Hardy Chicken Coop and Run
On April 25, 2015 my husband and I packed up our kids and our dog (she travels with us wherever we go) and drove to pick up our very first 1-2 day old chicks. We had waited close to three years after moving into our current house before deciding that this was the right time to get our chickens. We were all very excited when the day finally came to go and pick up our chicks.
Our dog was very interested in the faint rustling coming from the box.
The previous winter was filled with researching (chickens, coop types, coop construction, how to care for chickens, etc.) and drawing up coop and run plans. After looking through many books and poring over the many beautiful coops on Backyard Chickens.com, we finally decided on our final coop and run design.
When we got home with the chicks, we put them under a heat lamp in our basement. The kids (and dog) pretty much lived down with the chicks until we moved the little ladies (and little did we know a rooster) out into the coop.
Our pup and Rose, our Barred Rock, did a very nice job of keeping watch over the flock.
After gathering the materials we needed (well, most of them anyways as we ended up taking many trips to Menards throughout the coop and run construction), we began constructing the frame of the coop.
My parents had some extra 2x4's in their barn (some of the 2x4's were the boards my great, great grandparents used to build their first house on the farm in 1884) so we were able to construct most of the frame using these boards. *See plans for board lengths.
After leveling the ground, we placed four 18" cement squares (one at each corner) on the soil and put the frame of the floor squarely on these stones. We decided to insulate the floor, so we used ground-rated, 3/4" plywood on the bottom of the frame, stuffed some left-over insulation between the joists, used 3/4" plywood on the top and finished it with a laminate remnant from Menards (for easy cleaning) before putting up the walls.
We were lucky to have my dad help us out with putting up the frame.
A great learning experience for the kids!
We also decided to insulate the walls and ceiling of the coop so we added plywood to the inside of the coop first. The bottom 12" of plywood is treated plywood so it won't rot if it gets wet when we wash the floors. We used 1/2" plywood on the walls and 1/4" plywood on the ceiling.
The roofing came next. We stapled some tar paper down before attaching corrugated steel panels to the roof. We bought eight 3'X8' corrugated steel panels and ran them from the east end of the coop all the way down to the west end of the run.
The run was attached to the coop so we could have one long run of a roofing and continuous shelter for the chickens. After leveling out the 'run' ground, we partially buried ground-rated 6x6 boards on all three sides of the run. The 6x6 boards are attached to the coop using 5" screws at the base. We toe-nailed four screws on each 6x6 at the point it attaches to the coop. We bought even longer screws (8") to screw the 6x6 boards into each other on the two outside corners of the run. Finally, the joists were erected and a roof was added over the run.
Back to the coop. We stuffed insulation in-between the joists on the outside of the coop. Then, tongue-and-groove car siding was hung using a nail gun. The nail gun made the installation of the car siding very quick and easy. The most difficult part was fitting the car siding between the exposed roof joists, but with a little elbow grease (and our trusty jig saw), everything came together very nicely! I loved the look of the natural car siding, but we had our hearts set on a red coop with white trim.
For our windows, we decided to install simple barn-sash windows. We wanted windows that could swing all the way open to allow for the maximum amount of air circulation. These windows were also much more inexpensive than the traditional windows we looked at. We paid $18 per window at Menards. The kids enjoyed helping me paint the windows white.
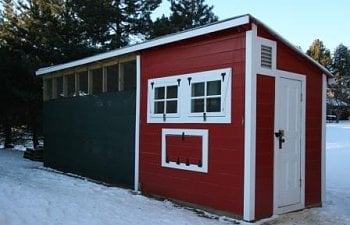
After the windows went in, we painted the coop a brilliant autumn red.
We re-purposed a door that was originally in my great-great grandparent's farm house (built in 1884). The nest box door is insulated so the hens (and eggs) can stay as comfortable as possible in all seasons.
Here is a look at the back of the coop.
Finally, we put a large door on the west side of the run and added support boards between all of the run joists. We decided to make a 4' door so we could get a wheelbarrow in and out of the run if needed. Also, we put a spring hinge on the door so the door would shut right behind us. Half-inch hardware cloth was stapled to all sides of the run. We also removed a couple of inches of soil from the bottom of the run and attached 1/4" hardware cloth to all of the 6x6 boards and to the base of the coop to keep predators from digging up into the run. We put the soil back on top of the hardware cloth once the cloth was secured. Quarter-inch hardware cloth was also used on the inside of the windows and vents to keep predators out of the coop. A chicken door was attached to the coop using hinges at the bottom of the door, and we added 1"x1"x12" pieces of wood every 2" down the inside of the coop door so when the door drops down, the chickens have their own ladder into and out of the coop.
Here's a look at the inside of the coop:
We added 16"x16" nest boxes under the front windows. A sloping board was added to the top of the boxes to prohibit roosting on top of the boxes.
Goldie our Gold Star was the first to lay an egg at 18-weeks old. Note: We added a lip to the outside of the nest boxes so the blue inserts couldn't be kicked out. Also, we turned the inserts sideways so they would fit snugly inside of the boxes.
A hanging waterer and feeder were added using eye hooks on the ceiling and carabiner (which attaches the chains to the waterer and feeder).
I built a perch out of extra 2x4's and a small ash tree that was getting choked out by larger trees in our woods. The ash provides a comfortable, easy-to-grip surface for our birds, and it should last a long time since it is a very hard wood.
Our birds like the high perch by the windows.
Here are our chicks enjoying their new coop!
Our chickens free-range most days. We keep them in the run when we go out of town or if the weather gets bitterly cold.
The total cost for the coop alone was about $1400.00. The run cost another $700.00. It took us about a month and a half to build the coop and run. This was our first construction project, but thoroughly enjoyed the experience!
We are rewarded with eggs of many colors and sizes.
Now that it is winter, our birds still love to get out of the coop when the weather is warm enough.
We wrapped the run in a stretchy snow fence to help keep out the wind and snow. The snow fence is a simple shade cloth that can be purchased at most home-improvement stores. Shade cloth is a very durable material and we plan on washing it down with a hose this coming spring before we remove it so that it will be ready to be put back up on the run next fall (thanks to my mother-in-law for the great idea of using the shade cloth).
Hay was spread out on the floor of the run.
As you can see, the snow fence has kept the snow out of the run very well. It's amazing how much the shade cloth blocks the wind too!
I took these winter pictures in the run today and we currently have wind chills at -40 degrees fahrenheit. The chickens have spent much of the day in their run, protected by the snow fence.
In a few months we are going to pick up five more baby chicks. We are looking forward to adding more chickens to our family!
 The design is chicken & human friendly. Very nice looking & functional. Your chickens look happy & healthy.