First off let me say, this is not my design but is a concept copied from/inspired by Jimmy Walt's.
Second off let me say, that at the time this page was created(11-12-14) the waterer was just newly built and installed and not yet proven over time and temperature range.
I will post updates, good and bad, here on the page as they arise.
11-18-14: Heater Failed, think thermostat failed - not sure what will I'll try next, probably a bucket heater.
11-25-14: added new aquarium heater and some insulation...scroll down to see.
2-15-15: Holding up wonderfully, lowest temp yet -10F, using .5 to .8KWH (less than $0.10/day)
2-20-15: Lowest temp -12F.
4-7-15: Removed heater from jug as we had out last(I hope) hard freeze a few nights ago.
very happy with this setup and am relieved to have this winter chicken keeping tool in my toolbox so to speak.
12-14-17: New pic way down below showing new insulation cover and better bottom insulation.
More discussion on this thread....https://www.backyardchickens.com/t/936870/my-new-heated-waterer#post_14588396......questions might be better answered on the thread as articles don't seem to send new comment notifications.
Parts list:
-2 gallon kitty litter jug with 6 horizontal nipples, I marked it with 1 quart graduations to monitor water usage and add med dosages if necessary.
-50 watt submersible aquarium heater for 2-10 gallon tanks that has an automatic thermostat to hold temps at 76-78F mounted on a piece of polycarbonate and covered with 1/2 hardware cloth just in case the water runs out nothing will touch it.
-Hot spa thermometer I had in my stash of stuff with a piece of pipe insulation to keep it floating where I could read the water temp without removing it from the jug.
-A large silicone stopper that I just happened to have in my stash was modified to go around the power cord and provide vacuum release yet offer a seal to prevent evaporation or slow spills if it ever get knocked over.
All assembled:

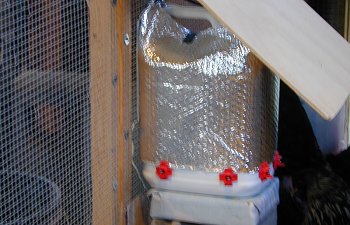
Here it is in my coop:
The slanted board has 2 holes near the top and is hinged with wire attached to the HC coop wall, this keeps the chooks from roosting on top of the waterer and away from the power cord, a hook above holds the board for waterer maintenance. The power cord and thermometer string goes thru the coop wall.....
...and up to the power strip where it is plugged into a thermocube(which turns on at 35F and off at 45F) and a kilowatt meter to track the power usage. The timer is for the overheard light to promote winter laying.
Here's an inside view, the light is provided by a flashlight outside of the jug:
Aquarium heater suction mounted to the polycarb and the stopper with cord slot and vacuum release hole
I added a ziptie to further secure the heater to the polycarb and wrapped a piece of 1/2" hardware cloth around the whole assembly.
The thermometer, piece of pipe insulation fit just right and keeps it floating horizontally:
Stopper:
Heater:
New Heater added 11-25-14
Added some insulation around and under.
Reflective bubble wrap around jug.
2" pink foam wrapped in plastic feed bag material underneath.
UPDATE 12-14-17:
Added a piece of feed bag over bubble wrap to stop pecking, I guess chickens like to pop bubble wrap too!
The feed bag wrapped block of pink foam insulation got nasty, so I unwrapped it and set it under part of a 3 gallon bucket fit perfectly over the concrete block and contains any drips.

Second off let me say, that at the time this page was created(11-12-14) the waterer was just newly built and installed and not yet proven over time and temperature range.
I will post updates, good and bad, here on the page as they arise.
11-18-14: Heater Failed, think thermostat failed - not sure what will I'll try next, probably a bucket heater.
11-25-14: added new aquarium heater and some insulation...scroll down to see.
2-15-15: Holding up wonderfully, lowest temp yet -10F, using .5 to .8KWH (less than $0.10/day)
2-20-15: Lowest temp -12F.
4-7-15: Removed heater from jug as we had out last(I hope) hard freeze a few nights ago.
very happy with this setup and am relieved to have this winter chicken keeping tool in my toolbox so to speak.
12-14-17: New pic way down below showing new insulation cover and better bottom insulation.
More discussion on this thread....https://www.backyardchickens.com/t/936870/my-new-heated-waterer#post_14588396......questions might be better answered on the thread as articles don't seem to send new comment notifications.
Parts list:
-2 gallon kitty litter jug with 6 horizontal nipples, I marked it with 1 quart graduations to monitor water usage and add med dosages if necessary.
-50 watt submersible aquarium heater for 2-10 gallon tanks that has an automatic thermostat to hold temps at 76-78F mounted on a piece of polycarbonate and covered with 1/2 hardware cloth just in case the water runs out nothing will touch it.
-Hot spa thermometer I had in my stash of stuff with a piece of pipe insulation to keep it floating where I could read the water temp without removing it from the jug.
-A large silicone stopper that I just happened to have in my stash was modified to go around the power cord and provide vacuum release yet offer a seal to prevent evaporation or slow spills if it ever get knocked over.
All assembled:
Here it is in my coop:
The slanted board has 2 holes near the top and is hinged with wire attached to the HC coop wall, this keeps the chooks from roosting on top of the waterer and away from the power cord, a hook above holds the board for waterer maintenance. The power cord and thermometer string goes thru the coop wall.....
...and up to the power strip where it is plugged into a thermocube(which turns on at 35F and off at 45F) and a kilowatt meter to track the power usage. The timer is for the overheard light to promote winter laying.
Here's an inside view, the light is provided by a flashlight outside of the jug:
Aquarium heater suction mounted to the polycarb and the stopper with cord slot and vacuum release hole
I added a ziptie to further secure the heater to the polycarb and wrapped a piece of 1/2" hardware cloth around the whole assembly.
The thermometer, piece of pipe insulation fit just right and keeps it floating horizontally:
Stopper:
Heater:
New Heater added 11-25-14
Added some insulation around and under.
Reflective bubble wrap around jug.
2" pink foam wrapped in plastic feed bag material underneath.
UPDATE 12-14-17:
Added a piece of feed bag over bubble wrap to stop pecking, I guess chickens like to pop bubble wrap too!
The feed bag wrapped block of pink foam insulation got nasty, so I unwrapped it and set it under part of a 3 gallon bucket fit perfectly over the concrete block and contains any drips.