I brooded my first chicks the way most of us learned to brood chicks...in the house, in a big box, with a heat lamp. It was a hoot at first, having all those adorable baby chicks right where we could watch them and hear their cute little peeps. Then came the dust. And the 24 hour peeping. And the mess from pine shavings and dumped waterers. By the time those first chicks were 2 weeks old I wanted them OUT of my house! They were stressed, I was stressed, and I wasn't enjoying them one bit anymore.

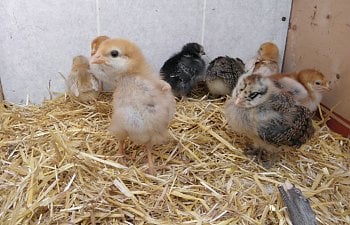
Doesn't this look like a nice, natural way for chicks to get a good start? Bright room, lots of ambient noise, hot lamp, cramped quarters, no true nighttime! Ah, yes. The joys of brooding by the book. And it's so pleasant for the people in the house, too. Ken kept his tuxedo in a wardrobe bag in the closet just on the other side of the brooder, not visible in this photo. Even after a most thorough cleaning once the chicks moved out, we still found dust inside the pocket of that tux when he got it out months later. Yeah, that kind of insidious dust is hard to combat no matter how fastidious you try to be.
We'd almost finished the coop and on April 1st, ready or not, out they went - at the ripe old age of 5.5 weeks. At that point it was them or me! The first night we put them out it got down to 20 degrees. I hooked up a heat lamp for them and then I spent the rest of the night jumping out of my warm bed, putting my boots and jacket on with my jammies (I was a true western woman fashion diva!) and grabbing a flashlight to check on them. Those stupid chicks were huddled in a cozy ball right in front of the pop door. The heat lamp was on the other side of the coop. They didn't even use it. They were fine. I, on the other hand, was freezing! I got up in the morning, after a couple of hours of broken sleep, and went out with my heart in my throat fully expecting to see frozen chicks. Surprise!! They were already up, had eaten, and were ready to go out into their makeshift temporary run. The second night was almost exactly the same as the first, with one exception. I only got up to check on them once - just once- and again they were sleeping soundly nowhere near the heat lamp. The next day the heat lamp came out. If they weren't going to use it I wasn't going to risk a fire and run up my electric bill. Um, and of course that night it snowed. And we got snow over and over again. Our last snowfall was on June 6th. In the meantime they just kept growing and thriving. That's when I began to doubt the absolute insistence on indoor brooding with precise temperature requirements for each week.
I've covered Scout's story elsewhere on BYC. He was a broody hatched chick who suffered severely frostbitten feet when our temps went from a balmy 60 degrees to a bone chilling week of -17 and even lower in only 26 hours. He got his feet wet at the waterer and froze them. Not even the most protective broody hen could have done anything to prevent it, nor to fix it. So Scout came in for treatment. That was my first experience with using a heating pad cave, which I've also covered extensively elsewhere in the forums. When he was ready to rejoin the flock, I took his entire brooder outside, set it up in the coop, and formed his Mama Heating Pad cave out there. I propped open the door to his brooder so that he could fit to get in and out but the older chickens couldn't follow. It worked like a charm. He was able to mingle with the flock at his own pace. He grew and thrived, and became a handsome rooster we were so proud to see strutting out there. The last piece of the brooding outdoors puzzle fell into place.
Scout's entire brooder moved out to the coop. Scout all snuggled into his "cave". It was -4 degrees
when this was taken.
In order to brood outdoors for the first time, there are a few things you'll need. The first of these is courage. Yep, it takes courage to ignore all the warnings about keeping those little chicks indoors under a heat lamp. Conventional brooding sometimes makes it sound like you'll have your chicks inside until you find the first egg in the bottom of the brooder, and even then says you should only put them outside for an hour or so - as long as it's clear and sunny and the temps are 90 degrees or above. That's an exaggeration, of course, but boy, it sure seems like that's the message sometimes. But broody hens don't follow the book. Although the normal course of things call for them to set a clutch of eggs and raise chicks during the spring, our modern kept birds don't always follow that pattern. They'll brood chicks any time of the year and those chicks follow her around even on the coldest days. They'll run all over their environment, exploring, learning and dashing under her for a quick warm-up, and when it gets dark they burrow under her and sleep all night. Why do we do it so differently and believe it's better for them?
The second requirement for brooding outdoors is creativity. Look around you. Do you have any pieces of old fencing that you can form into a cave? Old pillowcases and/or towels that are stuffed in the back of the linen closet? Get 'em out! Figure out how to best utilize them to make an imitation broody hen. You'll want it soft like she is, warm and dark. You'll also want the chicks to be able to duck in and out at will and climb all over their imitation mom, just as they do with a broody. Aren't pictures of broody hens with chicks tucked under, around, and a couple of them snuggled down on top of her just adorable? Wait until you see that happen with a Mama Hen you invented! Do you have last year's brooder box - you know, the one you spent hours crafting out of wood and hardware cloth or even taped-together cardboard boxes? Use it as the shelter point for your outdoor brooder, either by standing it on end and securing the sides of your outside enclosure to it, or taking it apart and using zip-ties to wrap the bottom part of your pen with it as a bit of a windbreak.
And the final requirement is common sense. That's sometimes the hardest one to practice. It is essential to use your common sense, from start to finish, when brooding chicks outside away from your constant vigilance. Look at your brooder pen with a clear eye for detail. Is the coop or run secure from predators? Your brooder pen will only be as secure as the place where it's located. Are any sharp points covered or turned inward? Is the pen large enough? Is it in a sensible location in your coop or run? Can you easily access their food and water? How difficult is it to rake out soiled bedding and replace it? And does your common sense extend to looking at your chicks' setup and duplicating as closely as possible everything they would experience if a mama hen was raising them?
You'll need to build a brooder pen. You can make this out of scrap lumber with hardware cloth or chicken wire (if it's located within a secure area already protected against predators) and make it as large as your coop or run can comfortably accommodate without crowding the rest of your flock, if you have one. For just a few chicks you can put a large wire dog crate, with hardware cloth layered at the bottom to prevent escapees, to good use - as I did with Scout. You want to end up with it being a large box, square or rectangular, depending on your coop or run's layout. I also strongly recommend covering the top. I've used landscape fabric attached to the top edge of the pen with clothespins in a pinch. Chicken wire or plastic fencing also work well. Since my run is covered, I eventually settled on attaching green plastic fencing from the "ceiling" of the run down to the top edge of the brooder pen so I could go in there and stand comfortably to work while keeping chicks inside and hens outside. Chicks are inventive with ways to get out, and older hens can become curious enough to fly over and into the brooder.
If you are using Mama Heating Pad, remember that the cave will take up over almost 2 square feet (maybe more, depending on your cave) of the chicks' living space. If you are using a heat lamp, you'll need to make sure it's a safe distance away from the bedding and the sides of the pen, and secured, secured, secured! Personally I detest the things - it's artificial light all night long, which disturbs older chickens you might have, and it heats their entire environment, even if you try to provide "cooler spots" away from the light. Dust and dander gather on them, adding to the fire risk. So if you are brave enough to have read this far, please look at the link to Mama Heating Pad in the Brooder and go the whole 9 yards. End of lecture! You can also use your Premier or Eco-Glow, if that's what you have, but I tend to like the "cave" much better because it's closed on the sides and back, with only a small awning in front that they duck under to access the darkness, warmth, and security of the cave. At this point you aren't worried about aesthetics - you are out to build a safe enclosure within your coop or run.
In our case we had an old dog exercise pen that I used to use back in my dog showing days. The first job was to cover the bottom couple of feet with hardware cloth - the bars in the pen were large enough for chicks to squirt out otherwise. It was a simple matter of laying out the pen, unrolling the hardware cloth over it, then zip-tying the HC in place. We set it up in the run so that it was opened all the way up and formed a rectangle that was much longer than it was wide. We took our old brooder box, the one we used in the house last year, set it up on its end, then attached the back side of the X-pen to it. This side was next to the outer fencing on the run. The access door was on the closer side, nearest the run door, and that's where I could enter the brooder and tend the chicks. The old brooder became a perfect wind block on three sides. We covered the floor of the entire pen and the floor of the upended brooder box with straw. Then we set up the wire frame for the cave, put the heating pad over it, and covered that with a towel to form that little awning that they like so much. The cave was also covered with straw, top, sides, and rammed in behind to hold in heat. The entire brooder pen took less than an hour and half to set up from start to finish.
Old brooder set on end, with the far side of the The straw frame on the floor of the enclosed box.
pen attached.
Towel forms an "awning" at the front over the pad. The chicks settle in. It was 21 degrees out there .
A chick's eye view of the other end of their pen. They spent more time on top than under the cave.
We brooded three batches of chicks outside this year. We wanted the chicks to have maximum space and we didn't think that the coop presented them with that kind of opportunity so our larger, plastic covered run was the logical choice. If your coop is large enough, then by all means, put your outdoor brooder in there. You need to have it where it is easiest for you to tend. If you have older chickens, I can't stress enough the importance of having the chicks where the older birds can see them day in and day out. The chicks carefully watch the adults as well and learn so much from them. You will be so glad you did this when it's time to integrate them into the flock full time. If these are your first chicks, by putting them outside from the start you have avoided all of the pitfalls of putting them out for the first time when they are older, including the stage where you beat yourself up wondering if they need a night light! They'll be accustomed to temperature changes, they'll have no problem with darkness, and they become strong and self-reliant from the start. You are in charge of their security and supplies. They do all the rest. They eat and play during the day, and they sleep at night. No training necessary! In our situation, when it was time for them to mingle, we put the big girls (and Scout) outside in the yard, then opened the side of the brooder pen just enough for the chicks to get out. They wandered around the run, then a few ventured outside. The older birds were curious, and when the chicks got a little too pushy they got well deserved reminder that they still had a lot to learn. If they got spooked or chilled they found the opening and went back into their pen. Snoopy or pushy older birds couldn't follow. Integration began under our watchful eye and it was smooth, without major incident, all because they were used to each other. Within a week I was able to keep the door to the chicks' pen open all day long, and the Bigs wandered in, snitched a little of the Littles' food, and wandered back out, whether there were chicks inside the brooder pen at the time or not.
Gladys (front) & Kat (back) check out the chicks. Always in sight, chicks and adults.
Pen opened all the way and Kat greets a chick while Scout takes his turn exploring the brooder pen.
Mathilda explores.
The chicks go outside to greet a new day. Thanks to the chicks and older birds always being "together", with multiple
feeding stations and dual waterers, the chicks got plenty to eat, there was minimal bullying, and now as adults they all
exist peacefully in the coop and run. We had total integration by the time each batch was 4 weeks old.
And this peaceful scene is the result. They still squabble at times but it's usually just the Littles overstepping their bounds and they are quickly brought back in line.
On the Mama Heating Pad thread, another strong advocate of outdoor heating pad brooding is azygous, and she has come up with a simply brilliant "portal" system. She cut small doorways into a couple of sides of her brooder pen. She then cut plywood "doors" that match the cutouts she made and that's exactly what they are - chick sized doors into and out of the brooder pen. When she's ready to start integrating the chicks with the older population, she just opens the portals. The chicks can run out to explore and run back in if the older chickens get a little too feisty. The adults can't get at the chicks food or follow the chicks in because the portals aren't large enough for them to squeeze through. At night she closes the portals. You can bet this portal idea will be incorporated into my brooder pen next year!
Setting up an outdoor brooder pen also has other advantages, as if more were needed! I ended up with a broody just when the last of the chicks were already fully integrated with the flock, at the ripe old age of 4 weeks! So rather than take the pen down we simply removed Mama Heating Pad and put her nest full of eggs in its place. Instant safe place for her to brood and raise her babies without her being totally isolated from the flock. Then, just when I thought I could take the pen out and give the chickens the entire run back, I had a chicken who was injured. In she went until she was recovered enough to rejoin the others and again, very few re-integration issues because she wasn't kept totally away from them.
The chicks' pen, re-purposed with a nest at the back in place of Mama Heating Pad, and Mama Agatha sitting on her eggs. Notice two things - since this was her first full day of actively brooding, we have landscape fabric fastened to the sides of the pen to give her time to settle in without the others upsetting her. This was removed after her third day of sitting tight. And above you can make out some green plastic fencing hanging down a bit. One of our snoopier hens, Mathilda, kept flying over the top into the brooding area. The fencing draped over the pen put a stop to that right quick.
Brooding chicks outside doesn't have to be scary or dangerous. You simply provide them with a safely enclosed space, a source of heat, and food and water. I use a bucket with vertical nipples for little tiny chicks until they show me that they are strong enough to trip that trigger mechanism, usually for the first week. At that point that waterer gets removed, cleaned, and put away until the next time I need it, and they graduate to a bucket with horizontal nipples. Water stays clean, bedding stays drier, and chicks stay hydrated. Hanging the food and water at the far end of the pen ensures that they move out into the cooler areas of the pen regularly, getting exercise and encouraging fast feathering. As the sun goes down and the Bigs go into the coop to roost, the Littles snuggle down under or on top of Mama Heating pad and do the same. After a week or so I put a roost in there for them,and gradually raise it as they grow.
This year's chicks were all brooded outdoors with temperatures in the teens and twenties. We didn't lose a single chick to illness, chilling or have any signs of distress in them. Two or three of the second batch of chicks we got came to us with pasty butt, which I treated in the usual way. But it didn't recur or happen to any of the others, and out of 23 chicks all were hale, hardy and healthy into adulthood. Have you ever seen broody raised chicks with pasty butt? Seems to me that it's another hazard of brooding indoors under constant, artificial light and eating 24/7 with no natural "bedtime" in their lives, although I have no scientific evidence to support my theory.
The arguments in favor of brooding chicks outside are many: strong chicks experiencing as natural a beginning as possible; fast feathering; no dramatic change from being in the house for weeks to the place where they'll live out the rests of their lives; natural day/night cycles; and a reduction in integration issues. The bonuses for you are immediate, and among those are no dust and dander in the house, no cheeping all night long, no mess around the brooder, and a much more relaxed approach to raising your chicks. I have done it both ways, indoors and outdoors, and I can tell you firsthand that even during a snowstorm, these chicks not only survived, they thrived. And isn't that what we all want?
Below I have provided a couple of links for further information:
https://www.backyardchickens.com/a/brooding-with-mama-heating-pad
https://www.backyardchickens.com/a/frostbitten-feet-the-adventures-of-scout