2016-04-06.jpg
April 6th 2016 and we have just gotten 3 inches of snow here in Wisconsin. Meanwhile, our chicken adventure has begun with the set up of a brooder box in anticipation of getting our first batch of chickens. I had Rhode Islands when I was growing up on our farm in South Dakota, but since then life has been pretty much chicken free. My daughter who is an animal lover, spent weeks researching and reading books on chicken care in order to convince us that she could care for a flock of hens. No need to convince mama, but dad was a whole nother story... The weekend he was gone out of town, she spent designing a poster board with all the pros and cons of chicken ownership. I was also quietly trying to convince him this was a good thing. April fools morning he told her absolutely no chickens would be gotten, she was convinced she just had not tried hard enough in her argument. A few days later, I walked into the local feed store to ask some chick related questions and was greeted by peeping. The order had come in a day early, and I was the first person to see the new chicks. Several text messages later, my husband gave his blessing and I was headed home with two Easter Eggers, two Buff Orpingtons and a Barred Rock.


2016-04-06.jpg

Our brooder was a small box and we decided to go the Mama Heating pad route rather than a heat lamp. Here is one of the Buffs and the Rock peeking out of MHP... SO FLUFFY!!!!


2016-05-03.jpg
April continued to be cold and snowy off and on, but once may arrived, coop building began in earnest. First order of business was to create a better wind break from the current fence we had on the north side of our property. We sit on 3 acres with an additional 3 south of our home we rent to some local farmers. All this is located in a subdivision out in the country. After securing our building permit and letting the neighbors around us know what was in the works, we began by adding a couple feet onto our split rail and then filling in the gaps to make it more of a shadow box privacy style fence. The base pavers are 8x15x4 inch concrete pavers that we dug in to create a level space. Sand sits under the pavers, much faster for the leveling process than continuing to dig out dirt.


2016-05-20.jpg
Framing began after the pavers went in. I had created a general design for what I wanted in the coop and we spent several nights looking at photos of what we thought would work well for the space and size of flock we were thinking of having. In his mind, that meant average and 4 birds, in my mind chicken math had already begun... if you have 5, why not 8? A medium coop was decided on and I began to sketch out what I wanted. Note to anyone who is asking their spouse to build something of this nature. If your significant other is one of those blueprint in hand, need it written down, tell me exactly what to buy and how long to cut it people, save yourself a whole lot of time and jumps on the cuss-o-meter and pay for plans. Really.


2016-05-20.jpg
Hip roof next. Again, cannot stress enough. I know there are websites out there that calculate your hip roof measurements for you, even has numbers and templates how the boards should be cut, but unless you have a doctorate in hip roof architecture, build a hip roof a day for a living, or are a genius child Lego prodigy, save yourself a lot of creative language moments and buy a plan. Steve would tell you to get one without a hip roof.


2016-05-20.jpg
Finally some the exterior covering begins to go on. At this point we are about two weeks into the project as May is a busy month around here. The exterior is tongue and groove cedar left over from someones celeing project that Steve and hidden in a friend's garage for the past year. Originally he planned to build a cedar chest for me since my father had passed away before he had a chance to build one for me, he suprised me with this information when we began discussing coop building in earnest. I may have gotten a bit teary...


2016-05-20.jpg
Exterior of the coop showing the south and east sides. We opted to lay a 2 1/2 foot skirt of hardware cloth around the base of the coop rather than digging down. There is a history of woodchucks, skunks and even rats paying us a visit since we live in the middle of dairy farm country and I have yet to see a burrowing animal start its hole 3 feet away from a structure. We went with 1/4" cloth to make sure the rats were not an issue and have closed in the run under the coop with that as well.


2016-05-20.jpg
Underside shot of the roof as the 1x6 goes up to hide the multitude of carpentry sins. The windows are barn sashes installed with hinges on the top allowing me to prop them open in the summer for ventilation. They are backed with 1/2" hardware cloth as they will not be left open in the evening. Planning to paint them, they are a very soft raw wood right now, but we are at odds on color. I say brown or black, he votes for dark green.


2016-05-20.jpg
Another shot of the interior facing the south. The horizontal board above the pop door opening with support the poop board with two roosts above it.


2016-05-20.jpg
Fearless carpenter puting on the drip edge in preperation for the flashing that will also give the illusion of master carpenter skills. The underside of the roof is now finished off with 1/2" hardware cloth to stop critters and birds from getting into the coop and provide maximum ventilation. Steve originally wanted to go with vented soffit, but after reading more on BYC decided to agree with my plan so that we would not have a moisture problem. I am planning to install a temperature and humidity monitor in the coop this summer.


2016-05-20.jpg
Another exterior shot showing the smaller egg door to the left and larger clean out door on the right. This will also serve as access to food and water under the poop board if I decide I need to move them into the coop in the winter rather than having it out in the run. I have free salad dressing buckets from the local bar that I added horizontal water nipples to, cutting the dripping to almost nothing. The food bucket is the same size with 3" 45 degree schedule 40 elbows that I installed using a 4" hole saw and 2 large O rings to hold in place. Both will be able to slide under the poop board so the birds cannot perch on top of them. There is a second clean out door on the south side of the coop that allows me to actually climb into the structure if I need to.


2016-05-20.jpg
May 20th
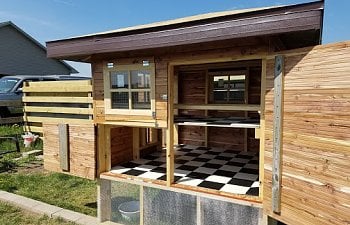
Flooring is in, poop board is done, moving day has arrived. I found a 6x9 vynal flooring remnent at my local hardware place for $22 and it was the perfect size to cover the floor and the board. No adhesive, just dry fit for easy removal and cleaning.


2016-05-20.jpg


2016-05-20.jpg

Happy hens, found the feeder and water bucket with a little coaxing as they were up on the roosts pretty quickly. Planning to put more scrap wood under the buckets as they get older. At 6 weeks, this is already way too low, but I have space to move the buckets up. I will update as we build the outdoor run and finish off the pop door.
5601733208383012078-account_id=1.jpg
  • Like
Reactions: trumpeting_angel