We just have 5 chickens, and it seems most commercially available heated water dishes are larger and more expensive than I'd like. With the cold Chicago winter coming up, I needed to come up with something. I found a 1 quart heated pet bowl from Walmart.com for $13.47 ($16.38 including tax and shipping). It is a good, stable design so they won't tip it over. A pleasant surprise is that this bowl is made in USA.
Unfortunately, it was clear our chooks would walk in it, poop in it, and otherwise make a mess. I needed a way to keep the water clean and provide a good, fresh supply. I saw that a 1 quart waterer ($4.28 including tax from a local feed store) would sit comfortably in the bowl, but I thought that would be awkward and would add a layer of separation/insulation between the heated bowl and the water. I decided to cut down the rim of the base so that the water would directly touch the sides of the heated water dish; that would let it heat more efficiently. I then would have to securely mount the base inside the bowl.

Original pieces as purchased.
The grand total expense was $20.66, but you may be able to do it for even less. (Farm & Fleet, and some other places, has a lower price for the water bottle and base).
The base with the rim trimmed off.
I used a 4" grinder to cut the rim and a bench grinder to smooth all the sharp edges. (wear safety goggles! metal splinters can fly) If you get a plastic base, it will be easier to cut (see update at the bottom- I strongly recommend a plastic base instead of metal). I tried to attach the base to the bowl with epoxy, but that didn't hold the metal to plastic; I then found that hot glue works very well.
Here it is after mounting the base in the bowl. I carefully cleaned off all excess glue.
The waterer is designed so that the water level in the outer rim will not go higher than the drain holes on the inside, and that put the water level way too low, my chooks would really have to crane their necks to get a few drops.
The water level was way too low.
I solved this by drilling two holes in the side of the plastic bottle. (a single hole would work, but like pouring a drink from a can, with two holes one is the air inlet, the other is the water outlet). The top hole should not be higher up than the rim of the heated bowl; I found the water level settles in at about 1/8" below that top hole.
These holes raised the water level in the bowl.
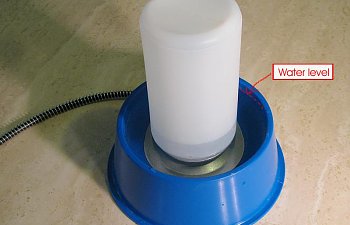
Finished and assembled, the water level looks good.
Before making these modifications, I'd recommend filling the bowl with water and plug it in to be sure it works. After making the modifications you won't be able to return or exchange it. The problem with this is that this bowl is thermostatically controlled to only operate in cold weather. I guess the only way to test it would be to put it outdoors in sub-freezing weather, an option I didn't have in early October.
1. Late December: So far it's working well. Last month my standard waterer started freezing up each night and I removed it. This one is is staying unfrozen. and lately it's been about 15 degrees at night. Hope it holds on when the weather really gets cold; we usually get some sub-zero weather in January and February.
2. Mid January: It got down to 10 degrees last night, and there was a paper thin skin of ice on top of the water. Thin enough for them to easily peck through, but that indicates that we could soon get too cold for this to be a sole water source. I'm suspecting it will freeze up at 0 degrees.
3. I've learned that that the galvanized metal may react with the ACV in the water, so I peeled off the metal base and replaced it by hot-gluing on a plastic base. That's working great, and it holds much better than did the metal base.
4. I've found that it doesn't hold enough water for my five chickens. Since the blue bowl is a one quart bowl, and the white bottle is a one quart bottle, after the chooks have drunk three or four ounces the water level drops to about 1/2" or 3/4" below the lip of the bowl, making it a bit of a tight squeeze for them. My solution is to fill the white bottle, screw it to the base, set it down and quickly pour more water into the blue base before it fills up. Once I do that I have plenty of water to keep my chickens moist and tender.
Unfortunately, it was clear our chooks would walk in it, poop in it, and otherwise make a mess. I needed a way to keep the water clean and provide a good, fresh supply. I saw that a 1 quart waterer ($4.28 including tax from a local feed store) would sit comfortably in the bowl, but I thought that would be awkward and would add a layer of separation/insulation between the heated bowl and the water. I decided to cut down the rim of the base so that the water would directly touch the sides of the heated water dish; that would let it heat more efficiently. I then would have to securely mount the base inside the bowl.
Original pieces as purchased.
The grand total expense was $20.66, but you may be able to do it for even less. (Farm & Fleet, and some other places, has a lower price for the water bottle and base).
The base with the rim trimmed off.
I used a 4" grinder to cut the rim and a bench grinder to smooth all the sharp edges. (wear safety goggles! metal splinters can fly) If you get a plastic base, it will be easier to cut (see update at the bottom- I strongly recommend a plastic base instead of metal). I tried to attach the base to the bowl with epoxy, but that didn't hold the metal to plastic; I then found that hot glue works very well.
Here it is after mounting the base in the bowl. I carefully cleaned off all excess glue.
The waterer is designed so that the water level in the outer rim will not go higher than the drain holes on the inside, and that put the water level way too low, my chooks would really have to crane their necks to get a few drops.
The water level was way too low.
I solved this by drilling two holes in the side of the plastic bottle. (a single hole would work, but like pouring a drink from a can, with two holes one is the air inlet, the other is the water outlet). The top hole should not be higher up than the rim of the heated bowl; I found the water level settles in at about 1/8" below that top hole.
These holes raised the water level in the bowl.
Finished and assembled, the water level looks good.
Before making these modifications, I'd recommend filling the bowl with water and plug it in to be sure it works. After making the modifications you won't be able to return or exchange it. The problem with this is that this bowl is thermostatically controlled to only operate in cold weather. I guess the only way to test it would be to put it outdoors in sub-freezing weather, an option I didn't have in early October.
Farm Innovators Heated Pet Bowl, 1 Quart, $13.47
With tax and shipping: $16.38
Water bottle and base, with tax 4.28
Total: $20.66
UPDATES:With tax and shipping: $16.38
Water bottle and base, with tax 4.28
Total: $20.66
1. Late December: So far it's working well. Last month my standard waterer started freezing up each night and I removed it. This one is is staying unfrozen. and lately it's been about 15 degrees at night. Hope it holds on when the weather really gets cold; we usually get some sub-zero weather in January and February.
2. Mid January: It got down to 10 degrees last night, and there was a paper thin skin of ice on top of the water. Thin enough for them to easily peck through, but that indicates that we could soon get too cold for this to be a sole water source. I'm suspecting it will freeze up at 0 degrees.
3. I've learned that that the galvanized metal may react with the ACV in the water, so I peeled off the metal base and replaced it by hot-gluing on a plastic base. That's working great, and it holds much better than did the metal base.
4. I've found that it doesn't hold enough water for my five chickens. Since the blue bowl is a one quart bowl, and the white bottle is a one quart bottle, after the chooks have drunk three or four ounces the water level drops to about 1/2" or 3/4" below the lip of the bowl, making it a bit of a tight squeeze for them. My solution is to fill the white bottle, screw it to the base, set it down and quickly pour more water into the blue base before it fills up. Once I do that I have plenty of water to keep my chickens moist and tender.