When my wife and I became a couple some years back, she let it be known that if we ever made it back to the country, she would love to have a few chickens. I promised that if/when we made that move she WOULD have those chickens. Fast forward about five years and we were in a position to buy half a farm well out in the hills of western Wisconsin (the half without the buildings). We set about building our house and getting settled deep in the woods on top a ridge with a beautiful view. Once the house was complete (a 2 1/2 year project), and a little rest and recovery completed, we ordered those chickens I promised, not realizing what a task I had given myself. I'm something of an OCD perfectionist when it comes to making things, and I'm afraid that bled over from building our house to building one for the chickens. Everything took longer than planned, and cost more than was believable, mainly because I was operating by the seat of my pants and making it up as I went. We started with a set of plans purchased off the internet, but personal choices and changes eventually had us arrive at something that didn't even resemble the original plans. The chickens quickly outgrew the small quarters on the floor of our dining room, and knowing the coop would not be done any time soon, I took the time out to build an interim coop that could sit in the garage. Fast forward a few weeks more, and we have finally completed the luxury suite for our six girls. Other than the stress of building the coop before they could start laying eggs in the garage, we have thoroughly enjoyed having them around. I didn't realize what distinct personalities they could have or how intelligent they can be. They just turned twenty weeks old this week, and from the signs, we expect to see our first egg any day now.

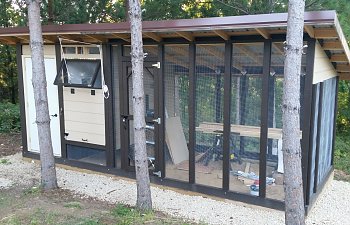
Our new 8X20 coop and run, almost finished, except for some paint, trim, and a ramp.The coop windows are hand made from 2x stock and some left over polycarbonate material from an old tear down years ago. The coop doors also open up like the windows, so my pulley system works for both. When cleaning the coop, we just move the fastener from the window down to the door and hoist away. The vent openings above are covered with hardware cloth on the inside. Still haven't figured what we want to place outside yet.
The "half way house" for the little girls while they waited for the big girl coop. I made this as a modular unit by creating each wall, top and bottom as a separate piece, connected with a few screws. The one large wall closest to the house door swings down to the floor to access the whole coop. The whole thing breaks down and can be stacked away in about 20 minutes.
Sighting for the new coop location (pink flags). We wanted it to be convenient, but not too close. The location is about 75% shaded by the pines in the summer, but with the low branches trimmed as they are, the whole coop and run are largely bathed in sunlight in the winter.
I learned my lesson after the last fence we installed in this rocky soil. This is way better on my body than a post hole digger. Faster too since it was raining shortly after I finished putting in the support posts.
Total base size is 8x20. Base framing all set up and ready for fill. 4x4 posts set below the frostline and cemented in, with below grade 2x6 framing all round.
That's a one cubic yard bucket, and I filled it five times with washed gravel to make a good drainage base. Since the foundation is on sloping ground, we believe this will give us excellent drainage.
After the gravel was set and leveled, I covered with heavy landscape fabric, followed by a layer of 1/2" hardware cloth. Nothing is digging its way in to this coop! Much sand was then added on top of the hardware cloth in the run. The 4x8 gravel area is the crawl space under the storage section. I added vents in the sides to keep moisture from becoming a problem under the floor.
Setting the initial bracing and roof trusses. The uprights are four feet on center. This allowed easy access as the build progressed. After the structure was largely completed, the remaining uprights were added at twenty four inches on center, and doubled up for strength.
Metal roofing going on. I ordered these sheets custom pre-cut, so they span full length with no horizontal seams.
Interior walls are 1/4" OSB.
The building is 8X8, divided in to two 4X8 sections. The tall portion on the left is storage, and the raised section on the right is the coop. You can see below, a couple of the vents added to the crawl space below storage. The floors are 3/4" construction grade plywood.
We had a crank out window left over from building our house basement because the contractor made the opening the wrong size. This seemed like a perfect place to finally use it. All the walls are packed with vapor barrier fiberglass batts, and since contractors were already here doing some insulation repair in our house, we had them spray foam the inside of the roof in both the coop and storage area.
Wall facing the run, insulated and the chicken door framed.
Pre-primed 4x8 siding sheets on all exterior walls.
Because of my years working in the emergency medical field, I know the value of good safety equipment. I was cutting a kerf in this 2x4 when what looked like a small knot exploded in my face. I had several shrapnel welts on my face, and the right lense on my safety glasses was hit so hard, it pushed the glasses up on my nose. I'm pretty sure my eye would not have survived a hit like that.
The girls exploring their new home. We kept the nesting boxes covered for the first week to make sure they didn't start to think they were for sleeping at night. The low roost is visible here, but the high roost that lets them look out the window is above the camera. There are 10" removable boards in front of each door to keep bedding inside when we swing them open for access. Now that they have access to the covered run, we have removed the food and water from inside.
We wanted them to know where home and their roost were, so the girls were kept in the coop for about a week before we allowed them out in the run. Here one of the Bard's is tentatively exploring for the first time.
Watching the chickens enjoy their first day in the big girl coop.
The girls love their greens.
Our new 8X20 coop and run, almost finished, except for some paint, trim, and a ramp.The coop windows are hand made from 2x stock and some left over polycarbonate material from an old tear down years ago. The coop doors also open up like the windows, so my pulley system works for both. When cleaning the coop, we just move the fastener from the window down to the door and hoist away. The vent openings above are covered with hardware cloth on the inside. Still haven't figured what we want to place outside yet.
The "half way house" for the little girls while they waited for the big girl coop. I made this as a modular unit by creating each wall, top and bottom as a separate piece, connected with a few screws. The one large wall closest to the house door swings down to the floor to access the whole coop. The whole thing breaks down and can be stacked away in about 20 minutes.
Sighting for the new coop location (pink flags). We wanted it to be convenient, but not too close. The location is about 75% shaded by the pines in the summer, but with the low branches trimmed as they are, the whole coop and run are largely bathed in sunlight in the winter.
I learned my lesson after the last fence we installed in this rocky soil. This is way better on my body than a post hole digger. Faster too since it was raining shortly after I finished putting in the support posts.
Total base size is 8x20. Base framing all set up and ready for fill. 4x4 posts set below the frostline and cemented in, with below grade 2x6 framing all round.
That's a one cubic yard bucket, and I filled it five times with washed gravel to make a good drainage base. Since the foundation is on sloping ground, we believe this will give us excellent drainage.
After the gravel was set and leveled, I covered with heavy landscape fabric, followed by a layer of 1/2" hardware cloth. Nothing is digging its way in to this coop! Much sand was then added on top of the hardware cloth in the run. The 4x8 gravel area is the crawl space under the storage section. I added vents in the sides to keep moisture from becoming a problem under the floor.
Setting the initial bracing and roof trusses. The uprights are four feet on center. This allowed easy access as the build progressed. After the structure was largely completed, the remaining uprights were added at twenty four inches on center, and doubled up for strength.
Metal roofing going on. I ordered these sheets custom pre-cut, so they span full length with no horizontal seams.
Interior walls are 1/4" OSB.
The building is 8X8, divided in to two 4X8 sections. The tall portion on the left is storage, and the raised section on the right is the coop. You can see below, a couple of the vents added to the crawl space below storage. The floors are 3/4" construction grade plywood.
We had a crank out window left over from building our house basement because the contractor made the opening the wrong size. This seemed like a perfect place to finally use it. All the walls are packed with vapor barrier fiberglass batts, and since contractors were already here doing some insulation repair in our house, we had them spray foam the inside of the roof in both the coop and storage area.
Wall facing the run, insulated and the chicken door framed.
Pre-primed 4x8 siding sheets on all exterior walls.
Because of my years working in the emergency medical field, I know the value of good safety equipment. I was cutting a kerf in this 2x4 when what looked like a small knot exploded in my face. I had several shrapnel welts on my face, and the right lense on my safety glasses was hit so hard, it pushed the glasses up on my nose. I'm pretty sure my eye would not have survived a hit like that.
Storage portion of the coop, with nesting boxes under cover and out of the weather. My wife insisted on being able to check on the girls from the storage/nest box area, so I cut in this little opening with one screened door and one windowed door for when it gets colder. It actually worked well. The week they were sequestered inside, we could just reach through to fill both the feeder and water bucket, plus offer treats since the low roost is just inside the window ledge. The retractable key ring has keys for both storage and the coop padlocks. It's handy, and when the racoons figure how to take the keys and open the locks, it's time for us to stop raising chickens.
The girls exploring their new home. We kept the nesting boxes covered for the first week to make sure they didn't start to think they were for sleeping at night. The low roost is visible here, but the high roost that lets them look out the window is above the camera. There are 10" removable boards in front of each door to keep bedding inside when we swing them open for access. Now that they have access to the covered run, we have removed the food and water from inside.
We wanted them to know where home and their roost were, so the girls were kept in the coop for about a week before we allowed them out in the run. Here one of the Bard's is tentatively exploring for the first time.
Watching the chickens enjoy their first day in the big girl coop.
The girls love their greens.